XBox One S includes an inbuilt UHD Blu-Ray player which can be used for DVD, Blu-Ray or the newer UHD discs. Moreover, in Xbox One support page, it says that Xbox One supports 3D Blu-ray discs when played on 3D TVs. But your Blu-ray settings should be set right on the dashboard and you also need to switch it into 3d mode on your display manually.
Xbox One S Disc and Blu-ray Settings
Disc and Blu-ray settings allow you to set the Xbox One console behavior for disc playback. There are three basic types of settings:
- Disc settings
- Blu-ray settings
- Preferred language settings
You can get to these settings by following these steps:
- Scroll left on the Home screen to open the guide.
- Select Settings.
- Select All Settings.
- Select Disc & Blu-ray.
Disc settings
The following settings control how the console behaves when a disc is inserted:
- Play disc automatically
If you select this setting, a disc begins playing automatically when you insert it. - Resume playback
If you select this setting, the player bookmarks the point at which you stopped watching the disc. When you start watching again, it resumes at the same point.
Blu-ray settings
The following advanced settings are available for the Blu-ray player:
- Dolby Digital dynamic range control
This setting allows for full audio or modifies the audio to keep a consistent volume even through the loudest action scenes. - Enable BD Live to improve Blu-ray playback
This setting allows access to additional features and content through the BD Live service. - Persistent Storage
Use this setting to clear Blu-ray–specific data that’s been cached to the console.
Preferred language settings
The following preferred language settings are available for disc menus:
- Menu
Sets the language used for the movie menus. - Audio
Sets the language for the audio track of the movie. - Subtitle
Sets the language for subtitles in the movie.
Note These language settings are defaults and may not be supported by all movies.
Refer to Xbox One Support page.
Adjust the display settings on Xbox One S console
Calibrate HD TV with Xbox One S
You can calibrate your 3D TV with your console by going into Settings > Display & sound and selecting Calibrate HDTV .
The calibration tool will guide you through the steps to choose the best settings for your TV.
Enable 3D on the Xbox One S
At the end of the calibration procedure, you will be taken back to the Display & sound settings. Simply go to the Video Fidelity column and tick the Allow 3D checkbox. This setting allows you to watch 3D Blu-ray Discs on Xbox One S.
Note Your television must be 3D-capable to watch 3D content. And the Blu-ray player app only allows you to enjoy 3D Blu-ray movies available in your region through your Xbox One S console.
Each Xbox One console is manufactured for a specific Blu-ray and DVD region, following international standards. The Xbox One console can play Blu-ray discs and DVDs that are sold in the same region as the console. See the following tables for the countries in each disc region.
Supported regions
Blu-ray discs
Find the region code represented as A, B, or C on the packaging, and verify that it matches your region.
Region
Geographic regions/countries
A
Includes most North, Central, and South American and Southeast Asian countries and regions, plus Taiwan, Japan, Hong Kong SAR, Macau, and Korea
B
Includes most European, African, and Southwest Asian countries, plus Australia and New Zealand
C
Includes the remaining Central and South Asian countries, as well as China and Russia
Some Blu-ray discs and DVDs are not region-encoded or are coded to all regions. Region-free Blu-ray discs and DVDs will play on any Xbox One console.
Removing 3D Blu-ray Region Codes for XBox One S
Xbox One S supports to stream media from USB 1.0, 2.0, or 3.0 removable drive. This gives users the chance to remove 3D Blu-ray region codes and copy 3D Blu-ray for XBox One S. Pavtube ByteCopy ( Pavtube ByteCopy for Mac ) bypasses the region codes of your 3D Blu-ray and directly extract the main title. Besides, it allows you to convert 3D Blu-ray to 3D MP4, 3D AVI, 3D WMV easily. It also can convert 3D Blu-ray to 2D video and convert 2D Blu-ray to 3D video.
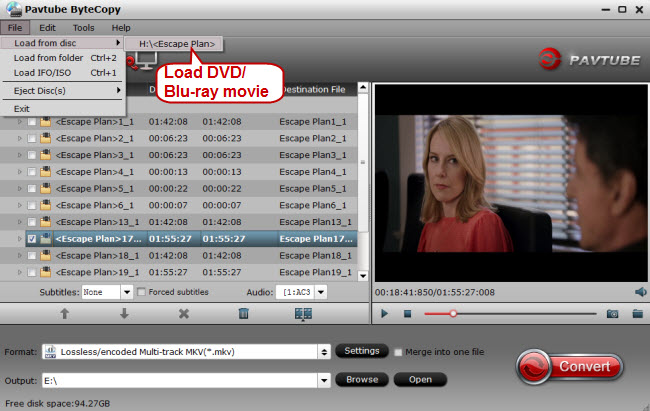
Step 1. Import 3D Blu-ray source.
Click “Load file” button to import the inserted 3D Blu-ray disc from Blu-ray drive. After few second, it will be imported successfully and you can preview the whole movie in the preview window.

Note: Mention to Blu-ray to computer copy, there are two ways typically – backup and copy 3D Blu-ray movie from the original Blu-ray disc, 1:1 backing up 3D Blu-ray to a folder, and copying 3D Blu-ray movie to a file with only the main movie title. Ane it is wise to choice the later one – 3D Blu-ray main title copy since it helps you get rid of all the unwanted titles in 3D Blu-ray and saves a lot of hard disc storage.
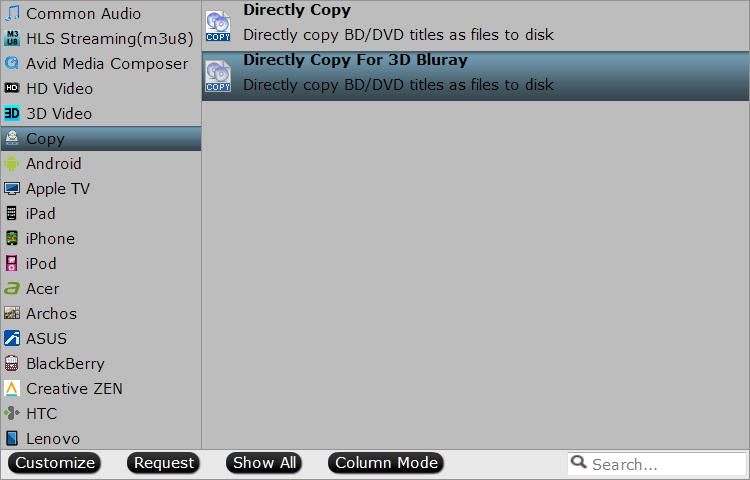
Step 2. Choose the copy mode.
A: Now go to “Format” menu to select “Copy” > “Directly Copy For 3D Bluray” from the “Format” menu to copy the . m2ts files only which contains the main movie on your 3D Blu-ray disc.

For wide streaming choices, you also can choose to rip Blu-ray to 3D MP4, 3D MKV, etc. Click Format and select “MKV Side-by-Side 3D Video(*.mkv)” under 3D Video. In general, mkv is a well-accepted file format for tv, media players or plex and keep up the video quality. Of course, 3D video in .mp4, 3D video in .avi are supported as well.
Step 3. Start directly copying 3D Blu-ray disc for Xbox One S
Finally, click “Convert” button to start lossless 3D Blu-ray Backup for Main Movie on PC. When the copying work is done, you are able to click “Open” button to get the output .m2ts files without any other extra contents.
Using the USB ports on your Xbox One console
There are three USB 3.0 ports on the Xbox One console for easy access: two on the rear of the console and one either on the front (Xbox One S console) or the left side (original Xbox One console).
External storage
If you have a USB 3.0 external drive that has a capacity of 256 GB or more, you can use it to store games and apps. Or, you can use the drive to store media.
If you have a USB drive that doesn’t meet these requirements, you can still use it to store media.
Troubleshoot external storage detection on Xbox One
This article describes Xbox One system requirements for external storage drives and what to do if your console can’t detect a connected external drive.
Important Make sure you don’t have any important information stored on your hard drive before setting it up with your Xbox One. The Xbox One will reformat your drive.
Requirements
For an external storage drive to save games and apps from Xbox One, it must meet the following requirements:
- It uses a USB 3.0 connection. If you’re using a USB hub, the hub must also be USB 3.0 or later.
- It has 256 GB or larger storage capacity.
- It has a partition. Typically, drives come with a preformatted partition. For more information about partitioning an external hard drive, refer to the manufacturer’s instructions.
Devices that don’t meet these requirements will be treated as media storage, such as for music or video.
How to detect your external storage?
When you first connect an external storage device with your Xbox One, the console should detect the device and walk you through the process of setting it up.
If this doesn’t happen, or if you want to confirm later that your console detects the storage device, here’s how:
- Scroll left from Home to open the guide.
- Select Settings.
- Select All settings.
- Select System.
- Select Storage.
- Select Manage storage. If you see your storage device listed, your console has detected it.
Related Articles:
- Best Simple Way to Stream Any 4K Video to Xbox One S
- Play MP4 on Xbox One S
- Xbox One/Xbox One S Supported MKV and how to play all MKV
- How to Play 4K Blu-ray on Xbox One S?
- Rip DVD to Xbox One S to Stream via USB


 Pavtube New Official Site


