Playing the video in VLC is a happy thing, but we may meet the video and audio sync issue which affect the video enjoyment, especially the foreign language, we can’t get the best video experience. VLC is an excellent video player, video converter, you can sync audio in VLC media player on Windows and Mac OS, just 4 steps, you can solve this trouble.
Method 1: Sync Audio in VLC Media Player
Step 1.Click on the |settings| menu. Then Choose |Preferences|.
Step 2. From the the new |Preferences| window: On the left handside menu, click on |Audio|
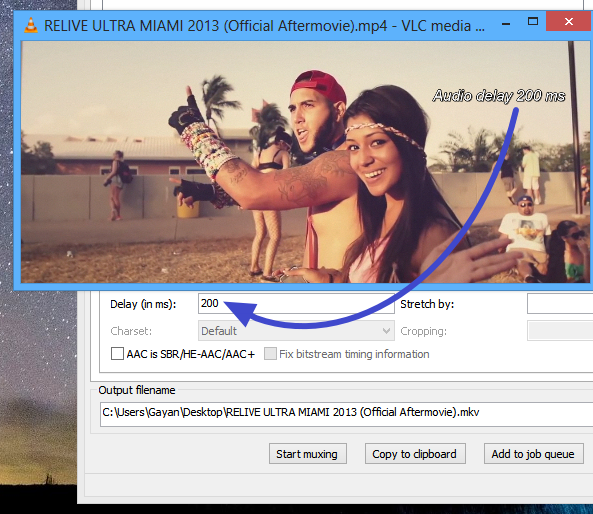
Step 3. Pressing the hotkeys once will speed up or slow down the audio by 50 milliseconds. If you continue to press it, the number of milliseconds will continuously be incremented.
Tips:
- The values are in the unit of ms(milli seconds). So 1000ms = 1 sec
- Positive numbers move the audio forward
- Negative nubmers move the audio back
Step 4. Speed up or slow down the sound timing of the video until your reach the desired state. Make sure that the video is playing and listen to the sound carefully and match it with the video to do this.
Step 5. Be sure to go back in the options again and change it to zero after you are done watching the video that was initially out of sync. Or you can click on |Reset All| once you are in the Preferences window.

Method 2: Sync Audio in VLC Media Player-Keyboard shortcuts
Step 1. While watching the video, ctrl + K or ctrl + L to increase/decrease delay: It goes up by 50 miliseconds each time.
Tip: This does not have the same precision as the previous method bu tit works on the fly.
Step 2. If your audio requires to be slowed down then hit the ‘K’ hotkey from your keyboard. For the opposite of this hit the ‘J’ hotkey on your keyboard.
For Mac, the shortcut keys are ‘G’ and ‘F’. Confirmation is displayed on the top-right area of the player’s screen. It fades away quickly.
Step 3. Once you are close, then you can go in the Preferences menu to adjust with more accuracy.
Best VLC Assistant for The Best Video Playback
Above tricks are simple and works every time, but it can make a world of difference to your videos. Fortunately, you also can use the professional video converter and change the video fromat and adjust the video related parameters, like the Pavtube Video Converter Ultimate which is a professional video converter and easy to use, you can play any video in VLC smoothly, including the DVD and Blu-ray movies, because this software can remove the DVD and Blu-ray copy protection and allows you to get the digital DVD and Blu-ray movies, like the DVD, Blu-ray to M2TS, MP4, AVI, MOV, H.264, H.265, etc.
You also can copy the Blu-ray and DVD to exteral hard drive, SD card, USB or upload to the NAS, like the Synology DiskStation DS418j, QNAP TS-231P NAS, Seagate, etc. Some users are searching for the way to play the 4K video in VLC, you also can take full use of this software, at the same time, you can adjust the video codec, video frame, video bitrate, video resolution, etc. Know more, you can read this video converter review.
Guide: Few steps, you can control the video well

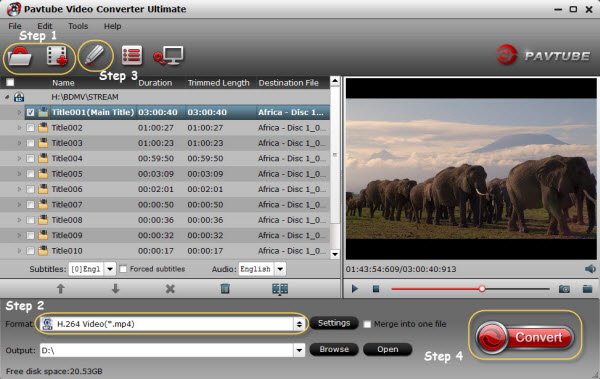
Step 1. You can drag the videos to the left window directly, you also can create a folder and add the videos to it, then import the folder to this software for doing batch video conversion.
Strep 2. Click the Format button and 300+ video formats are listed here, you can choose one from the Common Video, HD Videos. MP4 is the best option which is wide used by many media player, devices, etc.
Step 3. This step is optional, you can enter the video setting window and set the video related parameters, if you don’t know how to do, you can keep all the original settings too.
Step 4. Go back to the main interface and clik the Convert button to start the video conversion.


 Pavtube New Official Site


