In Windows Media Center, you can play audio CDs and DVD movies. You can also play data CDs and DVDs (discs that contain digital media files, such as MP3, WMV, and JPEG files). But when you are playing DVDs in Media Center, you’d better make sure that video file types are supported. Otherwise, you won’t play DVD on Windows Media Player successfully.
To see which file types will work, see the follwoing file types supported by Windows Media Center: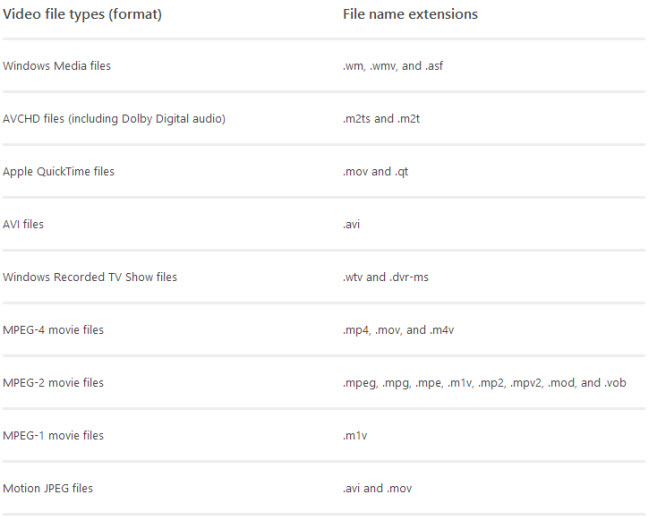
When your DVDs have copy & region protection and some codec that can’t be supported by WMC, which leads the failure DVD playback on Windows Media Center, you need to rip DVD to Windows Media Center more compatible WMV, MP4, AVI, etc formats with DVD Ripper.
Pavtube DVDAid is just a perfect choice to convert various DVDs including Disney DVD discs to the video format compatible with Microsoft Windows Media Center. It employs the NVIDIA technology where the processing is done on the NVIDIA GPU instead of the computer CPU enabling the Central Processing Unit to run other applications. Its rate of converting videos is six times faster than other DVD rippers with a high definition and smooth playback while it is still maintains higher quality. Read Best DVD Ripper for Windows 10.
Other Download:
– Pavtube old official address: http://www.pavtube.cn/dvd_ripper/
– Cnet Download: http://download.cnet.com/Pavtube-DVDAid/3000-7970_4-76158510.html
How to Rip DVDs for Watching on Windows Media Center?
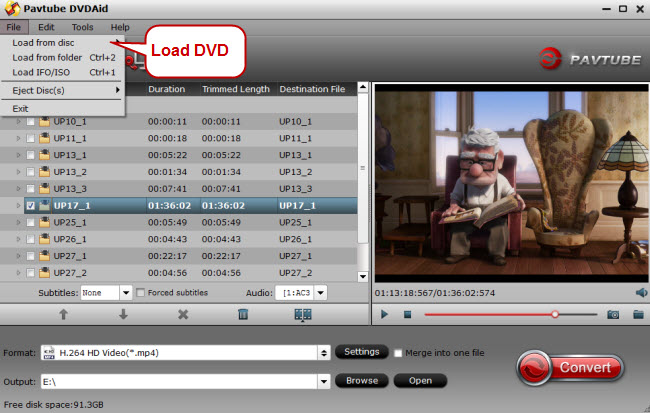
Step 1. Load DVD
Run DVD to Windows Media Center converter on PC, and click “File” to follow “Load from disc” and find the DVD disc you put into the computer.
Step 2. Choose Windows Media Center supported video format
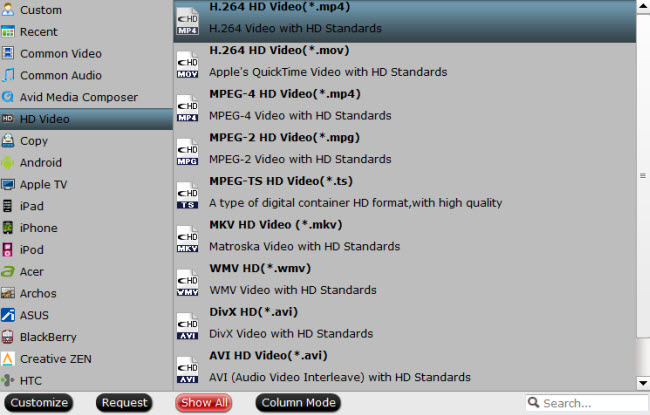
Before selecting the video format for Windows Media Center, you should check Windows Media Center supported video formats. Then click the format bar under the video file list to find “HD Video.” Under “HD Video” item please find the output video formats compatible with Windows Media Center according to the form listed above.
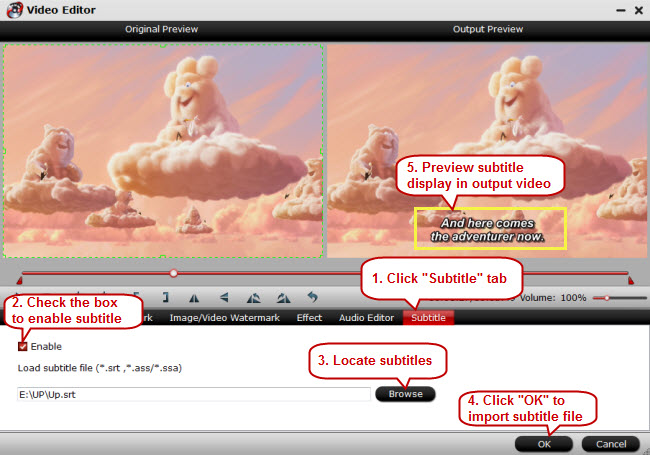
Tip: This software support to add external subtitle to DVD movies for WMC if needed, open “Video Editor” window, click the “Subtitle” bar and check “Enable”, then you will be able to browse and add subtitles that you have saved on local computer to the DVD movies.
Step 3. Convert DVD to Windows Media Center
After choosing the right video format for Windows Media Center, just click “Convert” on bottom right of the main UI to make DVD to Windows Media Center conversion happen.
Add Ripped DVD files to Windows Media Center
The first time you start Windows Media Center, it looks for media files in the Music, Pictures, and Videos libraries on your computer. Through these libraries, you can control which songs, movies, and other media appear in Media Center.
There are two ways to do this:
From outside of Media Center, add or remove folders in Windows libraries (for more information, see Working with libraries). When you add or remove a folder, the change is reflected in Media Center.
From within Media Center, add or remove folders that you want Media Center to monitor for media files. When you add or remove a folder, the change is reflected in your Windows library.
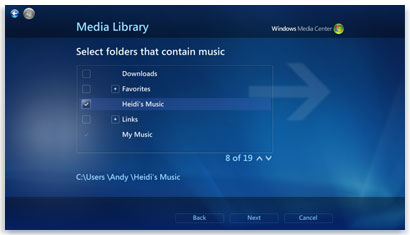
Each time you open Media Center, it looks for media files in the your Music, Pictures, and Videos libraries, and in the Recorded TV library (usually located at C:\Users\Public). If you add or delete a file in any of those folders, the content that appears in Media Center is automatically updated
Related Articles:


 Pavtube New Official Site


