We all know MP4 is more convenient than DVD disc, we all know a DVD Ripper can convert DVD to MP4, then you have more options to play and enjoy DVD movie on various portable devices, popular media players. However, DVD movie is packaged in a DVD disc, which is different from a common 1 hour or 2 hours MP4 digital video, some long DVD soap operas are devided into many chapters which can help you to control the DVD playback process and choose any chapter you like to playback. If ripping and copying DVD to MP4 with chapter on Mac (masOS High Sierra), that’s so nice.
Dream DVD to MP4 Converter for Retaining Chapter
From the constant and reliable test, we have found a DVD to MP4 converter on Mac (masOS High Sierra): ByteCopy for Mac which can satisfy your need, you can backup DVD to MP4 with all DVD chapters, in addition, this software can keep the multiple audio tracks for you. Sometimes, users don’t know how to define an excellent DVD Ripper, here, removing DVD protection ability is the first consideration, if not, you can’t do anything on DVD, this software can remove most DVD protection and create you a safe and clean DVD conversion condition.
Nobody likes the single DVD to MP4 conversion, if you can get more options, why not? In this software, you not only can convert DVD to MP4 with chapter, audio tracks, you also can choose the audio track or delete the audio track you don’t want. Except the excellent functions, this software have the powerful operating system compatibilty, for Windows users, you can download Windows version. This review will help you to know more information about this software.
Quick Guide: Convert DVD to MP4 with Chapter on Mac(masOS High Sierra)
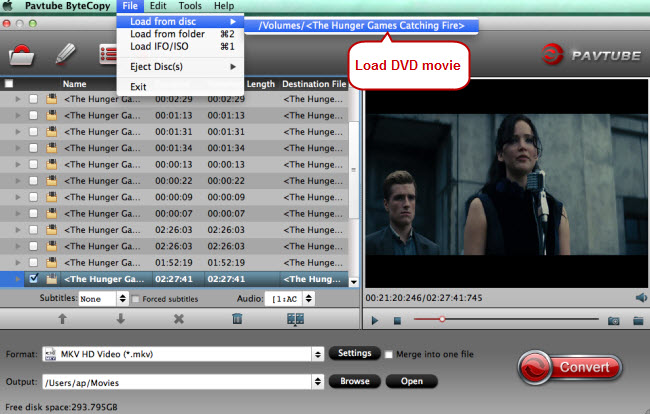
Step 1. Insert your DVD disc into your DVD-ROM, run this software, and click File and choose Load files button to import your DVD videos directly from your disc. You can also load IFO/ISO image file as well as DVD folder that stored on your computer’s HDD. This software will detect the DVD main titles automatically. By the way, you can copy DVD with forced subtitles at the main interface.

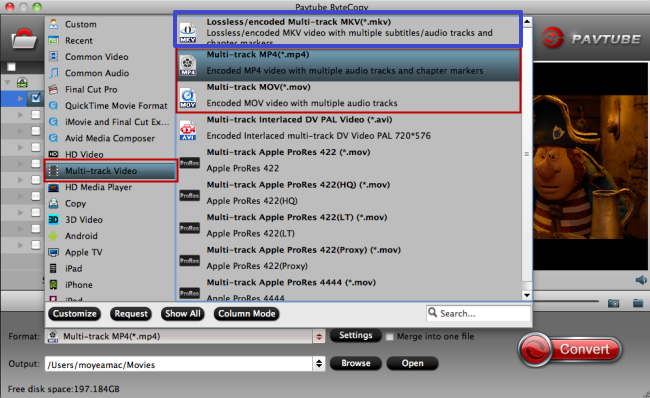
Step 2. Click on the main title, then press Format button and choose Multi-track Video > Multi-track MP4 (*.mp4) video, this video formats can keep all the DVD multiple audio tracks and chapter markers. In addition, you also can chosoe MKV, MOV, AVI video formats as the output video files.

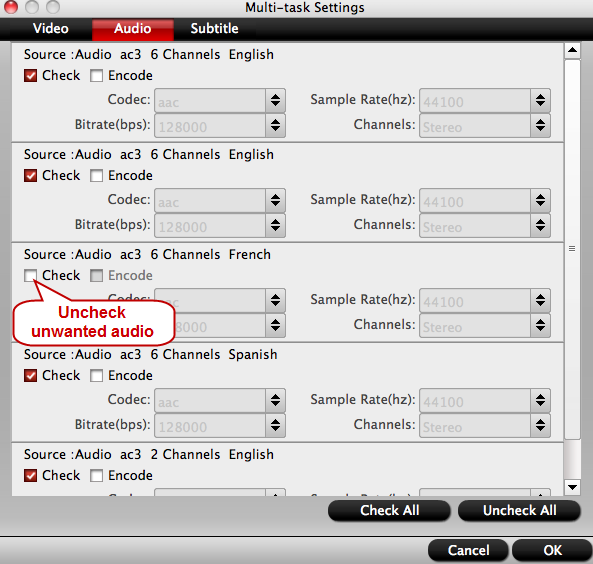
Step 3. Click Settings button, the Multi-task Settings dialogue box appears. By default the software keeps multiple audio track and chapter markers. You can check your desired audio track, also you can adjust the audio codec, Sample rate, Bitrate,Channels, etc.

NOTE: If you choose MP4 video, you can’t choose the subtitles, if you choose MKV vidoe, you can select your desired subtitles.
Step 4. After all the choices are done, go back to the main interface and click Convert to start DVD to MP4 video conversion with chapter. Wait for a while, a brand new MP4 video will be finished.
How to Play Video on QuickTime With Chapters
To most Mac users, QuickTime is a popular media player, following will show you how to play video on QuickTime with Chapters.
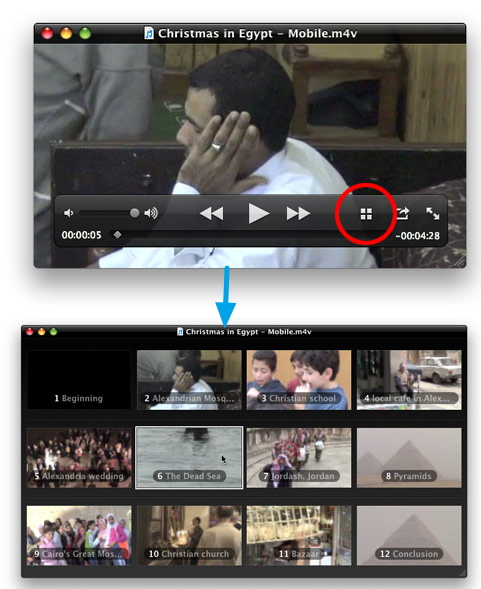
Drag a movie file and drop it on top of the QuickTime Player icon (in the Dock or in the Applications folder). Or, from the QuickTime Player File menu, choose “Open File,” choose a movie file, then click “Open.” If the movie that opens contains chapter markers, a “Show chapters” icon (circled below) appears in the controller bar. Also you can do one of the following:
- Click the Show Chapter icon in the floating toolbar
- Choose View > Show Chapters
- Type Command+R


 Pavtube New Official Site


