Although MKV offers a richer media experience than any other current format With the features such as alternate audio tracks, multilingual subtitles and chapter points. However, it is not welcomed by Plex Media Sever. In Plex official site, it said that Plex for PlayStation app does not currently support Direct Playing of MKV container videos. That’s why so many people have MKV on Plex playback issue on Reddit. 
According to Plex media server supported format, if you want to play your local MKV file on Plex, you’d better convert MVK to MP4. And for Direct Streaming, you also need to keep this MP4 video with AAC audio and 20Mbps or lower bitrate. This need your MKV Converter has the ability of allowing consumers to adjust the video parameters.
Considering the features of easy-to-use and economy, I recommend Pavtube Video Converter Ultimate. It is powerful enough to convert any MKV file to Plex supported MP4, AVI, MOV, etc and enables you to change video size, bitrate, codec, frame rate and audio sample rate, channel, etc. Its intuitive interface can make you know the next step clearly. The most important is that it now is only for $45.5 – the cheapest price for a Video Converter Ultimate product since Pavtube is offering Cyber Monday Coupon.
Its Mac verison Pavtube iMedia Converter Ultimate is much cheaper in Pavtube Thanksgiving & Black Friday & Cyber Monday Coupon. It supports El Capitan system so you can convert MKV to Plex Media server on mac OS X El Capitan without any issue.
Free download and install

Other Download:
– Pavtube old official address: http://www.pavtube.cn/blu-ray-video-converter-ultimate/
– Cnet Download: http://download.cnet.com/Pavtube-Video-Converter-Ultimate/3000-2194_4-75938564.html
How to convert MKV to Plex Media Server with just 3 clicks?
Step 1: Add MKV file
Click “File” to load your MKV file to this app. It supports batch conversion so you can add more one file at a time. And you can choose your wanted subtitle and audio in the chapter list.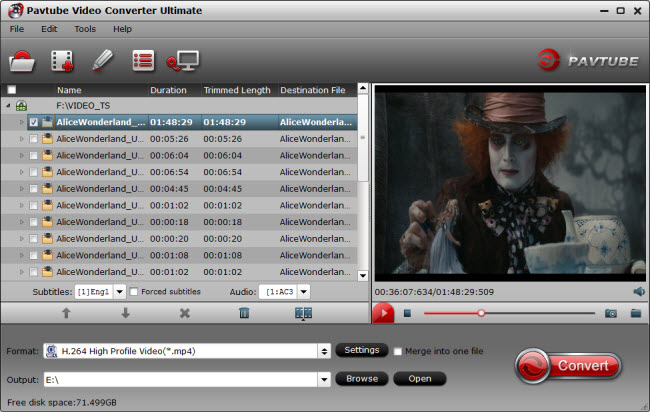
Step 2: Choose target format
Press “Format” icon. In the drop-down list, you can see many profiles. Find your target format in “HD Video” or “Common Video”. I suggest MP4 format so you can choose HD MP4 or “H.264 High profile MP4”.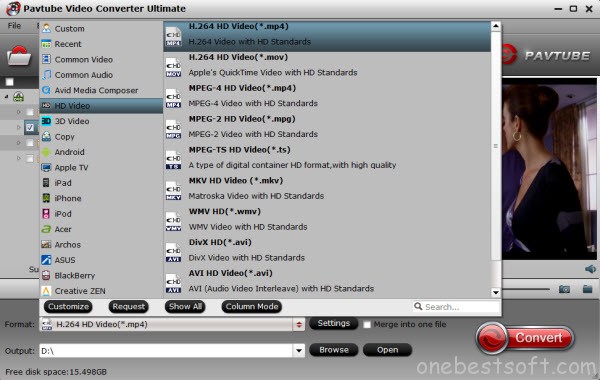
Tip: If you are not sure the output video parameters, you can click “Settings”. Reset the audio codec to AAC and video bitrate to 20Mbps or lower. You can preview the video size and parameters at the below chart.
Step 3: Start to convert MKV to Plex
Simply hit “Convert” at the bottom right corner to start to convert MKV to MP4 for Plex. Once the conversion ends, open the output folder to locate the video.
Plex enables you to share movies on TV, PS3, Xbox One, Android, iOS, and other DLNA-certified devices locally via home network connection, or remotely, as long as you have a Internet connection. So now, you can play this MKV file via Plex on your various multimedia players.
Related Articles:
Nov
Nov
The Xtreamer SideWinder 2 is a Full HD Media Player based on the powerful next generation Realtek (RTD 1185 chipset). It can play nearly any 1080P video file, play DTS HD and Dolby TrueHD with 7.1 bit streaming (HD Audio). For those who want to rip Blu-ray to a more compatible format but keeping 7.1 surround sound, Xtreamer SideWinder 2 is a ideal media player to stream the ripped Blu-ray movies since not all media players can support DTS 7.1 sound.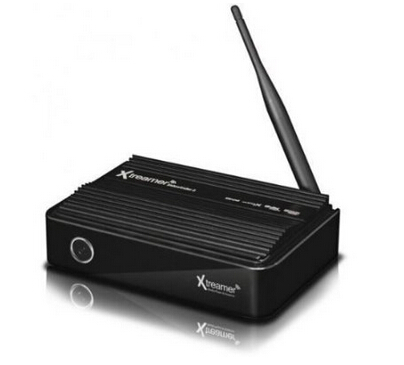
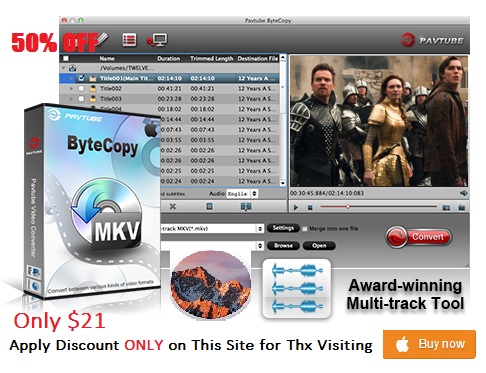
Actually, not only the media player supporting 7.1 sound is hard to find, but a Blu-ray Ripper with the capability of preserving 7.1 sound while ripping Blu-ray is tough to get. As far as I know, Pavtube ByteCopy can achieve the job. This software can convert Blu-ray to lossless MKV format preserving multi-track subtitle/audio and all chapter markers. Besides lossless MKV, you also can get multi-track MKV/MOV with 7.1 audio for Xtreamer SideWinder 2 and you can choose your wanted subtitle/audio track from settings.(reasons to choose ByteCopy)
Free download and install:

Other Download:
– Pavtube old official address: http://www.pavtube.cn/bytecopy/
– Cnet Download: http://download.cnet.com/Pavtube-ByteCopy/3000-7970_4-76158512.html
How to rip Blu-ray to Xtreamer SideWinder 2 with DTS 7.1 Audio?
Step 1: Add Blu-ray to the app
Download this Blu-ray to Xtreamer SideWinder 2 program(Mac version) and click the “Load disc” icon to import movie files from Blu-ray Disc.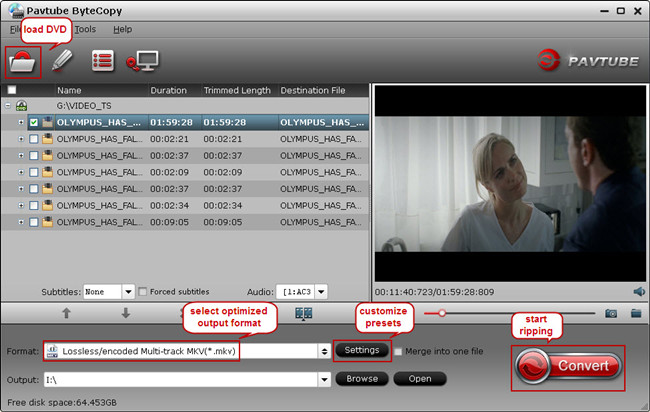
Step 2. Choose MKV format keeping 7.1 audio
Click “Format” bar to choose the output format. To preserve riginal Dolby TrueHD 7.1 audio for Blu-ray movie ripping, just select “Lossless/encoded multi-track MKV (* mkv)” from “Multi-track Video” quality in “Format” box. Make sure the original BD disc does contain Dolby TrueHD audio, otherwise you still can’t get Dolby TrueHD 7.1 audio saved. (Learn Dolby TrueHD and DTS-HD Master Audio)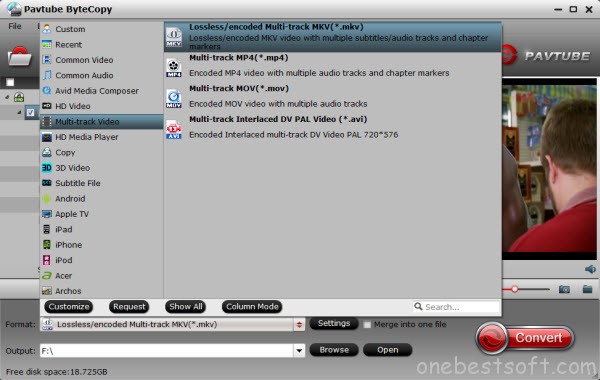
Tip: In “Settings” option, you can make adjustments on your audio, video, subtitles. It’s worth mentioning that, by default, all audio & subtitles tracks in a source file are checked to be saved in the MKV container, if there are some tracks you don’t like, you can go to Multi-task Settings window to uncheck and remove them under Audio tab and Subtitle tab. Just keep your desired Dolby TrueHD 7.1 audio channel.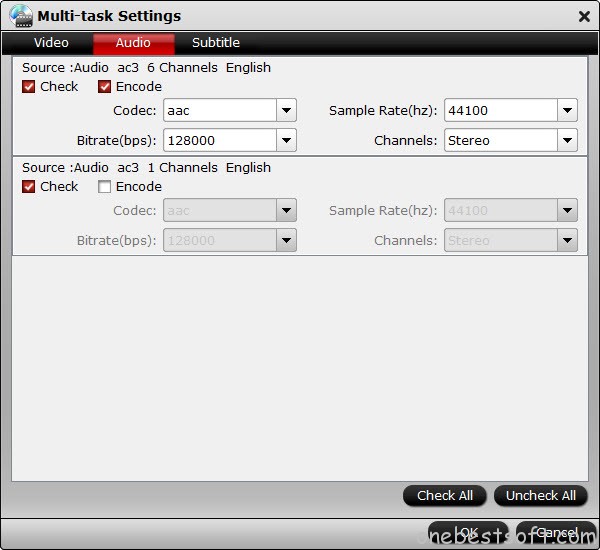
Step 3. Start ripping Blu-ray with 7.1 audio
Hit the big “Convert” button, it will start converting Blu-ray movies to Xtreamer SideWinder 2 in lossless mkv videos with the original Dolby TrueHD 7.1 audio saved.
This Blu-ray ripping will cost some time depending on the original Blu-ray size, you computer configuration, network speed.
Additional Tips:
Pavtube ByteCopy legally bypass the copyright protection of DRM and it also supports to export .srt subtitles and add *.srt, *.ssa, *.ass subtitles to BD/DVD movies. You can get it at 20% discount at Pavtube Thanksgiving Coupon and special offer after liked Pavtube Facebook.
Related Articles:
Nov
To reward the old and new customers who are are a always supporting Pavtube products, Pavtube Studio brings forward its super Black Friday offer – Mac Blu-ray/DVD Ripper & Copier for only $21. This deal will save customers an incredible $21 off the original price. 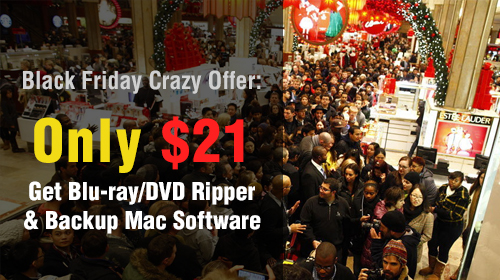
Pavtube Studio is dedicated to multimedia software developing for Mac. Its resounding Mac Blu-ray/DVD ripper can be updated to support each Mac OS X upgrade, like El Capitan, Yosemite. With Pavtube Mac BD/DVD Ripper – Pavtube ByteCopy for Mac, you can convert and commercial and region-locked Blu-ray/DVD to H.265, M3U8, MP4, MOV, AVI, etc with original video quality. Moreover, it can output lossless MKV with multi-track subtitle/audio and all chapter markers and multi-track MP4/MOV with 5.1/7.1 sound. More details about Pavtube Mac Blu-ray/DVD Ripper are in reasons to choose Pavtube ByteCopy for Mac.
Such good Mac Blu-ray/DVD ripper can’t be get at $21 in normal days. And this Black Friday Coupon from Pavtube is only from Nov 26 to Nov 28.2015. Catch the rare opportunity to make your digital life more wonderful and convenient at below:
Pavtube also picks out its another three knock-out products and offers an incredible discount at Black Friday. You can see the comparison between them in the chart. And please know more about Pavtube Black Friday & Cyber Monday & Thanksgiving Coupon in Facebook.
More Guides:
- Rip DVD for Popcorn Hour A-500 Pro on Mac OS X El Capitan
- Rip and Copy DVD to VLC on Mac OS X with VLC Alternative
- Play Blu-ray/DVD on Apple TV With M4V Format
- Rip Blu-ray to MKV with 7.1 Sound for Asus O! Play Mini V2
- Shrink Blu-ray Movies From BD-50 to BD-25 on Mac
- How to Backup and Copy DVD on Mac OS X El Capitan?
- 3 Apps from Pavtube to Help You Backup X-Men Collection Blu-ray Discs
- 3 Ways to Copy Best Vampire DVD Movies on Mac/PC
- Rip and Backup Blu-ray Furious 7 Full Movie on PC/Mac
Nov
KDLinks HD720 Media player can play all 2D/3D media files with USB 3.0 High Speed External Hard Drive. Plus it also supports Blu-Ray Navigation Menu but BD-1.0 and 2D movies only. For 3D Blu-ray owners, they can consider ripping 3D Blu-ray to 3D MP4 to achieve 3D Blu-ray playback on KDLinks HD720 Media player via USB 3.0 then to enjoy high resolution and high transmission speed.
To convert 3D Blu-ray to 3D MP4, you can use Pavtube BDMagic for Mac. It can convert 2D/3D Blu-ray to KDLinks HD720 Media player with 3D MP4 format or normal 2D MP4, MOV, H.265, M3U8, M4V, etc. It can preserve the original video quality while ripping Blu-ray on Mac (El Captian included) and on the other hand, it allows you to adjust video/audio parameters and 3D depth to customize your own 3D movies.
For Windows users, please turn to Pavtube BDMagic which makes you convert 3D Blu-ray to USB 3.0 for KDLinks HD720 Media player on Windows.
Free download and install:

Other Download:
– Pavtube old official address: http://www.pavtube.cn/blu-ray-ripper-mac/
– Cnet Download: http://download.cnet.com/Pavtube-BDMagic/3000-7970_4-76177782.html
How to Convert 3D Blu-ray to 3D MP4 for KDLinks HD720 Media player?
Step 1: Load 3D Blu-ray Disc.
click “Load file” button to load 3D Blu-ray files directly to this 3D Blu-ray to 3D MP4 application.
Step 2. Choose 3D MP4 format
From the “Format” drop-down list, you are suggested to follow the path “3D Video > MP4 Side-by-Side 3D Video (*.mp4)” for ripping Blu-ray to side-by-side 3D MP4 video. This video also can be used in LG 3D TV or other 3D TV via Kodi.
Tip: If you like, you can click “Settings” which is next to “Format”, free change your target video size, bitrate, frame rate and 3D depth. If you want to get best video quality, pls switch them to “original”.
Step 3. Start conversion.
Click “Convert” button to start 3D Blu-ray to 3D MP4 conversion in side-by-side mode. Once the conversion finished, you are able to get the generated 3D MP4 files via clicking “Open” button with ease.
Transfer the ripped 3D Blu-ray to USB 3.0 External Drive. Then you can play HD 3D movies on KDLinks HD720 Media player via USB. (Learn: Difference between U Disc and USB Flash Drive)
Related Articles:
Nov
The reason why Blu-ray gets so popular in the market is it comes with lossless audio quality with mainly three lossless audio codecs: PCM, Dolby TrueHD and DTS-HD MA. And the Dolby TrueHD and DTS-HD Master Audio can deliver unprecedented home theater experience with 7.1 channels, so there may be no one willing to loose the wonderful audio while backup a Blu-ray movie. So the media players which can support 7.1 Channel will get big market, like Asus O! Play Mini V2 which supports impressive 7.1-channel surround sound. So how can you rip Blu-ray to Asus O! Play Mini V2 with 7.1 Sound?
There are many Blu-ray rippers on the market but not all of them can keep 7.1 channel while ripping Blu-ray. Generally, if you want to preserve 5.1 or 7.1 surround sound, you have to output lossless MKV format, not SD MKV, or HD MKV. Fortunately, after I tested several free and paid Blu-ray rippers and discovered Pavtube ByteCopy.
This program can keep Dolby True HD 7.1 audio when ripping Blu-ray movie to Asus O! Play Mini V2. It can convert Blu-ray to MKV with lossless video output and multiple audio & subtitle & chapter markers preservation.
It has the professional Mac version which can make you rip Blu-ray to MKV with 7.1 Sound for Asus O! Play Mini V2 on Mac OS X El Capitan.
Free download and install:

Other Download:
– Pavtube old official address: http://www.pavtube.cn/bytecopy/
– Cnet Download: http://download.cnet.com/Pavtube-ByteCopy/3000-7970_4-76158512.html
How to Convert Blu-ray to MKV with 7.1 Sound for Asus O! Play Mini V2?
Step 1: Add Blu-ray to the app
Run Pavtube ByteCopy (reasons to choose it) and click the “Load disc” icon to import movie files from Blu-ray Disc.
Step 2. Choose MKV format keeping 7.1 audio
Click “Format” bar to choose the output format. To preserve riginal Dolby TrueHD 7.1 audio for Blu-ray movie ripping, just select “Lossless/encoded multi-track MKV (* mkv)” from “Multi-track Video” quality in “Format” box. Make sure the original BD disc does contain Dolby TrueHD audio, otherwise you still can’t get Dolby TrueHD 7.1 audio saved.
Tip: If you want to customize your own video you can click“Settings” option, which allows you to make adjustments on your audio, video, subtitles. It’s worth mentioning that, by default, all audio & subtitles tracks in a source file are checked to be saved in the MKV container, if there are some tracks you don’t like, you can go to Multi-task Settings window to uncheck and remove them under Audio tab and Subtitle tab. Just keep your desired Dolby TrueHD 7.1 audio channel.
Step 3. Start ripping Blu-ray with 7.1 audio
Hit the big Convert button, it will start converting Blu-ray movies to Asus O! Play Mini V2 in lossless mkv videos with the original Dolby TrueHD 7.1 audio saved.
This Blu-ray ripping will cost some time depending on the original Blu-ray size, you computer configuration, network speed.
Additional Tips:
Pavtube ByteCopy legally bypass the copyright protection of DRM and it also supports to export .srt subtitles and add *.srt, *.ssa, *.ass subtitles to BD/DVD movies. You can get it at 20% discount at Pavtube Thanksgiving Coupon and special offer after liked Pavtube Facebook.
Related Software:
BDMagic for Windwos/Mac – The best Blu-ray solution to rip and backup any commercial and region-locked Blu-ray to H.265, M3U8, MP4, MKV, AVI, FLV, etc.
DVDAid for Windows/Mac – Capacity of ripping copy-protected and homemade DVD to iPhone 6S, iPad, Surface Pro, Synology NAS, Seagate Wireless Plus,http://www.ecardmax.com/hoteditor/styles/office2007/switch_richtext_off.gif etc with suitable format.
Pavtube Video Converter for Windows/Mac – Function of converting Blu-ray/DVD, 4K/SD/HD video in any format to nearly all popular video format you have ever seen.
Related Articles:
- Convert 3D MKV/FLV/WMV/AVI to Galaxy S5/iPhone 6 For Watching on ZEISS VR One
- How to Watch Blu-ray on Popcorn Hour A-400 With ISO/M2TS/MKV format?
- Copy Blu-ray/DVD to MKV with AC3 DTS 6 Channels
- 3 Apps from Pavtube to Help You Backup X-Men Collection Blu-ray Discs
- 4K Players + Play 4K Ultra HD Video on PC with Two Methods
Nov
In Apple communities and forums, we always see this knid of question: “ I put DVD in my Mac and the DVD player pops up. But when I press Play, it says “Supported Disc Not Available”. Why my Mac won’t play DVD? ” This “Mac won’t play DVD” issue gradually becomes the common issue for Mac users. What’s the reason and how to solve it? In this article, you will find the answer.
Why DVD won’t play on Mac (Book Pro)
1. Mac (Book Pro) won’t recognize DVD for optical drive refuses DVD disc or there is no DVD icon and no recognition even though the disc is well put into the drive.
2. DVD Player on Mac can’t read DVD for commercial region codes, DVD disc scratch/broken and other incompatibility problems.
Learn More: How To Play Region Code 1 And 2 DVD Without Changing DVD Region Codes?
How to Fix ‘Mac(Book Pro) Won’t Play DVD’ Problem?
If Mac can’t read your DVD for optical drive, you need to repair or buy a new one to make DVD playback run well on your Mac.
For DVD icon lost PROBLEM, you can try to reset NVRAM (or PRAM). Shut down your computer and turn on later. When you hear the startup sound, press and hold the Command-Option-P-R keys immediately until the computer restarts and you hear the startup sound again.
You DVD get scratched/broken or has a region codes different with your DVD Drive, the only solution to solve “Mac Can’t Play DVD” is to rip DVD to MP4, MOV or other popular format with DVD Ripper.
You can try Pavtube BDMagic for Mac. This software can rip and backup the latest DVD movies to MP4, MOV etc, on Mac with removal of copy protections, covering CSS,region code, UOP, Sony ArccOS, Disney X-project DRM. It is compatible with the newest Mac 10.11 El Capitan system so that you needn’t worry DVD Ripper breakdown issue on Mac El Capitan.
You can get it now at 30% off discount in Pavtube Thanksgiving Coupon and Pavtube Facebook.
Free download and install:

Other Download:
– Pavtube old official address: http://www.pavtube.cn/blu-ray-ripper-mac/
– Cnet Download: http://download.cnet.com/Pavtube-BDMagic/3000-7970_4-76177782.html
Step 1: Run the DVD to Mac (Book Pro) program and click “File” > “Load from disc” to import DVD movie. (This app also work in Blu-ray so that you can convert Blu-ray to Mac with it. )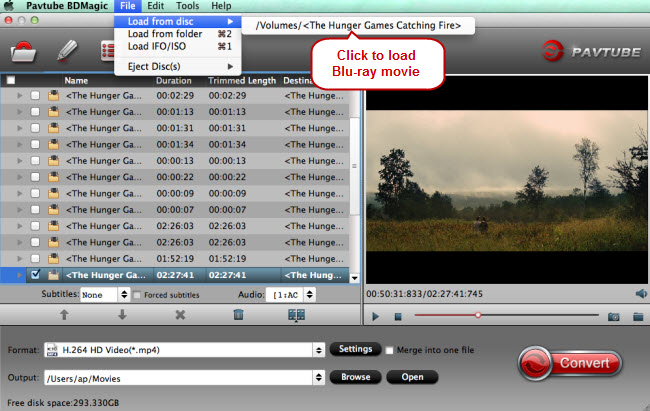
Step 2: Mac can playback MP4 format well, so just head to the output format list to follow “HD Video” > “H.264 HD Video (*.mp4).”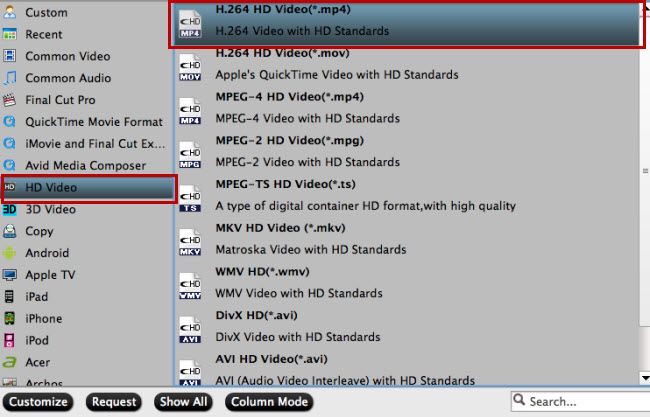
Tip: Click the “Settings” button to adjust video/audio parameters to get more compatible video for Mac (Book Pro).
Step 3: Click on the “Convert” in bottom right corner to start to rip DVD to MP4 for Mac (Book Pro).
Now, try to play DVD on Mac (Book Pro) again.
Related Articles:
Nov
Many people have lots of WMV files that want to play on a standard DVD player like the below questioner:
“I have a .wmv movie I would like to burn to a DVD to play on a standard DVD player connected to my TV (not just on my computer). I have several pieces of software that can convert the .wmv file to another format, but don’t know which format I should convert it to. Any suggestions?”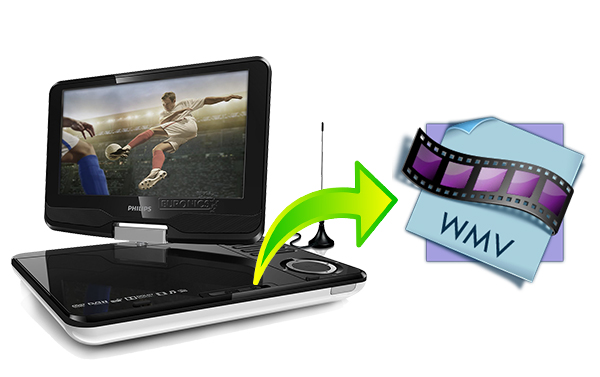
In fact, there are two ways to play WMV on a DVD Player: method 1: burn WMV to a DVD; method 2: convert WMV to DVD player supported format. Here, the article will introduce you the two ways in detail.
Method 1: Burn WMV to DVD for Playing on DVD Player
Pavtube DVD Creator is an easy-to-use DVD-burning software. It can burn AVI, WMV, MP4, MOV, MTS, Tivo, etc to DVD video. The beneficial DVD menu customizing features allow you to change the DVD menu template/style, menu text, display aspect ratio and background, you can also set chapter maker and playback mode.
Step 1: Run the DVD Creator software, import WMV file into it for burning DVD disc project.
Step 2: Switch to the menu pane, double click a DVD menu beneath the Menu Template to apply it to your DVD. You can customize the background video/image, background music, text, title thumbnail and more for your DVD menu. You can also choose the DVD quality at the bottom of the software, higher quality requires bigger DVD disc volume.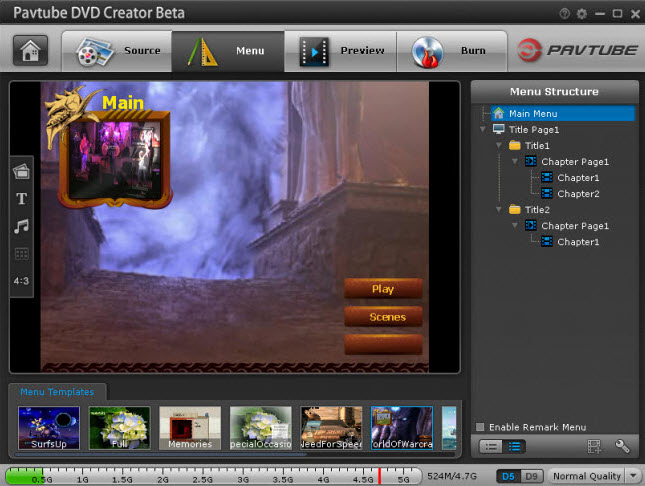
Step 3: Click the “Burn” button to start burning WMV to DVD. Once the process ends, you can play your DVD burned from WMV on DVD player. 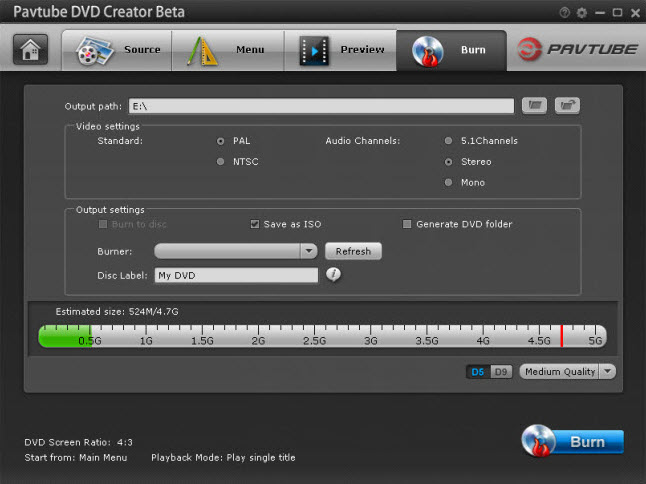
Method 2: Convert WMV files to DVD Player supported format
To convert WMV files to DVD player supported format, you need a WMV to DVD player converter. Here, I recommend Pavtube Video Converter Ultimate for you. It is a comprehensive and professional video software. It can works on WMV, VOB, H.265, AVI, MOV, M4V, etc and change them to DVD Player supported format. During the process, it allows you to reset video codec, size, framerate and audio channel, codec, sample rate to get the most suitable video for your DVD player or other multimedia players. (Read review)
If you are a Mac user, the equivalence product is iMedia Converter for Mac, which can change WMV to DVD player suitable format on Mac OS X 10.11 El Capitan. Now, you can get it at 20% off discount.
Free download and install

Other Download:
– Pavtube old official address: http://www.pavtube.cn/blu-ray-video-converter-ultimate/
– Cnet Download: http://download.cnet.com/Pavtube-Video-Converter-Ultimate/3000-2194_4-75938564.html
Step 1: Import WMV to the app
Start the program on your computer, click “File” > “Add Video/Audio” or “Add from folder” to input your source WMV files to the application.
Step 2: Choose VOB format
From “Format” bar drop-down option, choose “VOB Format” > “DVD-Video Format – NTSC(*.vob)” or “DVD-Video Format – PAL(*.vob)” as output format.
Learn also: Play TV Program on Old DVD Player
Note: PAL and NTSC are analog television systems. PAL format is common for Europe and Asia. PAL is used in almost all Western European countries, Australia and in some countries of Africa, South America and Asia. NTSC is a Color TV standard for the United States, Canada, Japan and other countries of North and South America and Asia.
Tip: DVD player only accepts VOB format encoded with MPEG-2, so you can open profile settings to make sure or change the codec is MPEG-2.
Step 3: Convert WMV to DVD Player
Hit right-bottom convert button to carry out the conversion process from WMV to DVD Player supported VOB. When the process finishes, open output folder to locate the generated VOB file for DVD player.
Both the ways are easy to operate. You can choose any one of them to help you play WMV file on DVD Player.
Related Software:
BDMagic for Windwos/Mac – The best Blu-ray solution to rip and backup any commercial and region-locked Blu-ray to H.265, M3U8, MP4, MKV, AVI, FLV, etc.
DVDAid for Windows/Mac – Capacity of ripping copy-protected and homemade DVD to iPhone 6S, iPad, Surface Pro, Synology NAS, Seagate Wireless Plus, etc with suitable format.
ByteCopy for Windows/Mac – It can rip Blu-ray/DVD to lossless MKV keeping multi-track subtile/audio and all chapter markers.
Related Articles:
Nov
MP018 Full HD Media Player is with full 1080p player, which will give your extraordinary video experience. Moreover, it supports Ypbpr output, external HDD or U disk, SD card and HDMI and various audio and picture format, all these functions will help you to enjoy your HD movie at home. If you have plenty of Blu-ray disc collection, ripping these Blu-ray to U disc for MP018 Full HD Media Player is a nice idea. 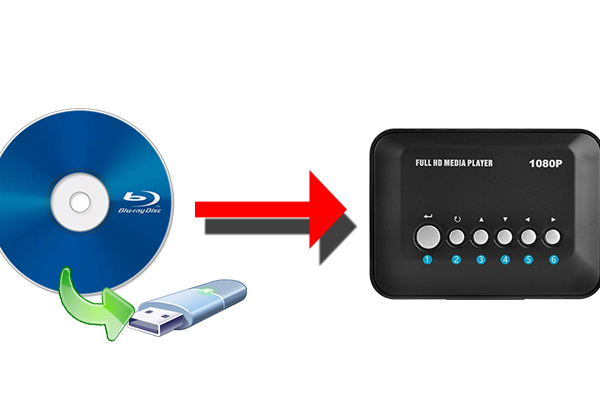
Hot search: Blu-ray to Seagate Wireless Plus | Blu-ray to WD MyCloud | 300 DVD to External Drive | Blu-ray to Synology DS416
Backing up Blu-ray to U disc not only can make you play Blu-ray movies on MP018 Full HD Media Player freely, but gives you the carriage convenience so that you can take your favorite Blu-ray movies with you. Then you can watch them in hotel with HD TV or in the caravan when you are going on a trip. To achieve the goal, you need a Blu-ray ripper.
Here, I want to recommend Pavtube BDMagic to you. This top-ranked Blu-ray ripper can rip and convert any commercial and region-locked Blu-ray to U Disc for MP018 Full HD Media Player in MP4, AVI, MOV, MKV, WMV, FLV, etc. It offers you H.264, DivX codec for video and DTS, MP3, ACC codec for audio. Besides this, it also allows you to add srt/ass/ssa subtitle to your Blu-ray video.
Its equivalent Mac version is Pavtube BDMagic for Mac which has updated to support Mac OS X 10.11 El Capitan.
Free download and install: 

Other Download:
– Pavtube old official address: http://www.pavtube.cn/blu-ray-ripper/
– Cnet Download: http://download.cnet.com/Pavtube-BDMagic/3000-7970_4-75922877.html
How to Rip Blu-ray to U Disc for MP018 Full HD Media Player?
Step 1: Load Blu-ray movie on PC
Run Blu-ray to MP018 Full HD Media Player converter on your PC, and click “File” > “Load from disc” to load Blu-ray movie to the app. You can choose your desired subtitle and audio below the chapter list. And this app supports batch conversion so that you can add more than one Blu-ray movies at a time. 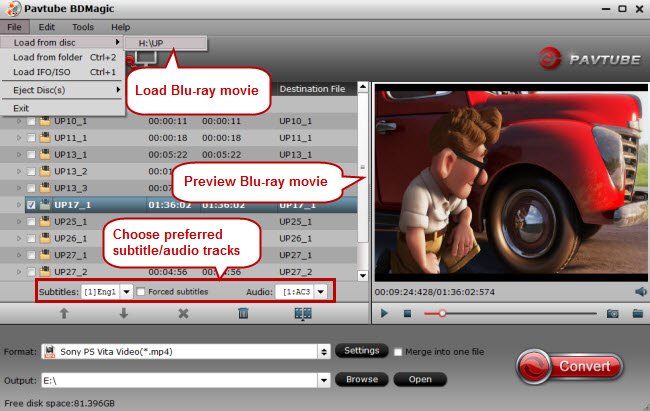
Step 2: Choose format for MP018 Full HD Media Player
Since MP018 Full HD Media Player support H.264 and DivX video codec, so you can choose AVI or “H.264 HD Video (*.mp4)” from “HD Video” as the target output format.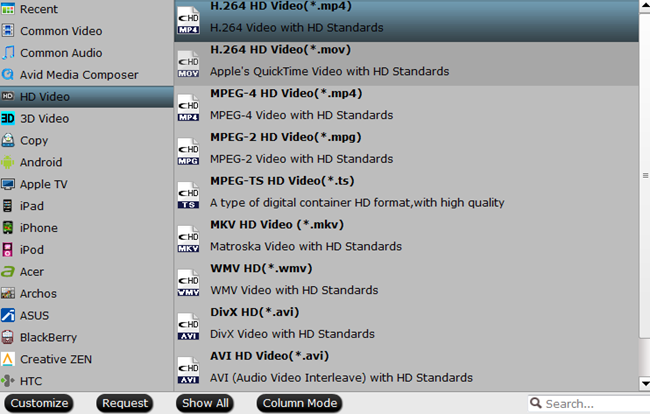
Tip: If you want to add subtitle in your foreign Blu-ray for watching on MP018 Full HD Media Player via U Disc, you can go to the video editing interface by clicking“Edit”. Then hit on “Subtitle” to add your external SRT/ASS/SSA subtitle.
Note: The subtitle must be named as the movie title. 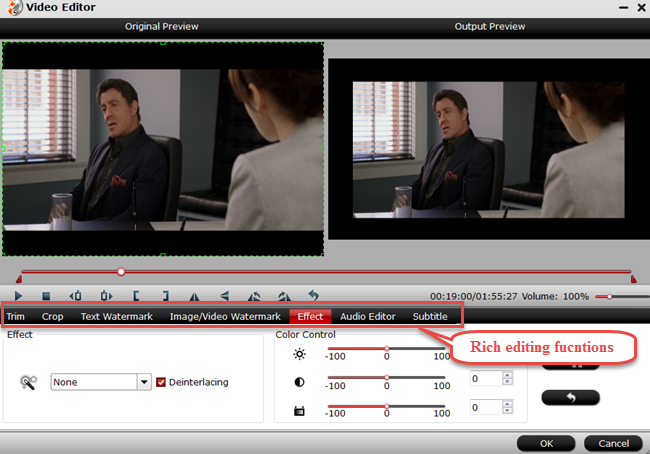
Step 4: Start to rip Blu-ray to U Disc
After everything is set down for video conversion, choose your video output destination folder and click the big red button “Convert” to convert your Blu-ray to H.264 MP4 for MP018 Full HD Media Player . If you’re tired of waiting the whole converting process, tick off “shutdown computer after conversion” and take care of other business or entertainment.
That’s all for the Blu-ray ripping. See, this app is so easy to use. What’s more, you can get a up to 40% discount during Pavtube Thanksgiving Coupon activity or like Pavtube Facebook to get a FB special offer.
Related Software:
DVDAid for Windows/Mac – Capacity of ripping copy-protected and homemade DVD to iPhone 6S, iPad, Surface Pro, Synology NAS, Seagate Wireless Plus, etc with suitable format.
ByteCopy for Windows/Mac – It can rip Blu-ray/DVD to lossless MKV keeping multi-track subtile/audio and all chapter markers.
Pavtube Video COnverter for Windows/Mac – Function of converting Blu-ray/DVD, 4K/SD/HD video in any format to nearly all popular video format you have ever seen.
Related Articles:
Nov
Cloud Media have made available a new addition to their range of media players with the launch of the Popcorn Hour A-500 Pro. Its processor is combined with Mali-400 MP4 graphics and supports HEVC decode. Other features include SD slot and HDMI port (with audio) at up to 3840 x 2160 @ 30Hz with cable to name a few. With this super high resolution, you can watch HD even 4K movies on it. You even can play DVD movies on this Popcorn Hour A-500 Pro. But before this, you should rip DVD to Popcorn Hour A-500 Pro supported format on Mac OS X El Capitan.
Popcorn Hour A-500 Pro Supported Media File Formats:
- Audio: AAC, FLAC, OGG, Dolby Digital, Dolby Digital Plus, DTS, WMA, WMA Pro, MPEG-1 Layer 1, 2, 3, MPEG-4 AAC-LC, MPEG-4 HE-AAC, MPEG-4 BSAC ,LPCM, FLAC, Vorbis, TrueAudio, APE Audio
- Video: MPEG1/2/4 Elementary (M1V, M2V, M4V), MPEG1/2 PS (M2P, MPG, DAT, VOB), MPEG2 Transport Stream (TS, TP, TRP, M2T, M2TS, MTS), AVI, ASF, WMV, Matroska (MKV), MOV (H.264), MP4, RMP4, 3D BD ISO
From the above chart, we figure out that although Popcorn Hour A-500 Pro support support various video format, it can;t play DVD directly. If you want to play DVD on Popcorn Hour A-500 Pro, you should copy DVD to VOB, MKV, MP4, WMV on Mac OS X El Capitan. This need you to ask help for a DVD Ripper. Handbrake can do this unless your DVD is copy-protected. Otherwise, you should turn to a Mac Handbrake alternative.
Pavtube BDMagic for Mac is a good choice. It can rip commercial and homemade DVD, DVD Folder, DVD IFO/ISO, even Blu-ray to MP4, MOV, MKV, AVI, WMV for Popcorn Hour A-500 Pro on Mac OS X El Capitan. It offers two ways to copy DVD, full disc copy and directly copy DVD main title. What’s more, it allows you to adjust video and audio bitrate, size to get better or smaller size video so that you can store more DVD movies on your SD card, HDD or other storage device.
Its Windows version is called Pavtube BDMgic, both of which are in the Pavtube Thanksgiving Coupon activity, where you can get Pavtube product at up to 40% off discount.
Free download and install:

Other Download:
– Pavtube old official address: http://www.pavtube.cn/blu-ray-ripper-mac/
– Cnet Download: http://download.cnet.com/Pavtube-BDMagic/3000-7970_4-76177782.html
How to Copy DVD for Popcorn Hour A-500 Pro on Mac OS X ElCapitan?
Step 1 : Input DVD source video
Instert DVD disc to DVD Drive and run DVD to Popcorn Hour A-500 Pro converter. Click “Add Disc” button on this program to import DVD into this app.
Step 2: Choose output format
Here, you have many choices, you can choose MP4, MKV, MOV, WMV in “Common Video” or “HD Video”. Moreover, you can select to directly copy DVD to VOB file for Popcorn Hour A-500 Pro.
Tip: When you choose to copy DVD to MP4, MOV, etc video, you can adjust video/audio parameters in “Settings”. If you plan to directly copy DVD to Popcorn Hour A-500 Pro, you won’t be able to reset the video spec.
Step 3: Copy DVD to Popcorn Hour A-500 Pro
Hit on the “Convert” button on software main interface and DVD to VOB/MP4/MOV/MKV conversion begins. After it is done, find the ripped DVD movie in output folder.
For other Popcorn Hour product, like Popcorn Hour A-400, the app is also a good partner to watch DVD, even Blu-ray.
Related Software:
ByteCopy for Windows/Mac – It can rip Blu-ray/DVD to lossless MKV keeping multi-track subtile/audio and all chapter markers.
Pavtube Video COnverter for Windows/Mac – Function of converting Blu-ray/DVD, 4K/SD/HD video in any format to nearly all popular video format you have ever seen.
Related Articles:
- Backup DVD Collection to HDD for Sumvision Micro 4 Media Player
- How to Rip TV Series DVD to Episodes for Plex?
- Rip 300 DVD Collection to External Drive for Dell/Lenovo/Toshiba Laptops
- Backup and Upload DVD Collections to Seagate Wireless Plus
- Put DVD Collection to Samsung Galaxy S6 edge+ for Playing
Nov
Sumvision Cyclone Micro 4 is one of the smallest and smartest media streamers on the market. It enables you to stream movies or music from your PC, laptop or any Android device using WiFi to any TV. So if you have large DVD collection, backing them up to HDD then play on Sumvision Micro 4 media player will be a nice idea. Before you backing up DVD collection to HDD for Sumvision Micro 4 media player, you should know the format that Sumvision Micro 4 media player can support: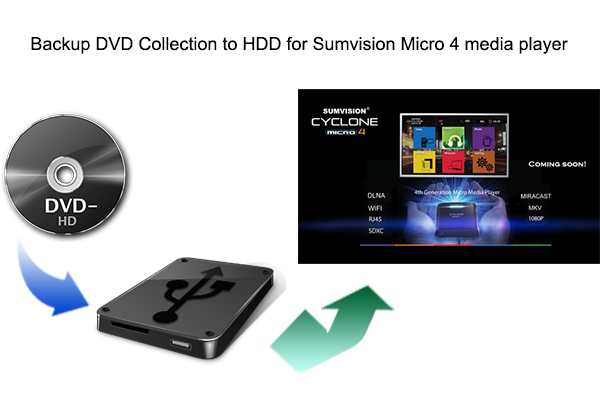
Sumvision Micro 4 media player supported format:
Video codecs supported: RM/RMVB, H.264, VC1, WMV, MPEG 1/2/4, Xvid, BD-ISO, MKV, MOV, WMV, TS, M2TS, MTS, FLV, AVI, DVD-ISO, VOB, M2P, MP4, MPG, SWF
Video output support: PAL, NTSC, 480p, 576p, 720p, 1080i, 1080p/50Hz, 1080p/60Hz
Since Sumvision Micro 4 media player supports many video format, so you can use Handbrake to rip DVD to MP4 for it if your DVD has no copy protection. Otherwise, I suggest you to use Pavtube DVDAid. It can rip any copy-protected and region-locked DVD to HDD in H.264, WMV, MPEG 1/2/4, Xvid, MKV, MOV, WMV, TS, M2TS, MTS, FLV, AVI, VOB, MP4, etc for Sumvision Micro 4. It also allows you to adjust video bitrate, fame rate, size, codec to determine output video size for Sumvision Micro 4 player. What’s mote, it can support batch conversion so you can backup more than one DVD movies at a time and tick “Shut down computer after conversion” when you don’t have enough time to wait for the process ending. (Read review)
If you are a Mac user, please turn to the equivalent Mac version which has updated to support Mac OS X 10.11 El Capitan so you can backup DVD collection to HDD for Sumvision Micro 4 on Mac El Capitan. And both the versions are in the Pavtube Thanksgiving promotion list where you can get up to 40% discount.
Free download and install:

Other Download:
– Pavtube old official address: http://www.pavtube.cn/dvd_ripper/
– Cnet Download: http://download.cnet.com/Pavtube-DVDAid/3000-7970_4-76158510.html
How to Backup DVD Collection to HDD for Sumvision Micro 4 player?
Step 1: Load DVD files with optical DVD drive.
Run the program, insert DVD into your computer’s DVD optical drive, and from the “File” drop-down menu, select “Load from disc” to add DVD disc to the program.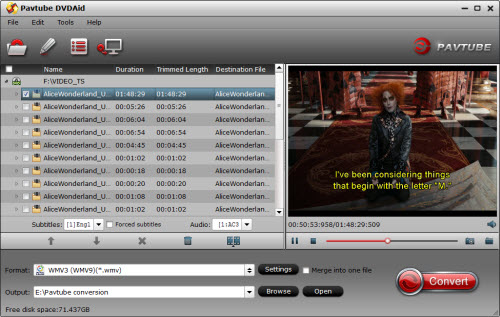
Step 2: Select output file format.
You can directly choose to output Sumvision Micro 4 media player playable file format by following the path “HD Video” > “H.264 HD Video (*.mp4). MP4 is the best choice for nearly all multimedia players can read it.
Tip:Click “Settings” to pop out “Profile Settings” window, set output video codec, size, bitrate, frame rate and audio codec, sample rate, bitrate and channels according to your own needs.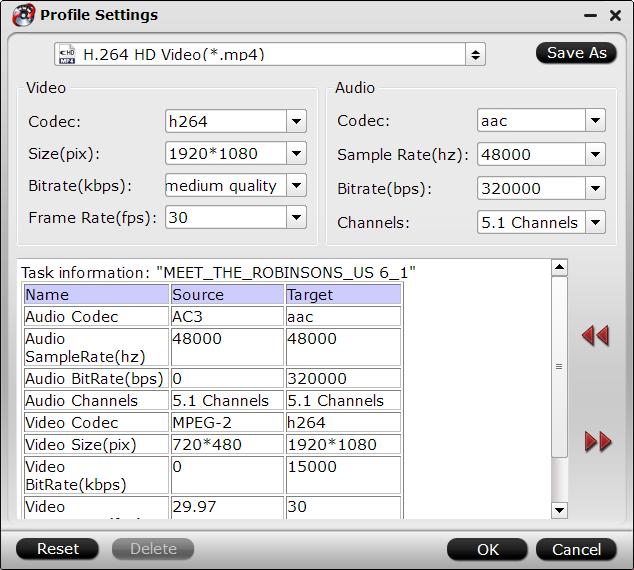
Step 3: Start DVD to HDD conversion process.
Start to rip DVD to HDD for Sumvision Micro 4 media player by hitting right-bottom “Convert” button. Once the process ends, just open the output folder to locate the generated video.
Put your ripped DVD movies to HDD then you should be able to watch them on Sumvision Micro 4 media player.
Related Software:
BDMagic for Windwos/Mac – The best Blu-ray solution to rip and backup any commercial and region-locked Blu-ray to H.265, M3U8, MP4, MKV, AVI, FLV, etc.
ByteCopy for Windows/Mac – It can rip Blu-ray/DVD to lossless MKV keeping multi-track subtile/audio and all chapter markers.
Pavtube Video COnverter for Windows/Mac – Function of converting Blu-ray/DVD, 4K/SD/HD video in any format to nearly all popular video format you have ever seen.
Related Articles:
- How to Watch Instructional DVDs on iPhone/iPad/iPod?
- How to Rip TV Series DVD to Episodes for Plex?
- Rip 300 DVD Collection to External Drive for Dell/Lenovo/Toshiba Laptops
- How to Stream DVD Movie to Roku 3 for Playing on HD TV
- Make 3D Movies for your Samsung Gear VR With Old Movie Library and Blu-ray/DVD Disc
Nov
Thanksgiving Day is coming. Some of you are probably planning the Thanksgiving menus for your family while some are ready for selecting the best Thanksgiving present for their parents. With great blessing and best wishes, Pavtube Studio also prepared a big gift for their consumer – Thanksgiving Promotion 2015 to celebrate Thanksgiving Day with our friends. Focusing on product quality and customer needs, Pavtube offers up to 40% discount for hot products to reward our customers.
Thanksgiving Day always comes with movies. I believe you must have prepared some Thanksgiving movies for enjoy with your family after dinner. With this wish, how can you bear the incompatibility issue when playing Thanksgiving Blu-ray/DVD movies on your HD TV, iPad, 4K Projector, etc. To avoid the embarrassing situation, you’d better rip the Blu-ray/DVD movies to your multimedia players with most compatible format and specs by using
Pavtube BDMgic for Windows / Mac
Pavtube DVDAid for Windows / Mac
Pavtube ByteCopy for Windows / Mac
When enjoying the Thanksgiving movies and having the Thanksgiving dinner together, how can you not record the scene to remember the warm time? After you record the happy time, you maybe want to edit the shooting in iMovie, FCP, Premiere Pro CC, etc before you sent it to your other family members or share it on Facebook. While putting the shoot into video editing program, you probably need the help of Pavtube Video Converter Ultimate and iMedia Converter for Mac, which can convert your HD/4K shoot to H.265 MKV/MP4, HD MP4, QuickTime, MOV, ProRes, AIC, DNxHD, MPEG-2, WMV, H.264, MPEG-4, etc. for your FCP X, iMovie, Premiere Pro CC, Sony Vegas Pro 13, Windows Media Player, VLC, Youtube, etc. On Windows 10/8.1/8/7/XP and Mac OS X 10.11 El Capitan, 10.10 Yosemite, 10.9 Mavericks, 10.8 Mountain Lion, 10.7, 10.6, 10.5.
Pavtube Video/BD/DVD software can convert Blu-ray/DVD, 4K/SD/HD video in any format to H.265 MP4/MKV, M3U8, MP4, MOV, MKV, AVI, M4V, etc. Especially, ByteCopy can rip Blu-ray/DVD to lossless MKV keeping multi-track subtitle/audio and all chapter markers. What’s more, Pavtube adds optimized preset profile for main digital products, like TV series, iPad, iPhone, Samsung, Sony, PS3/PSP, Xbox One/360, Android Tablet/Phone, Surface, etc.
All of the products can be get now at up to 40% off discount. Below is the list:
40% OFF Pavtube DVDAid for Windows/Mac
Original price: $35
Now: $21
Reasons to choose Pavtube DVDAid

2. 30% OFF Pavtube BDMagic for Windows/Mac
Original price: $49
Now: $34.3
Reasons to choose Pavtube BDMagic

3. 20% OFF Pavtube ByteCopy for Windows/Mac
Original price: $42
Now: $33.6
Reasons to choose Pavtube ByteCopy

4. 20% OFF Pavtube Video Converter Ultimate for Windows/Mac
Original price: $65
Now: $52

You won’t get a Blu-ray/DVD Software at such low price in normal days. So if you have a plan to purchase a BD/DVD/Video Converter in the near future, why not push the schedule forward and get it in Pavtube Thanksgiving Promotion activity.
Additional: To help you make a wise choice, I did a deep review and comparison between the four backup tools. You can check out the differences and then choose the favorite to create high quality Blu-ray/DVD/ISO/4K/HD Video and Movie backups: Pavtube Softwares Comparison: ByteCopy vs BDMagic vs DVDAid vs Video Converter Ultimate
Source: http://i-loveshare.com/pavtube-thanksgiving-coupon/
Related Guides
1. Pavtube DVDAid for Windows/Mac Guides
- Rip DVD with 99 Titles Strict Copy Protections on Win/Mac
- Upload DVDs to Google Drive for accessing on Phone/Tablet
- Stream DVD Movies to Watch on PS4 with Plex Media Server
- Add SRT/ASS/SSA Hard Subtitles to DVD Movies
2. Pavtube BDMagic for Windows/Mac Guides
- Stream Blu-ray/DVD Movies for Playing on Roku 4
- Backup Blu-rays to Dropbox for Easy Viewing and Sharing
- Backup Blu-ray to Synology DiskStation DS215j for Smart TV
- Watch Blu-ray/DVD on Mac Mini HTPC via XBMC With Lossless Quality
3. Pavtube ByteCopy for Windows/Mac Guides
- Encode Blu-ray to TrueHD 7.1 Audio MKV on Windows 10/8.1/8
- Play 3D Blu-ray Movies on WD TV Live/Live Plus/Live Hub/Live Streaming
- How to preserve Blu-ray chapter markers in digital copies?
- Rip Blu-ray movies to MKV/MP4 for playing with Kodi (XBMC)
4. Pavtube Video Converter Ultimate for Windows/Mac Guides
- Enjoy Blu-ray/DVD/Video on LG Ultra 4K TV Windows and Mac
- Watch 3D Yify Movie on Samsung Gear VR with 3D SBS format
- Save Movies and Videos on Dropbox, Google Drive, OneDrive, Box
- Edit BDMV Files with QuickTime, iMovie, FCP on Mac OS X El Capitan
That’s All!
PS. Have more questions about how to download, buy and use our Blu-ray/DVD Ripper, various Video Converter programs, please feel free to contact us>> or leave a message on our Official Facebook.
Nov
Plex Media Server allows you to store all your movies on a central server and watch them on your TV, iPad, computer or phones both home and away. This feature even makes people rip their DVD series to Plex in different episodes so that they can watch each chapter in their space time. The point here is, which tool is the best to rip Series DVD to episodes for Plex? Handbrake? Or another DVD ripper?
If you’ve searched and found varying thoughts over a long period of time, you folks would find that Handbrake is not the latest/best way to backup DVD series to episodes for Plex. Handbrake is a open-source program, which doesn’t have enough fund and labor to support it update to be compatible with each computer operating system upgrade. This easily leads to breakdown issue while ripping DVD to Plex on Windows 10 or Mac OS X El Capitan. Besides this disadvantage, it can’t work in copy-protected DVD. Comparing to Handbrake, although Pavtube DVDAid is a paid one, it can perform well in DVD Series to Plex ripping aspect.
Hot search: iTunes to Plex | Blu-ray to Plex
This DVD Series to Plex ripper can copy any copy-protected, even region-locked DVD to Plex supported format with excellent video quality. On Windows, you can get 6X times DVD ripping speed by H.264 codec which can make you rip more DVD TV series to Plex than Handbrake in the same time period. What’s more, you are allowed to adjust video/audio bitrate, size, frame rate, channel in “Settings”. You can learn more about it in review.
Mac version is here which has updated to support OS X El Capitan.
Free download and install:

Other Download:
– Pavtube old official address: http://www.pavtube.cn/dvd_ripper/
– Cnet Download: http://download.cnet.com/Pavtube-DVDAid/3000-7970_4-76158510.html
How to Rip TV Series DVD to Episodes for Plex?
Step 1: Add the DVD TV Series
Insert your DVD disc to the drive, then launch the DVD TV Series to Plex Ripper and click the “Load Disc” button to select and load the DVD TV Series to the app. This program will automatically choose the main title of the DVD TV Series disc. If you want to rip DVD to different episodes, you can tick each chapter instead of the whole DVD main title.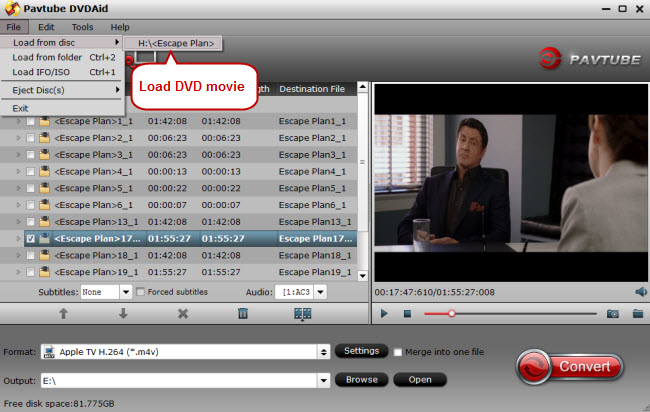
Tips: You can click on the dropdown list of “Subtitles” to select your needed subtitles so that you can view DVD movies with proper subtitles.
Step 2: Choose H.264 format
Click the “Profile” > “HD Video” option, and choose MP4 format recognized by Plex as output format. You can select H.264 HD Video (*.mp4) for Plex Media Server. 
Tip: With the right settings you can retain the quality of the original DVD while also saving space. Simply click Settings bar and you can tweak the settings to your satisfaction and even save it as preset.
Step 4: Start to rip TV Series DVD to Plex
Click the “Convert” button under the preview window, and the DVD ripper will start the conversion from TV Series DVD to Plex Media Server. This will take a while, depends on the encoding settings, hardware of your PC and the length of the DVD file.
Once the DVD ripping process ends successfully, locate the ripped DVD TV Series in the output folder. Now, you should drop the ripped DVD TV series file into Plex Media Server so that you can watch DVD TV Series via Plex media server on your smart TV, Apple TV, Xbox 360/One, Roku, computer tablets.
Knowledge Expansion: How to install Plex?
1.The Plex installation is straight forward on a Windows PC and there is no special tweaking needed. You must create a Plex account during the installation which is free. You must also tell Plex which folders contain your media.
2.The Plex sign-up screen is where you assign the server name: 
3.This screen lets you assign your media folders:
5. You can configure Plex for Internet channels:
6.Plex adds meta information to your media which it gets from the Internet: 
After installed the Plex successfully, now you can add ripped DVD TV Series to Plex Media Server. Then you can watch the TV Series on Plex whenever you are available.
Related Articles:
Nov
Since PS3/PS4 claims that they can support Blu-ray playback, game fans get so excited. But later, more and more feedback reveals that many issues occur while PS3/PS4 consumers play Blu-ray on their PS3/PS4:
“Why is the Just Dance 2014 Blu-ray disc I got shipped from Australia not working on my PS4 in India? How do I make it work?”
Blu-ray region code must be one of the factors that lead to the failure Blu-ray playback on PS4. In fact, there are 3 separate Blu-Ray region codes all over the world. And Australia and India belong to different area. Because these codes are classified alphabetically as Region A, Region B, and Region C like below:
Region A: This region covers all of North America, South America and South East Asia.
Region B: This encompasses Europe, Africa, Middle East, French territories and Greenland.
Region C: Region which covers the rest of the world including Russia, Asia, and China.
So you need to remove the region lock on Australia Blu-ray then you can play the Blu-ray on your PS4 in India. Commonly, Blu-ray Ripper program can get the job done. And Pavtube BDMagic is a powerful and easy-to-use Blu-ray ripper. With it, you can backup Blu-ray disc from region A/B/C to PS4 supported format video in region-free feature. It can preserve the original resolution and quality in the ripping process. What’s more, it enables you to full backup Blu-ray and directly copy the Blu-ray main title if you don’t want to change Blu-ray to normal MP4, MOV, MKV, etc format.
Its equivalent Mac version is Pavtube BDMagic for Mac. It has updated to support the newest 10.11 El Capitansystem which allows you to rip Australia Blu-ray to India PS4 on Mac OS X El Capitan.
Free download and install: 

Other Download:
– Pavtube old official address: http://www.pavtube.cn/blu-ray-ripper/
– Cnet Download: http://download.cnet.com/Pavtube-BDMagic/3000-7970_4-75922877.html
How to bypass or crack Blu-ray region codes for PS4?
Step 1: Load Blu-ray disc to the program
Select “Load from disc” from the “File” menu drop-down list to add Blu-ray movies to the program. Click the drop-down list of Subtitles, then all the subtitles info in the Blu-ray will be shown clearly, so you can select your needed language as your subtitles freely.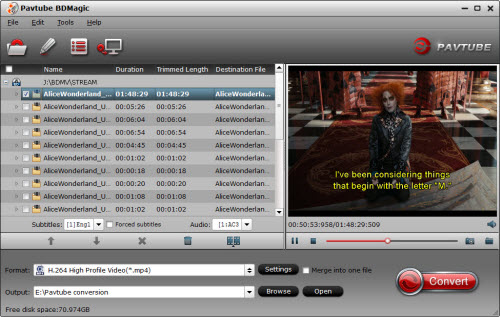
Step 2: Define output file format.
From “Format” drop-down list, go to choose “PSP/PS3” > “PS3 Video(1080P) MPEG-4 (*.mp4)” as the final output file format for playing on PS4.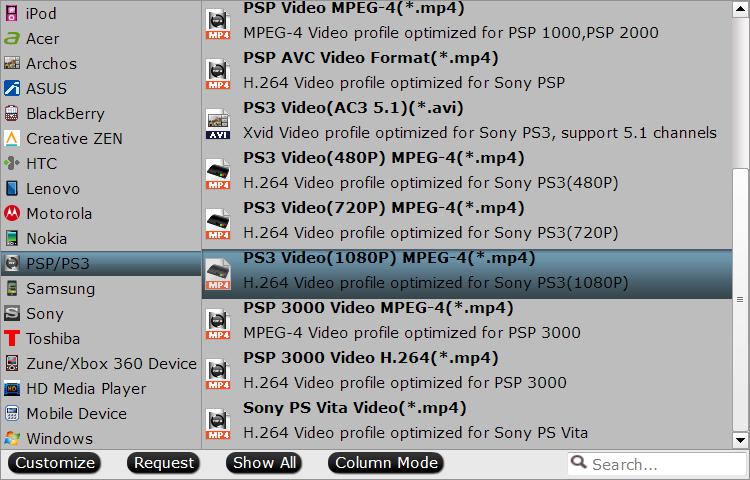
Tip: If you are not satisfied with the video resolution, you can click “Settings” to adjust it by yourselves.
Step 3: Start Blu-ray to PS4 conversion.
When all the settings is done, go back to the main interface and carry out the conversion by hitting right-bottom convert button. When the conversion is finished, click the “Open” icon on the main interface to pop out the converted files.
How to play MP4 files on PS4 from a USB device?
1. Connect the USB drive to PS4.
Turn on your PS4, plug your USB device into the PS4 USB port.
2. Go to the category (Music, Video, Photo, etc) on your PS4 home menu, select the USB device icon and then tap the “up triangular arrow” button.
3. Highlight “Display All” and the press the “x” button.
A list of all folders and playable content for that category will be displayed.
4.To view or play a file, highlight the file and press the “x” icon.
This article is also adapt to Blu-ray on other country. No matter which region codes the Blu-rays have, Pavtube BDMagic can rip them to PS4 in your country.
Related Articles:
Nov
H.265/HEVC is the new successor to H.264/AVC whose idea is to offer the same level of picture quality as AVC, but with better compression. It becomes gradually the standard codec for 4K videos and camera video recording. But it’s not the popular format for Android phones currently since most of the Android phones can’t play H.265 natively. To watch H.265 videos on Android phones, you need a H.265 player on Android or convert H.265 to H.264 for Android.
Play H.265 video on Android with H.265 Player
Cinemartin Cinec Hoid is a platform for mobile devices for enabling high quality cinema & broadcast videos to be played on smartphone & tablets. Currently, it is available as a multimedia video / player for Android, supporting playback of H.265 videos as H264, ProRes, Sony XAVC, XAVC-S, and other video codecs in advanced containers like mxf, mp4, mov, mkv, mts, etc.
Watch H.265 on Android phones using H.265 Decoder
Besides installing an H.265 player on smartphone to achieve H.265 playback on Android, you can also convert H.265 to Android phone supported format with an H.265 Decoder program. Pavtube Video Converter Ultimate(Review) is a good choice. This software can fulfill all your needs of viewing H.265 video on Android phones:
1. Decode H.265 MKV/MP4,etc to H.264 MP4/MKV/MOV/AVI, etc and MPEG, XviD codec video.
2. Reduce the video size while transcoding H.265 to Android phone playable video by lowering video size/bitrate or cropping video black area.
3. Support the newest Windows 10 system so you can deal with H.265 video on your Windows without H.265 Converter breakdown issue.
Note: Pavtube Studio offers the equivalent Mac H.265 to Android converter which has updated to support Mac OS X El Capitan. And you can get the software at 40% off discount on Facebook since Pavtube is holding on the Halloween Spirit Coupon. The activity will end at 7.November.
Free download and install

Other Download:
– Pavtube old official address: http://www.pavtube.cn/blu-ray-video-converter-ultimate/
– Cnet Download: http://download.cnet.com/Pavtube-Video-Converter-Ultimate/3000-2194_4-75938564.html
How to convert H.265 to Android phone with suitable format?
Step 1. Add H.265 videos
Download and install the H.265 to Android program and select Add button to import H.265 files to the software. This app supports batch conversion so you can import several files at a time.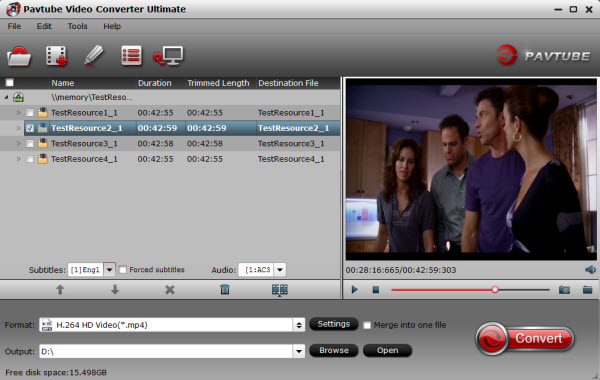
Step 2. Choose right format for Android.
Here, you are suggested to select the “HD Video”>>”H.264 HD Video(*.mp4)” as the output format for the higher resolution and wider compatibility. Surely you can choose other suitable format as you like.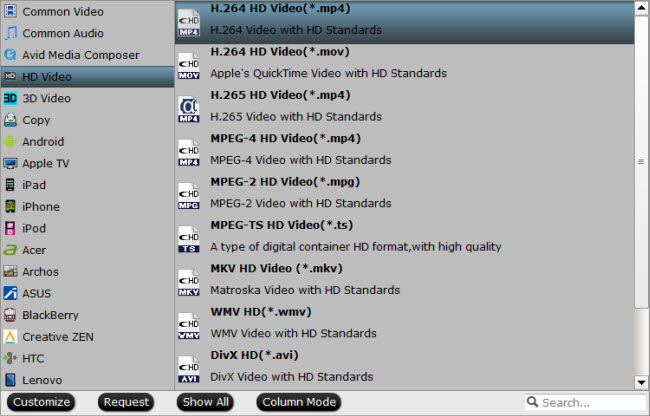
Tip: Even though common Android phones can be inserted into a extra MicroSD Card, these phones still can’t be put into many HD movies. So you maybe need to reduce the video size for storing more H.265 movies on Android phones.
Go to “Settings” on the main interface and lower the bitrate. Comparing with “Size” spec, bitrate is the main reason to affect the video size. You can preview the size at the below chart.
Notice: Bitrate also influences video quality. So don’t ignore video quality while pursuing the smaller size.
Step 3: Start to convert H.265 to Android phone
Simply hit big red “Convert” to begin to transcode H.265 to H.264 MP4 for Android phones. After the process, you can locate the generated video in output folder.
Transfer converted H.265 file to Android Phone
So you’ve plugged your USB to microUSB cable into your computer and Android phone and are ready to start downloading files. Staring intently at your screen, you wait for a drive, a window — something, anything — where you can drag-and-drop your files, but it just doesn’t come. Well, chances are, you are missing one simple yet critical but step. Here’s how to transfer files to your Android phone:
1. Connect your Android phone to your computer using the microUSB to USB cable.
2. If you are using a PC, you will see an installation bubble pop up in the bottom right of your screen. Wait for the computer to successfully complete installation.
3. The critical step: On your Android phone, pull down the notification window (aka ‘window shade’) and tap USB connected.
4. A notification window will appear. Tap Mount. Your phone will enter USB storage mode.
5. Find the removable storage drive. On a PC, navigate to My Computer and look for a new removable storage drive. On a Mac, the drive will appear on your desktop.
6. Drag-and-drop the desired file(s) to the drive.
7. In your phone’s notification window, tap Turn off USB storage.
8. Unplug your phone and you’re all set.
With more and more popular of H.265 codec in video production, H.265 converter will play important part on the market. After all, your old devices, like Apple TV, PS3, Surface Pro, etc, don’t support H.265. So, why not get one now?
Related Articles:
Nov
If you have large DVD collection as the below questioner, you maybe want to store the 300 DVD movie collection to external drive for your other laptop, mobile phones, notebooks as well:
“I’ve purchased 300 movies the past decade and want to have them on my devices when I travel like iPhone, Lenovo notebook, Dell and Toshiba laptops. Right now I am about to store these 300 DVD movies on an external drive and I want to use MP4 because I am not familiar with anything else. Anyone can give me a detailed guide to do it?”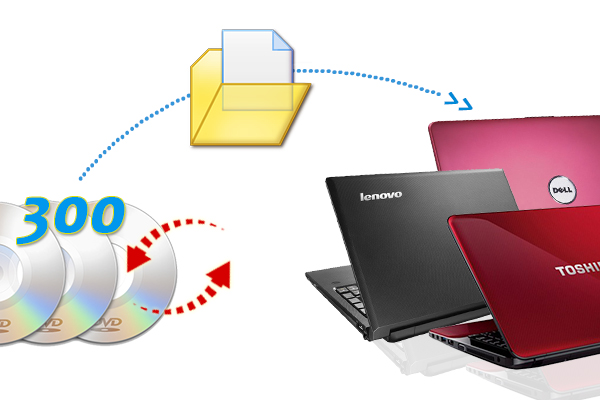
Large DVD collection takes up too much space on your shelf. And old DVD discs must can’t bear too times of insert-and-object. So digitalizing the 300 DVD movies to external hard drive is no doubt a good idea. Since the questioner want to play his DVD collection in many different devices, like iPhone, Lenovo notebook, Dell and Toshiba laptops, MP4 is indeed the best transformation destination because MP4 is really the most compatible format with nearly all devices.
To reach the questioner’s goal, it is easy with Pavtube DVDAid. It is a user-friendly and smart DVD ripping tool which can copy any old released and region-locked DVD to MP4, H.265, M3U8, MKV, AVI, WMV, etc format for iPhone, laptops, notebooks, TV, game consoles with fast speed. In profile settings, you can adjust video/audio size and codec to find the most suitable video quality for Dell/Lenovo/Toshiba Laptops.
Now, free get the software at below and follow the steps to rip these 300 DVD collection to MP4 for Dell/Lenovo/Toshiba Laptops.
Free download and install:

Other Download:
– Pavtube old official address: http://www.pavtube.cn/dvd_ripper/
– Cnet Download: http://download.cnet.com/Pavtube-DVDAid/3000-7970_4-76158510.html
How to rip 300 DVD disc to MP4 for laptops, notebooks, iPhone?
Step 1. Load DVD movie
Insert your DVD disc to DVD drive on your computer and then launch this DVD ripper. Click “File” icon and navigate to “Load from disc” to load DVD movies to the app. It can automatically chooses the main title to copy. 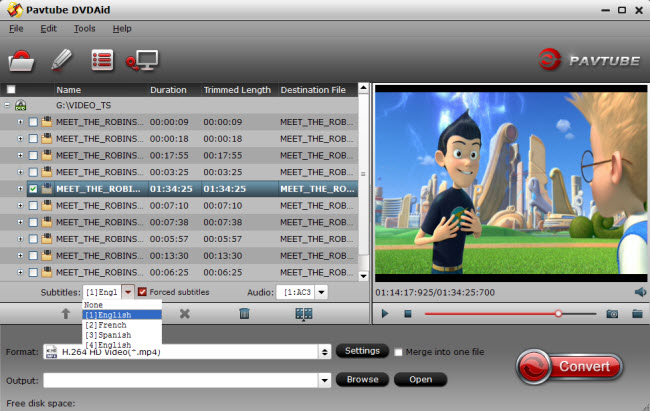
Tip 1: Select the preferred audio and subtitle track from the drop-down list of Audio and Subtitles boxes. Movies that include foreign language (e.g. Navi) in the main audio track, tick off the “forced subtitles” box and just show subtitles when a foreign or alien language is spoken, a sign, flag or other text in the scene is in different language.
Step 2. Choose output format
Choose from the “Format” menu to select the optimized profile for output. In order to stream 300 DVD movies on laptops, notebooks, iPhone in MP4 format, just follow the path “HD Video” > “H.264 HD Video(*.mp4)” as output format. 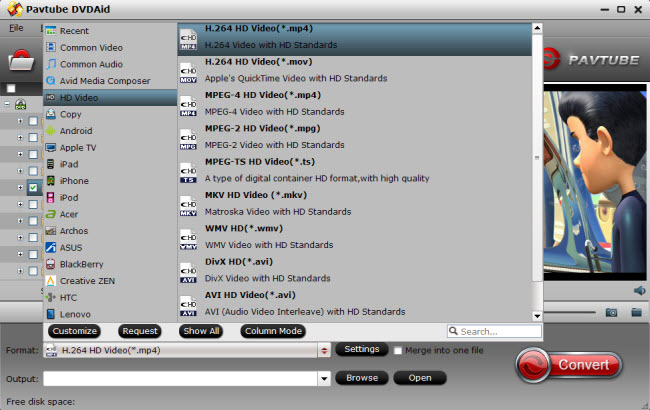
Tip 2: Optionally adjust video and audio parameters. To obtain the best movie playback on your multimedia device, you are allowed to set video codec, video size, bitrate, frame rate and other presets in Profile Settings. Just bear in mind that, higher bitrate leads to larger video size.
Step 3. Start ripping 300 DVD movies to MP4 video
Hit on the “Convert” button to start DVD to H.264 MP4 conversion. When it is done, you would fins a complete MP4 file located in the output folder.
Now, transfer the 300 DVD rips to external hard drive then you can enjoy them on your iPhone, Dell/Lenovo/Toshiba Laptops as you want.
Related Articles:
Oct
No fancy motion-sensitive remotes, either no many available apps, with such flaws, why does Vizio TV still have so many faithful fans? Because great picture quality and low price have had it begin to lag a bit ahead of the competition. If you don’t believe how great its picture is, just try it. Wait , if you attempt to play iTunes TV shows on Vizio TV, you need to do some video processing in advance. Don’t worry, it’s not complex, just simple three steps.

Why You Can’t Play iTunes TV Shows on Vizio TV Directly?
Actually, I think you should ask Apple Inc why our iTunes TV shows can’t be played on Vizio TV.
Maybe for more profit or just for higher knowledge copyright awareness, anyway, Apple puts DRM on its iTunes TV shows, videos, musics, ect which prevent us from playing any iTunes contents on any non-Apple products. To watch the purchased and rented iTunes TV shows on Vizio TV, we have to get rid of the DRM protection at first.
How to Remove iTunes DRM and Play iTunes TV Shows on Vizio TV?
To reach the goal, you have to need the help of a DRM Removal Program. There are many choices on the market.Pavtube ChewTune should be your first consideration for its easy-to-use and multiple-function feature. This software can remove DRM from iTunes movies and TV shows, and convert iTunes M4V video, M4A audio to H.264 MP4 video which is the most compatible format for Vizio TV. Of course, you can customize the video/audio parameters to get better iTunes TV shows playback on Vizio TV in its “Settings” window. (Learn other reasons to choose Pavtube ChewTune)
Free download and install DRM Removal:


Steps to Convert iTunes TV Shows to H.264 MP4 for Vizio TV
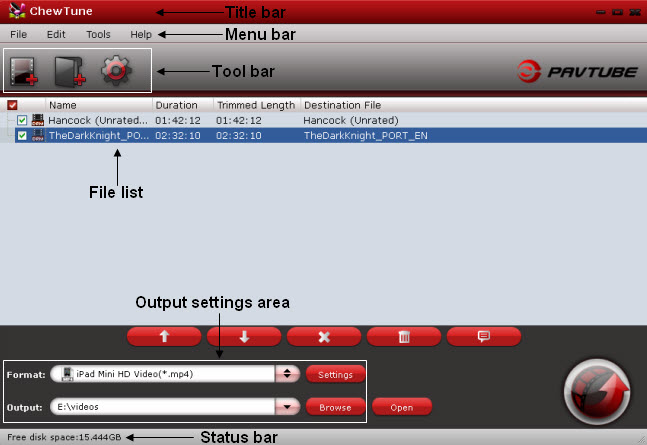
Step 1: Add iTunes TV shows
Install and launch the program on your computer, on the main interface, click “File” menu and select “Add Video/Audio” or “Add from folder” to import your iTunes TV shows.
You May Also Interested: Top 5 DVD to iTunes Converter for Mac and Windows
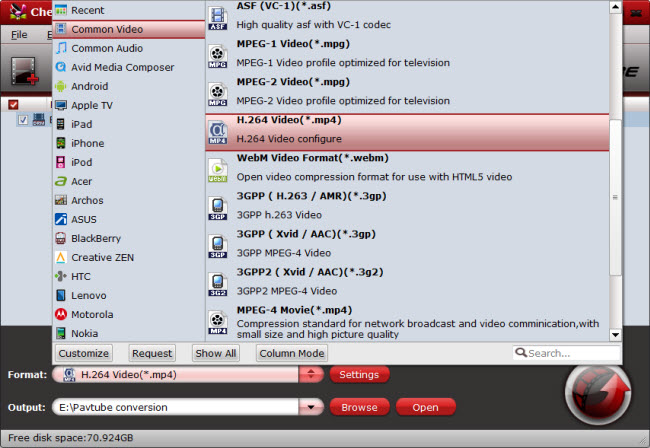
Step 2: Choose output format.
From “Format” drop-down bar, navigate to “Common Video” > “H.264 Video(*.mp4)” as the final output format.
Tip: Click “Settings”, you can open a profile setting window, here, you are allowed to adjust video size, codec, frame rate, etc.
Step 3: Start to convert iTunes to MP4
Hit the “Convert” button in the right-bottom under “Video Previewing” window to stat to convert iTunes TV shows to Vizio TV supported H.264 MP4 format video. You can locate the generated MP4 video in output folder.
Ok. The video processing ends. Is it simple? Now, you can try to play your iTunes TV shows on Vizio TV. Just try and you will find Vizio TV really can offer great picture.
Tips & Tricks:
Do you only think Pavtube ChewTune can make you convert iTunes TV show to Vizio TV? If so, you must be wrong. With the powerful DRM Removal in hand, you also can do the below transformation:
iTunes to PS4 | iTunes to Kodi | iTunes to iPhone 6 | iTunes to Oculus Rift DK2 | iTunes to Dropbox
Related Articles:
Oct
At Halloween, what you love to do maybe not just dress you up as horrible as much, but record a scary film at Halloween party on your own to watch and enjoy in the following year. But when you decide to play this Halloween Party Videos on VLC/QuickTime/Windows Media Player excitedly, you maybe get frustrated cause not all camera video can be played on VLC/QuickTime/Windows Media Player.
Camera videos presents XAVC, MXF, MOV, MPEG-4, AVI, etc format. For example, Nikon and Canon use Quicktime containers with H.264 codecs to create their camera-original files on the most current cameras, which can be shown as MOV format. But many first-generation DSLR cameras from Nikon wrote AVI files. So from time to time, when you play recorded Halloween party videos on VLC/QuickTime/Windows Media Player, you probably play an unsupported video unfortunately.
Here, I suggest you to simultaneously convert the recorded Halloween video to a more compatible format like MP4 when you put it to your computer. You can choose to use Pavtube iMedia Converter for Mac to achieve the goal. It is a Mac video converter, which is designed to convert any audio/video of different formats to other various formats like, H.265, MP4,M3U8, etc without hassle. So no matter what format your camera video is, you still can transcode the Halloween party video to VLC QuickTime/Windows Media Player. For some 4K camera, this program can downscale 4K Halloween video to 1080p for your media players.
This software now is participating in Pavtube Halloween Spirit Coupon where you can get the program at 40% off discount.
Free download and install

Other Download:
– Pavtube old official address: http://www.pavtube.cn/imedia-converter-mac/
– Cnet Download: http://download.cnet.com/Pavtube-iMedia-Converter/3000-2194_4-76177788.html
How to transcode Halloween video to VLC/QuickTime/Windows Media Player suitable format?
Step 1: Load Halloween video to app
Launch the software on your Mac computer, click “Add video” button to add Halloween party video record.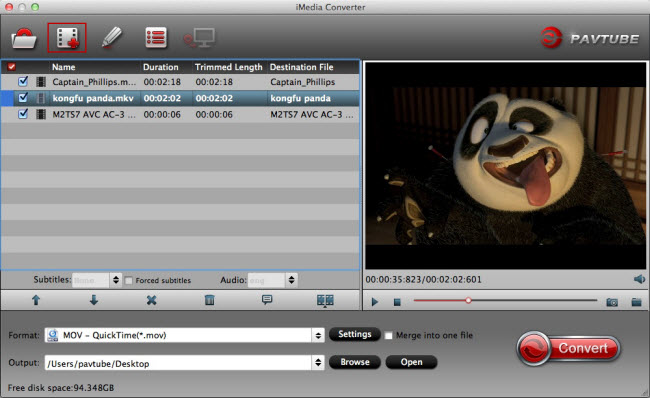
Step 2: Choose output format.
For great video quality and smoothly playback considerations, you can select the H.264 as output format from “Format > HD Video > H.264 HD Video (*.mp4)” which can be accepted by VLC/Quicktime/WMP.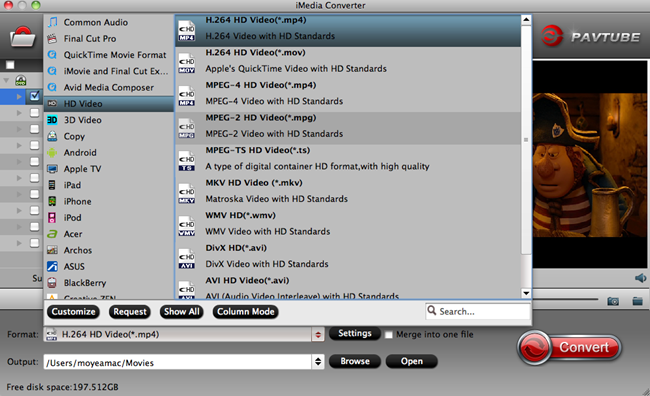
Useful tips:
1. If you have some clips in the Halloween party video that you don’t want, you can click “Edit” on the top menu where you can crop the unwanted area.
2. For 4K camera shoot, you can compress it to 1080p in “Settings”.
Step 3: Convert Halloween party video
Go back to the main interface, hit on the red “Convert” button to start to convert Halloween party video to VLC/Quicktime/Windows Media Player supported MP4.
With this processing, no matter which media player you use, you will not meet the issue again that you cant play Halloween party video on VLC/Quicktime/Windows Media Player.
Related Software:
Pavtube Video Converter Ultimate is the equivalent product of iMedia Converter for Mac. With it, you can convert any Halloween video to VLC/Windows Media Player suitable format or other any popular video format.
Related Articles:
Oct
TV plays important role in our Home Theater. As the most TV manufacturer, Samsung provides 3D/HD/4K TV to consumers(3D TV Buying Guide). When people are playing movies on Samsung TV, some of them respond that they meet troubles while playing MKV files on their Samsung Smart TV H6400. I think Samsung H6400 TV is just one case among many failure MKV video playback on Samsung TV.
MKV is an open standard free container that can store various video, audio, picture or subtitle tracks inside a single file. It is not a friendly format for most popular smart TV including Samsung H6400 TV that’s why although Samsung TV claims to support MKV files, sometimes we still can not solve the issues that Samsung TV won’t play MKV. This is probably because MKV files are with DTS audio and Samsung smart TV have bad compatibility with DTS audios.
To play MKV file on Samsung H6400 Smart TV successfully, you’d better transform MKV to Samsung TV most compatible MP4 format in case the codec in MKV file is not accepted by Samsung TV. Pavtube Video Converter Ultimate is a good choice. You can input any MKV file, even in H.265 codec to this MKV to Samsung Smart TV converter. It can export nearly all video formats you have all seen. The most important thing is that it has a TVs profile which offers you the best preset for your Samsung TV.
Mac users should turn to the equivalent iMedia Converter for Mac which can make you convert MKV to Samsung TV on El Capitan. Both the versions are in the Halloween promotion activity.
Free Download Pavtube Video Converter Ultimate:
Other Download:
– Pavtube old official address: http://www.pavtube.cn/blu-ray-video-converter-ultimate/
– Cnet Download: http://download.cnet.com/Pavtube-Video-Converter-Ultimate/3000-2194_4-75938564.html
How to transcode MKV to Samsung H6400 Smart TV supported format?
Step 1. Import MKV videos
Launch the program, click “;Load file(s)” or “;Add video” to load the MKV video file you want to convert to Samsung H6400 TV into the program.

Step 2: Choose suitable format
Click “Format” and navigate to “TVS” profile. Here lists the main four TV brands. Just choose Samsung TV. Or you can also select common H.264 MP4 format in “Common Video” or HD MP4 from “HD Video” so that you can use the video in other portable device.

Step 3: Start the MKV conversion
Press on “Convert” to start to convert MKV to Samsung smart H6400 TV supported format. Once the process ends, open the output folder to locate the video.
See, with just three simple steps, you will never need to worry that you can’t play MKV file on Samsung Smart TV. So just try do some MKV video processing before you play this MKV file on Samsung TV and other smart TV.
Related Articles:
Oct
Festivals are always the best opportunities to purchase the goods you were not willing to buy or had no ability to afford in the past days. 2015 Halloween is coming. Are you ready to open your wallet? To make your Halloween celebration even greater, Pavtube Studio has prepared a great Halloween Promotion – we are offering you a generous 40% Discount on our Blu-ray & DVD Softwares (Windows 10 and El Capitan supported).

Since Pavtube Studio offers many kinds of Blu-ray/DVD/Video softwares that you possibly don’t know which one to choose, I can make a brief introduction and a recommendation to you.
Recommendation 1: If you often do video conversion process, you can take Pavtube Video Converter Ultimate and Pavtube iMedia Converter for Mac into consideration. It can accept any Halloween movie source, like Blu-ray/DVD disc and 4K/SD/HD online/local video in any format and transform them to nearly any popular video format you have ever seen.
Recommendation 2: For those who have plenty of Blu-ray discs, Pavtube BDMagic and Pavtube BDMagic for Mac will be the best choice. They are cheaper than the recommendation one but supply the same effect on Blu-ray/DVD Halloween movies.
Recommendation 3: DVD owners who just need to rip and backup DVD disc or copy DVD folder, DVD ISO/IFO can focus on Pavtube DVDAid and Pavtube DVDAid for Mac. It only can deal with DVD movies but it is the cheapest item.
Recommendation 4: Pavtube ByteCopy and Pavtube ByteCopy for Mac are for situation that your Halloween Blu-ray/DVD movies have several subtitles and audio tracks and you want to keep all the tracks and chapter markers while ripping and copying the discs. What’s more, it enables you to extract FLAC/WAV audio from Blu-ray audio disc and extract SRT subtitle from Blu-ray movies.
Think about which one is the best choice for you so that you can solve your video conversion problem with the least money. Don’t waste the money-saving chance on Halloween. Just do it!
Oct
Summary: For Kids, a great Halloween night would not be complete without best Halloween movies. If you have collected some Halloween themed movies and plan to play these Halloween movies on Halloween party with your kids, check the solution below to see how to convert Halloween movies for unlimited Halloween movie watching on PS4/PS3/PSP.
Hot Search: DVD to PS4 | Blu-ray to PS3
some customers response that when they pop in a Halloween movie on the PS4/PS3/PSP, the console does recognize the disc being put in and when they start the movie, the screen would stay black, with no picture or not even sound appearing on PS4. For solving this problem, they have to contact Sony’s support team.
In fact, there is an easy way to fix the issue – convert Halloween movies to PS4/PS3/PSP supported video formats like MP4, AVI, MKV in MPEG-4, H264 codec. This aim can be reached as long as you have a right Halloween movies to PS4/PS3/PSP software. Pavtube BDMagic for Mac is recommended strongly here. As a user-friendly Halloween movies to PS4/PS3/PSP software for Mac OS users, it provides specified video formats for PS4, PS3, PSP and many other game hardware like Xbox 360, Xbox One, and more. With it, you can backup Halloween movies to PS4/PS3/PSP at fast speed. With updated decoding technology, it can effortlessly decrypts all kinds of Halloween movies to PS4/PS3/PSP for convenient and smooth viewing with the synchronization of audio and video. Besides, it is also able to stream Halloween movies to PS4/PS3/PSP.
If you are a windows user and also want to rip DVD to PS4, please read Pavtube BDMagic for Windows Review

Other Download:
– Pavtube old official address: http://www.pavtube.cn/blu-ray-ripper-mac/
– Cnet Download: http://download.cnet.com/Pavtube-BDMagic/3000-7970_4-76177782.html
How to Rip Halloween Movies to H.264 MP4 for PS3/PS4/PSP on Mac?
Step 1: Load DVD disc to the programme
Click “File” on the menu bar to load Halloween movies.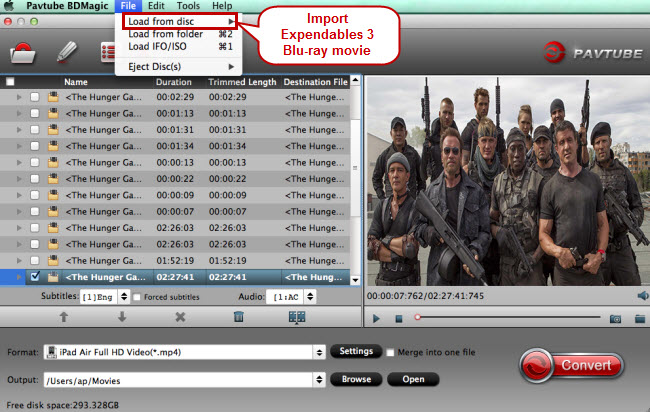
Step 2: Choose PS4 suitable format
In “Format” list, navigate “Common Video” > “H.264 Video(*.mp4)” as the output format.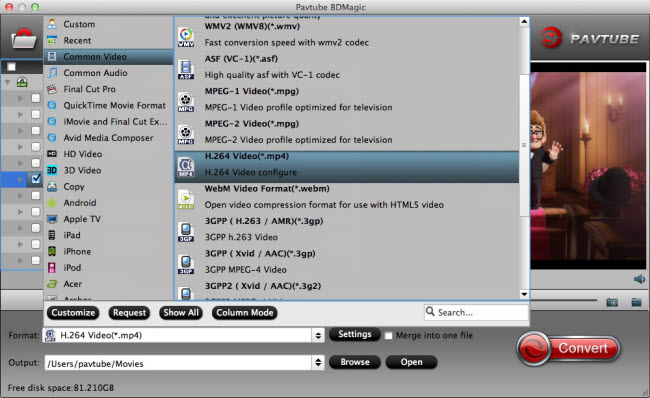
Step 3: Convert Halloween to h.264 MP4
On the right bottom, hit the big red “Convert” to start converting DVD to PS4 on Mac. When the process is finished, you can locate your created movie by opening output folder.
With Pavtube BDMagic for Mac, converting DVD to PS4 on Mac will be easy as A, B, C. Except for PS4 playable H.264 MP4, BDMagic also could encode DVD to M3U8 for IOS devices or H.265 video for higher resolution than H.264. Evenmore, BDMagic is also a good Blu-ray Ripper.
Additional:
1.With Pavtube Video Converter Ultimate, you could convert HD AVI ISO to PS4.
2.With Pavtube Chew Tune, you can transfer iTunes to PS4.
Read More:
Oct
Although Netflix offers only a few 3D films, it is still an important access to watch 3D films for 3D TV users(3D TV Buying guide). But from the avsforum.com site, people respond that it has some troubles when they are playing Netflix 3D movies on LG 3D TV. Possibly, it is because that the internet providers are not ready for it, or Netflix app version is too low. Anyway, when they play Netflix 3D movies on LG 3D TV, it just shows 2D.
Actually, you can rent and download Netflix 3D films and convert them to LG 3D TV more compatible 3D format. Then you can watch Netflix 3D movies on LG 3D TV via external hard drive or cloud storage more smoothly. With Pavtube Video Converter Ultimate (review), you can easily get the goal.
This video software is an all-in-one solution. It can work in any 3D movies downloaded from Netflix, YouTube, YIFY and other 3D streaming sites and 3D Blu-ray. It enables you to convert these 3D movies to 3D MP4/MKV/AVI/MOV/WMV with excellent 3D effect and nice video quality.
For Mac users, the equivalent product is iMedia Converter for Mac, which has updated to support OS X El Capitan.
Free Download Pavtube Video Converter Ultimate:
Other Download:
– Pavtube old official address: http://www.pavtube.cn/blu-ray-video-converter-ultimate/
– Cnet Download: http://download.cnet.com/Pavtube-Video-Converter-Ultimate/3000-2194_4-75938564.html
How to convert Netflix 3D movies to LG 3D TV?
Step 1: Add Netflix 3D movies
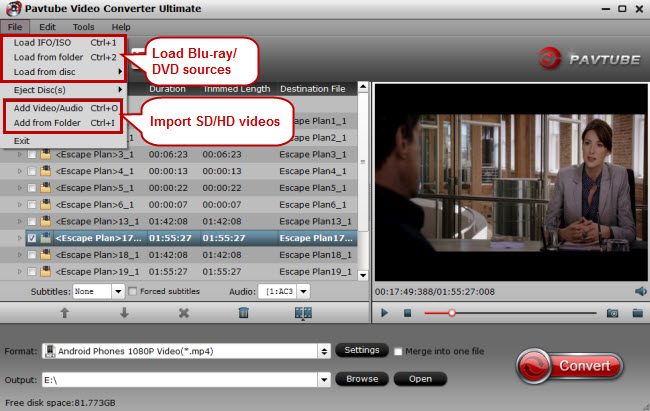
Click “Add video” to Netflix 3D movies to the 3D video converter and you can simply drag and drop the 3D movies on computer hard drive to the app.
Step 2: Select right 3D format
You can choose “MP4 Side-by-Side 3D Video(*.mp4) ” under “3D Video” category for your LG 3D TV. Then turn to “Browse”to decide the output folder.
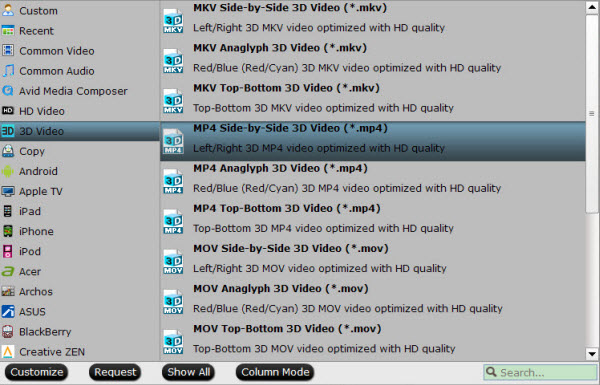
Tip: The most common Side-by-Side 3D TV format is the Side-by-Side Half where each sub-frame occupies just half the horizontal resolution of a full HD frame, resulting in a 3D image with 960pixels by 1080 lines instead of the 1920×1080 required for full 1080p content. This simplifies the electronics while making it compatible with HDMI 1.3 devices. So click “Settings” to make sure the video size is 1920×1080 for Half SBS.

Step 3: Start to convert Netflix to 3D MP4
Simply click “Convert” on the interface to finish the 3D video conversion for LG 3D TV. You can locate the generated 3D content in output folder.
Stream 3D Netflix movies on LG 3D TV via USB or some Cloud storage providers. This will not request you must update your Netflix app to the newest version.
Related Articles:
Oct
More and more people have upgraded their Mac system to the newest 10.11 El Capitan. When they are enjoying the benefits OS X El Capitan brought, many of them are suffering the softwares incompatibility issue on Mac OS X El Capitan, such as Blu-ray Ripper and DVD Ripper. Pavtube Studio updated its Mac products to meet the trend to prevent Pavtube users from the softwares incompatibility with El Capitan issue. Products that works compatible well with El Capitan including: Pavtube Video Converter for Mac, Pavtube HD Video Converter for Mac, Pavtube MTS/M2TS Converter for Mac, Pavtube MXF Converter for Mac, Pavtube iMixMXF, Pavtube BDMagic for Mac, Pavtube ByteCopy for Mac, Pavtube DVDAid for Mac, Pavtube iMedia Converter for Mac.
Rip and Backup Blu-ray/DVD on El Capitan
After updated to El Capitan, you can’t rip and copy Blu-ray/DVD any more? Don’t worry! Pavtube Blu-ray/DVD rippers have solved the system incompatibility issue.With Pavtube newly upgraded Blu-ray/DVD products, you will get no difficulty to make a full disc copy or the main movie copy of the original 2D/3D Blu-ray/DVD disc on Mac OS X El Capitan. Besides that, the program also enables you to rip/convert Blu-ray/DVD disc to various different file formats on El Capitan platform for playing on iPhone/iPad/iPod, Android phone and tablets, Windows phones or tablets, game consoles, HD media players, streaming to Apple TV/Amazon Fire TV/Roku, etc.
Support 4K UHD, 8K video conversion
Updated Pavtube Mac products can fully support you to convert 720P, HD, 4K even 8K videos differentiates itself from the pool of video converters on Mac OS X El Capitan. With preset profiles for Apple and Android, the best video converter for OS X El Capitan enables you to convert any videos of any resolution to iPhone(6S Plus/6 Plus), iPad(Air 3/Mini 4/Pro), Samsung(Galaxy S6), HTC, Blackberry, Sony, etc. in a single click. It’s very simple to use, requiring less time to learn the user guide.
Related Articles:
- Play and Edit BDMV Files with QuickTime, iMovie, FCP on Mac OS X El Capitan
- How to Convert and Burn Sony FDR-AX100 XAVC S to DVD on Mac
- How to Import and Edit Sony XAVC S to Avid Media Composer on Mac?
- How to Backup and Copy 2D/3D Blu-ray on Mac OS X 10.11 El Capitan?
- How to Rip or Backup Blu-ray to H.265 HEVC MP4 on Mac OS X
- How to Play and Watch H.265/HEVC files with VLC Media Player on Mac OS X
- How to Stream and Watch Blu-ray Movies on Apple TV 4 Mac OS X?
- How to Make a Copy/Backup of DVD movies to Mac OS X 10.11 El Capitan?
- Extract DVD scenes to ProRes and edit in Final Cut Pro on Mac
- Import and Edit Panasonic P2 Card MXF files with Final Cut Pro Mac OS X
- Best Editing Workflow of DJI Osmo 4K Video with iMovie/FCE on Mac
- Transfer and Stream Tivo Recordings to Apple TV 4 on Mac OS X
Oct
Whether you bought a 3D TV but never play 3D movies on it? If so, you can consider to install an add-on on Kodi that you can watch 3D movies without buying premium Blu-rays. One of the best add-ons for Kodi is Phoenix. Now, learn how to install Phoenix 2.0 add-on in Kodi for watching 3D movies on 3D TV.
- Hot Search: MKV to Kodi| iTunes Movies to Kodi | DVD to Kodi | Passthrough AC3 DTS with Kodi | ISO to Kodi
Tutorial How to Install Phoenix Kodi XBMC
- Open Kodi
- Select SYSTEM > File Manager

- Select Add Source

- Select None

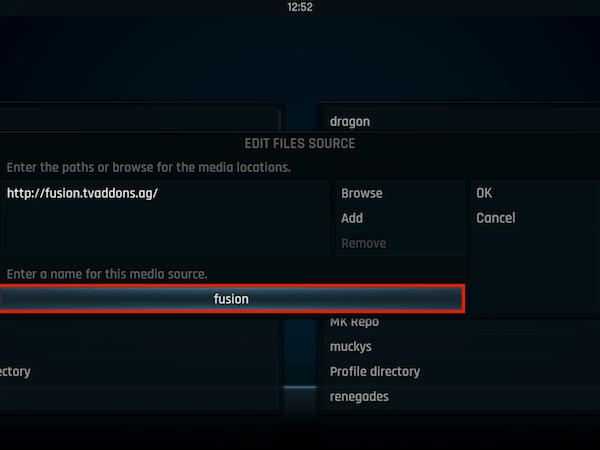
- Type the following EXACTLY http://fusion.tvaddons.ag and select Done

- Highlight the box underneath Enter a name for this media Source & type fusion
 h
h
- Select OK

- Go back to your Home Screen then slect SYSTEM.
- Select Add-Ons

- Select Install from zip file

- Select fusion

- Select xbmc-repos

- Select english. Select repository.xbmchub-x.x.x.zip

- Wait for Add-on enabled notification

- Select Get Add-Ons or Install from repository on Isengard

- Select TVADDONS.ag Addon Repository

- Select Video Add-Ons

- Select Phoenix

- Select Install

- Wait for Add-on enabled notification

Phoenix is now installed and ready to use. Once you have it installed, check out the 3D movies on Kodi that Phoenix and staael2014 have available. Access Phoenix from your video add-ons and then go into the staael2014 section and then click on the 3D Movies section.
When you hit the 3D button on your TV Remote (if you run Kodi off a Kodi box through your TV) or enable 3D on whatever display you use, your side by side image will convert into a properly 3D overlay and you can put on your 3D glasses and watch! This is a great solution to make use of your 3D TV.
From the feedbacks in koditips.com, many people respond that after they installed the add-on, they get something like stream unplayable. Some even can’t load the 3D movies at all. Please ensure that your Phoenix must be 2.0 or higher and make sure your internet connection runs well. After that if you still have the problem with 3D films, maybe you should try a video converter.
With Pavtube Video Converter Ultimate, you can convert any 3D films to Kodi supported 3D format with excellent video quality. You can download some 3D movies to hard drive from some torrent sites and transcode them to 3D SBS MP4 for Kodi. This won’t cost you any money on Blu-ray disc cause you can download Blu-rays in “FHD3D” format from internet.
For Mac users, the equivalent product is iMedia Converter for Mac, which has updated to support OS X El Capitan.
Free Download Pavtube Video Converter Ultimate:
Other Download:
– Pavtube old official address: http://www.pavtube.cn/blu-ray-video-converter-ultimate/
– Cnet Download: http://download.cnet.com/Pavtube-Video-Converter-Ultimate/3000-2194_4-75938564.html
How to convert 3D movies to Kodi with 3D video converter?
Step 1: Add source video
For disc users, click “Load from disc” to insert your Blu-ray/DVD movies to the software while you can simply drag and drop the 3D movies on computer hard drive to the app.

Step 2: Select output format and folder
For outputting 3D SBS MP4 for playing 3D via Kodi on 3D TV, you can choose “MP4 Side-by-Side 3D Video(*.mp4) ” under “3D Video” category. Then turn to “Browse”to decide the output folder.

Tip: The most common Side-by-Side 3D TV format is the Side-by-Side Half where each sub-frame occupies just half the horizontal resolution of a full HD frame, resulting in a 3D image with 960pixels by 1080 lines instead of the 1920×1080 required for full 1080p content. This simplifies the electronics while making it compatible with HDMI 1.3 devices. So click “Settings” to make sure the video size is 1920×1080 for Half SBS.

Step 4; Finish the conversion
Simply click “Convert” on the interface to finish the 3D video conversion for 3D TV. You can locate the generated 3D content in output folder.
Add 3D Movies to Kodi
Step 1: Download and install Kodi on your computer. After that, open Kodi.
Step 2: Select “Videos” in the home screen menu.

Step 3: Seclect Files, then select “Add Videos”.
Step 4: Click on “Browse” button. From This requester you can select the location where your Movies are located on your system. You can also choose a network drive if your Movies are there, this tutorial will use the network drive option and we will select “Windows network (SMB)”.
Step 5: In the next screen you should see the directories within your selected directory. If this is the right directory select “OK”. If all is ok then select “OK” again. In the next screen is where we tell Kodi what our source directory contains, in this case its “(Movies)”. When your happy with the settings select “OK”.
Step 6: Next screen is refresh info for contents of selected directory, select “Yes”. When you’ve selected ok you will be presented with this next screen, keep an eye on very top almost to the right as this updates the database with info about the films it finds. This item can take a long time depending on how many Movies you have in your collection.
Step 7: When finished, some your movie library should be listed on the interface.
Now, try play 3D movies on Kodi and it should work.
Related Articles:
Oct
YIFY must be in the most popular movie torrent sites nowadays. They usually wait for the official release of the new movies DVD/Blu-ray discs and then rip and re-encode the them to MP4 or MKV videos for people to watch. That’s why it can attract many movie fans. However, someone asked that when they downloaded YIFY movies and run the video, it showed “You are missing YIFY CODEC PACK to play this movie”. What’s the reason?
Actually, if you meet the problem , just relax for you possibly visited the FAKE “YIFY torrent site”. What’s more, I strongly suggest you not to download any so-called “YIFY official codec pack”, because it may contain malicious spyware programs. If you happened to do so, you’d better scan for viruses just in case.
You can Leanr >> Yify Movie Torrent Download and Play Tips
Tips: YIFI Movies Converter to Help You Play YIFY Movies on Any Device
If it is the true YIFI torrent site, you should download movies without any hassle, not need the codec pack. Generally, the common YIFY movies are MP4/MKV format, which can be played on PSP, iPhone, Android Tablet, Plex, etc. However, there are still some situations that the video codecs are not accepted by your devices. In this case, you can use some Video Converter to help you.
Pavtube Video Converter Ultimate is a good choice for you. This professional and all-in-one solution can transcode YIFY movies to H.265, M3U8, MP4, MKV, MOV, AVI, WMV, 3GP, FLV, FLAC, MP3, WMA, etc with excellent quality. It also can create 3D SBS, TAB, Anaglyph video out of 2D/3D YIFY movies. It offers several video and audio codec, where you can choose the right one for your portable multimedia players and it also enables you to adjust video/audio size, bitrate, frame rate, channels, sample rate to decide the output video and audio size and quality as you like.
Hot search: 3D YIFY to Gear VR | YIFY to iTunes | YIFY to YouTube
Free Download Pavtube Video Converter Ultimate:
Other Download:
– Pavtube old official address: http://www.pavtube.cn/blu-ray-video-converter-ultimate/
– Cnet Download http://download.cnet.com/Pavtube-Video-Converter-Ultimate/3000-2194_4-75938564.html
Tutorial on YIFY Videos Conversion with Video Converter Ultimate
Step 1: Add source video – “File” icon on the top menu gives you several choices to add your source video to the app or you can simply drag and drop the video to the software. Batch conversion supported allows you add multiple YIFY movies.
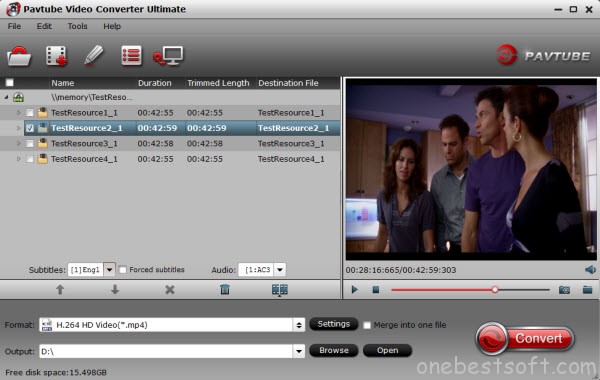
Step 2: Select suitable output format – hit on “Format”, here you will see hundreds choices. “Common Video” and “HD Video” will be your best choice. For 3D desire, just choose “3D Video”. There are still many optimized preset for some main device/systems and main smart phone, TV, tablet manufactures, like Sony, Android, iPhone, PSP/PS3, Xbox, etc.

Step 3: Finish the video conversion – click “Convert” button at the bottom of the interface to start to convert YIFY videos to other video format for your need.
Other tips:
- “Settings” is a place where you can reset video and audio parameters, like codec, size, frame rate, channel, bitrate, sample rate. You can preview the video size and resolution in the below chart.
- “Edit” on the top menu contains some functions: trim video footage, add .srt.ass.ssa subtitles, add watermark, crop unwanted video area, muse the audio and so on.
In short, this video software will be a good assistant if you really like to watch YIFY movies on your various multimedia players, no matter smart phones, tablet, laptop, computer, game consoles, etc.
Related Articles:
- Best Way to Play Torrent Yify MKV Movies on PS4
- Play and Watch 3D Yify Movie on Samsung Gear VR with 3D SBS format
- Can Someone add Yify MKV Videos to Plex Library and make Streamable?
- How to Play Downloaded YouTube Video on iPad Pro 9.7?
- Handbrake vs Pavtube Video Converter Ultimate : Which One Is Right for You?
Oct
Both Microsoft and Apple now have large, work-and-play-ready, tablets available and gunning for your home and office space. In front of the two excellent tablets, many consumers claims that iPad Pro is definitely a better device. But is it true? You can’t blindly believe in the position of iPad Pro in tablets just because the overlord status of iPhone in smart phones. Now, let’s have a spec showdown to see which one is better after all.
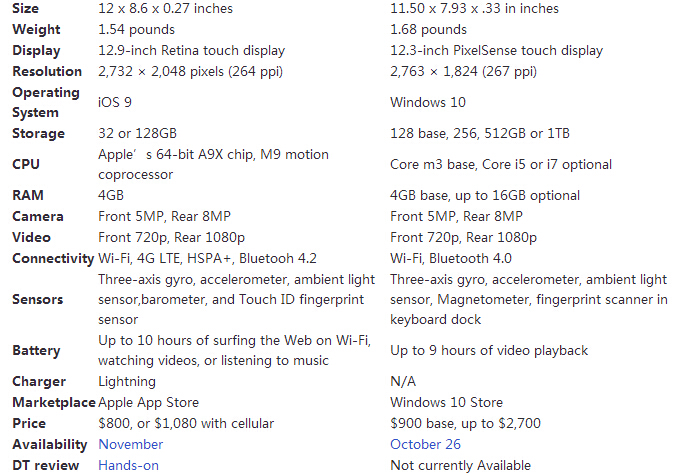
From the spec sheet, if you want to decide a winner in processor, I think it ties for they operate using different instruction sets, and with different operating systems, both of which is the most advanced in their field. For storage, we have a clear-up win for the Surface Pro 4 with bigger storage up to 1TB. So does the display. Considering the connectivity, both iPad Pro and Surface Pro 4 have Wi-Fi and Bluetooth, as you’d expect. Portability is a win in favor of the iPad Pro because the iPad Pro quotes up to 10 hours of battery life, while the Surface 4 Pro quotes up to 9 hours.
From the comparison between iPad Pro and Surface Pro 4, you maybe can’t say iPad Pro must be the better one. Of course, if you focus more on the portability, iPad Pro is no doubt the winner. No matter which tablet is your cup of tea, we can’t deny that both of them are good media players. However, from the supported format of Surface Pro and iPad previously, both of them have huge limit on video playback. For watching any video on iPad Pro or Surface Pro 4, you need a top video converter to help you. Pavtube Video Converter Ultimate is strongly recommended here for its super powerful functions:
- Firstly, it can work in any encryption Blu-ray/DVD, 4K/SD/HD videos in any format.
- Secondly, it could output nearly all video and audio format you saw before, like H.265, M3U8, MPV, MKV, AVI, etc and optimized preset for Windows and iPad.
- Thirdly, video/audio parameters resetting function makes you to decide the size and resolution of the output video according to your need.
- Fourthly, built-in editor allows you to add srt/ass/ssa subtitles, trim video footage, crop unwanted area, add watermark and other features.
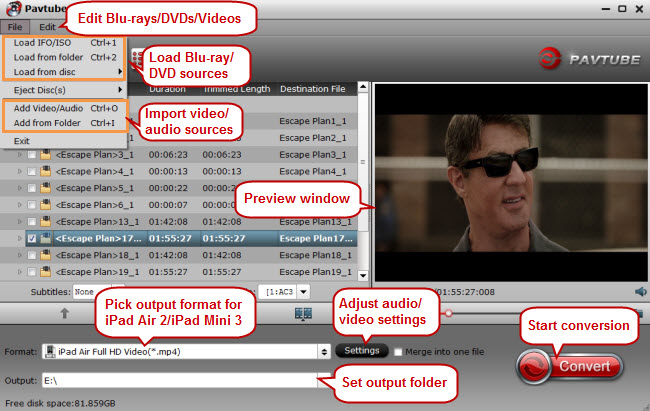
Free Download Top Video Converter:
Other Download:
– Pavtube old official address: http://www.pavtube.cn/blu-ray-video-converter-ultimate/
– Cnet Download: http://download.cnet.com/Pavtube-Video-Converter-Ultimate/3000-2194_4-75938564.html
Relevant Guides: DVD to iPad Air 2, Blu-ray on iPad Air 2, DVD on iPad Mini 3, Blu-ray to Surface Pro, DVD to Surface Pro, DVD to Surface 3, AVI on Surface Pro 3
Related Articles:
Oct
Q: “ Play MOV on Android: I have a lot of MOV video or movie files from Apple QuickTime, iPhone, and iPad etc, what should I do to play them on Android?”
A: In fact, it is easy, fast and worth the effort. This tutorial explains you how to put and play MOV on Android phones. If you want to get MOV files onto Android smartphones, you need convert MOV(QuickTime) to Android phone friendly format i.e. MP4 and then get it play.
Hot Search: MKV to Android | Tivo to Android | Blu-ray to Android | ISO/IFO to Android | iTunes to Android | Digital Copy to Android
Ever tried to move your MOV (QuickTime) movies to Android phones like Galaxy S6, S5, Sony Xperia Z3, etc? Many people have the trouble in playing MOV on Android which powers more than a billion phones and tablets around the world. Does Android play MOV? According to Android Official Website, Android phones and tablets don’t natively support MOV as the input format. To play MOV on Android, there are two solutions:
Method One: Install some Android MOV Players to play MOV on Android
But these players maybe only support some special MOV videos. What if the input MOV files don’t meet the requirement or you want to play other video formats on Android? Here comes the second method.
Method Two: Convert MOV(QuickTime) files to other formats
However, even you have installed a third-party video player like MX player, problems still exist: with on audio sometimes or crashes when running sometime. Then here comes a quick and effective fix- convert QuickTime MOV to Android friendly format to get them played without any issue.
Here Pavtube Video Converter Ultimate is the ideal QuickTime Converter for your devices. <Review.>. Overall, it’s a yet professional and easy-to-use video convert program. With it, you can fast encode QuickTime MOV to Galaxy S7/S6/S6 Edge, Galaxy Note 4, Galaxy Tab S2, Galaxy Tab 4, Galaxy Tab Pro playable MP4 video keeping the HD quality. What’s more, with the built-in video editor, you can trim, crop, add effect, subtitles to your videos as you need. If you are on a Mac, please get iMedia Converter for Mac.
Now it’s the step-by-step tutorial for you about How to convert QuickTime MOV files on Android:
STEP 1: Add QuickTime MOV files to the software
Download and install the best QT MOV Converter for iPad/iPhone/Android, and then run the program to add your Quicktime MOV files to it. 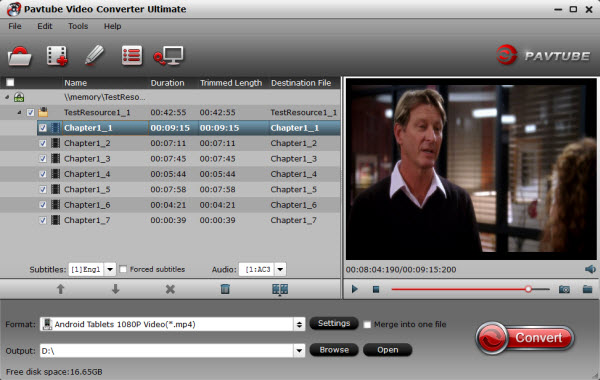
Step Two: Go to Format bar and select the “Android -> Android Phones 720P Video(*.mp4)” or “Android Phones 1080P Video (*.mp4)” as the target format. Or you can directly choose a suitable video format depending on your certain device, including Nexus 9, Galaxy S7, Galaxy Note 4, etc. 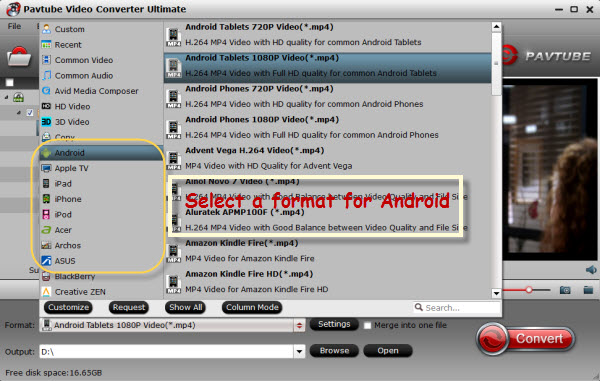
Step Three: Tap the “Settings” icon and you can adjust codec, bit rate, frame rate, sample rate and audio channel in the interface according to your needs and optimize the output file quality. In usual, 1280*720 video size, 1000~2000 video bitrate is proper. You’d better keep a good balance of the video size and quality.
Step Four: Hit the big Convert bar to start the MOV to Android conversion. After a while, you will get the output MP4 files ready to be transferred and played on Android phones with the best quality. Enjoy!
Read More:
Sep
Do you want to play commercial DVDs on WD TV Mini Media Player? If you’re interested in doing likewise while having no idea about how-to, keeping reading a brief guide below. Here, you can simply connect WD TV Mini to your TV, plug a USB-connected storage into the player and you are ready to enjoy all your digital media in DVD for smothly playback.
When we’re eagerly awaiting the WD TV HD Media Player rumoured sequel, WD has launched an alternative that supposedly complements both its original and forthcoming players, called the WD TV Mini. As we know, the WD TV can not support commercial DVDs, so you have to rip them. How to make it possible for you to watch commercial DVDs on your wide screen TV via WD TV Mini Media Player. What you will need is Pavtube DVDAid forWindows/ Mac, it not only rips, but it encodes too. Below is a step-by-step detailed operating steps:
How to play commercial DVDs on WD TV Mini Media Player?
Step 1: Load DVD source.
First of all, Download it and insert your commercial DVD to WD TV Mini Media Player. Now it’s time to import DVDs into the software after launching it. Click “Load files” icon to choose DVD discs for loading. 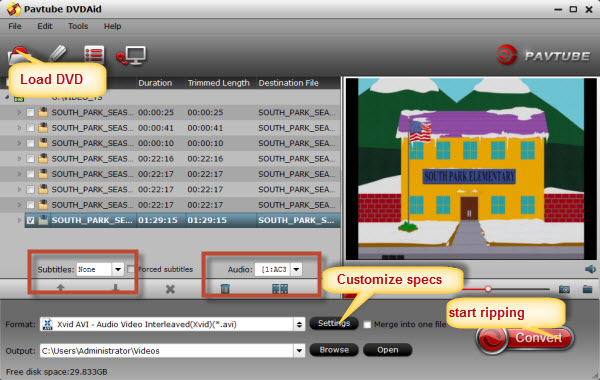
Step 2: Select subtitle and audio track
Click on the pull down menu of “Subtitle” and “Audio” respectively to select your needed subtitle and audio language.
Step 3: Select output format for WD TV Mini Media Player
Click on the drop-down list at the end of “Format” to choose an output format for WD TV Mini Media Player. Your selection should be in the range of AVI (Xvid, AVC, MPEG4), MPG/MPEG, VOB/ISO, MP4/MOV (MPEG4), RM or RMVB 8/9/10. Here I select “Commen Video – Xvid AVI – Audio Video Interleaved(Xvid)(*.avi)” as an example: 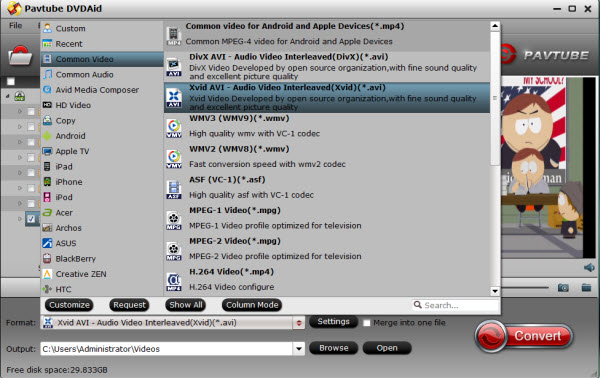
Step 4: Click “Settings” button to adjust video and audio parameters
The user manual tells us that when playback .avi (Xvid) video files, WD TV Mini need to choose the size as “1280*720”, so we need to follow the manual while ripping a DVD. 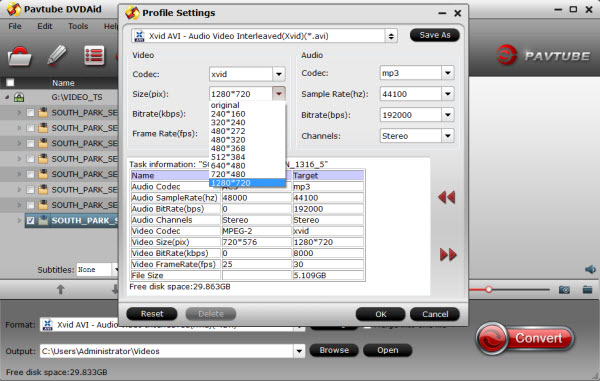
Step 5: Start ripping commercial DVDs .
Click “Convert” button to start conversion. Once finished, you can get the generated files for WD TV Mini via clicking on “Open” button with ease. Afterwards, just copy the output files to My Passport portable hard drive or other USB drive, and then connect WD TV Mini to your TV, plug your USB drive into the player and you are ready to enjoy the movies ripped from your commercial DVDs.
Further more information:
Media File Formats Supported on the WD TV Mini Media Player (Based on Firmware Version 1.00.60)
Video — AVI (Xvid, MPEG1/2/4), MPG/MPEG, VOB, MP4/MOV (MPEG4), RM or RMVB 8/9/10
RMVB supports up to 1024x576x24, 1024x576x30, or 800x600x30 compressed video resolution.
MPEG1/2/4 supports up to D1 resolution (720×480 in NTSC, 720×576 in PAL)
RMVB videos will play on the WD TV Mini Media Player only. They are not supported on the original WD TV HD Media Player, or the WD TV Live HD Media Player.
FLV file extensions are NOT supported. You will need to use conversion software to convert them to a supported format. (You can use Pavtube FLV to WD TV converter to slove this problem).
Audio — MP3, WAV/PCM/LPCM, WMA, AAC, FLAC, MKA, OGG, APE
Releated Articles:
Sep
Flash Video (FLV) is the name of a file format used to deliver video over the Internet using Adobe Flash Player. The most recent public release of Flash Player supports H.264 video and HE-AAC audio. Flash Video content may also be embedded within SWF files. Notable websites of the Flash Video format include YouTube, Google Video, Yahoo! Video, Reuters.com, Hulu.com, etc.But , today, in this article , i would like to show you a step by step guide on how to convert YouTube FLV to Android/iOS Devices for watching on Google Cardboard with zero quality loss.
Hot Search: Top 3D VR Glasses/Headsets | Top OSVR Apps | 3D movie to Oculus Rift | 3D Youtube FLV movies on Gear VR | iTunes Movies on VR One 
To play 3D Youtube FLV movies with Google Cardboard, first you need to convert 3D movie to Google Cardboard supported file type. As we know, Cardboard theater supports SBS, Over/Under and Red-Cyan anaglyph formats as well as plain 3D Youtube FLV movies in all formats originally supported by your phone. Here, Pavtube Video Converter Ultimate that supports handling 3D Blu-ray/DVD disc is necessary. Read the review.
With this all-in-one 3D Video Converter Ultimate for Google Cardboard, you can easily convert 3D contents no matter from Blu-ray disc, Blu-ray movie folder, DVD disc, MKV, AVI, VOB, WMV, Tivo, MPG, FLV/F4V files and export Anaglyph, Top-Bottom, Side-by-Side 3D video supported by Google Cardboard unit/Oculus Cinema with the best quality easily. If you are a Mac user, then Pavtube iMedia Converter for Mac is your first choose.
Now, download this professional App and follow below guide to learn How to Convert 3D Youtube FLV movies to SBS MP4/MKV for Google Cardboard. Hot!!! – (Now, you can get 50% OFF discount after liked our FaceBook.) More Money Saving Tips, you can Click Special Offer.
Just free download and install it at below: 

Other Download:
– Pavtube old official address: http://www.pavtube.cn/blu-ray-video-converter-ultimate/
– Cnet Download: http://download.cnet.com/Pavtube-Video-Converter-Ultimate/3000-2194_4-75938564.html
How to Watch 3D Youtube FLV files on Google Cardboard with Andorid/iOS devices
Step 1: Insert your 3D/2D Blu-ray or standard DVD movie to disc drive, click the “Add video” button to load your FLV files, browse to computer hard drive and import video into this app. and you can also click “Load from disc” button to load Blu-ray or DVD from ROM. For video file, 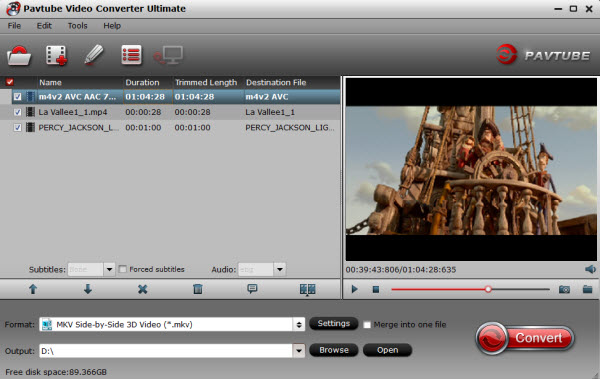
Step 2: Tap on “Format” bar and find “3D Video”, there are a lot of format options for you. “MP4 Side-by-Side 3D Video (*.mp4)” is recommended for Google Cardboard. (Read the differences Between Anaglyph 3D and Side-by-Side 3D) 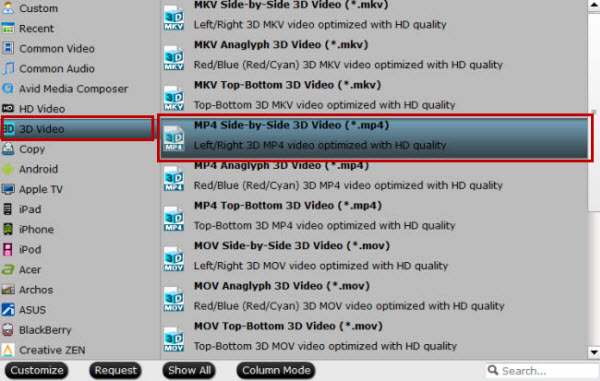
Step 3: Click the “Settings” icon and you will go into a new interface named “Profile Settings”. You can adjust codec, aspect ratio, bit rate, frame rate, sample rate and audio channel or 3D Depth in the interface according to your needs and optimize the output file quality.
Step 4: Start to rip 3D FLV to 3D SBS MP4. Hit the “Convert” button to transfer your 3D Blu-ray to MP4 Side-by-Side 3D video for playback with Google Cardboard.
After conversion, you can hit “Open” to find the generated 3D videos. Then, you can transfer the converted video files to Andorid/iPad or iPhone and other devices for Google Cardboard enjoyment.
Additional Tips- How to Find 3D videos from YouTube:
a. YouTube has official 3D channel; there you can find lots of 3D YouTube videos related to different niche. Rest you can customize your searches a bit by using the search queries.
b. Use this phrase before your keyword, “yt3d:enable=true” so the actual search query becomes “yt3d:enable=true Technology”
c. Just make sure the videos you are searching or viewing are 3D in nature.
Read More:
Sep
Moto X Pure Edition sports a 5.7-inch Quad HD LCD display, a Snapdragon 808 processor, 3GB of RAM, expandable storage up to 128GB and a big 3,000mAh battery. It also runs a near-stock version of Android 5.1.1 Lollipop with a few handy Motorola software features included, and comes with a 21MP rear-facing camera that’s supposedly really good. 
Like other Motorola phones ( Moto X, Moto G, Moto E and Nexus 6), the Moto X Pure Edition can not directly play your MKV and AVI movies downloaded from YouTube, Hulu, Google Video and other online video websites. So how to play MKV and AVI files on Moto X Pure Edition? The following tutorial will show you an easy solution to convert MKV/AVI to Moto X Pure Edition for watching MKV and AVI movies on Motorola new star via a best HD video conversion tool.
Moto X Pure Edition Supported Formats:
Audio: AAC, MP3, AAC+, AAC+ Enhanced, FLAC, AMR NB, AMB WB, MIDI, PCM, WAV, WMA (v2, v9, v10), QCELP, EVRC, OGG/Vorbis
Video: H.263, H.264, MPEG, VC-1, VP8
Hot Search: MKV to Android | Tivo to Android | Blu-ray to Android | ISO/IFO to Android | iTunes to Android | Digital Copy to Android
How to play MKV and AVI movies on Moto X Pure Edition
To Enjoy MKV and AVI movies on Moto X Pure Edition, the most effective way is that use Pavtube Video Converter Ultimate < review> which supports all kinds of Motorola smartphones. Users can use it to convert nearly any Videos to Motorola HD video profile included in profile library. If you are interested about how to do this HD Videos to Moto X Pure Edition conversion, please follow me in this step by step tutorial.
It also grants users incredible editing tools to optimize video effect according to their needs. Overall, it is the best application in the market that will surely bring out the best of in all your video and sound or simply say music and movie information you love to keep as well as listen to or video very often. The mac version is iMedia Converter for Mac.
Hot News!!! – (Now, you can get 50% OFF discount after liked our FaceBook.) More Money Saving Tips, you can Click Special Offer.
Free Download Top Video Converter for Moto X Pure Edition: 

Other Download:
– Pavtube old official address: http://www.pavtube.cn/blu-ray-video-converter-ultimate/
– Cnet Download: http://download.cnet.com/Pavtube-Video-Converter-Ultimate/3000-2194_4-75938564.html
Step 1: Load Movie files.
A. Load video. Click “Add Video” on the upper left to to load MKV or AVI files into this Moto X Pure Edition Video Converter tool.
B.Load DVD. Insert DVD to optical drive, and click “Load BD/DVD” to load DVD for DVD to iPhone 6S conversion.
C. Load Blu-ray Disc. Insert Blu-ray Disc to BD drive, and click “Load BD/DVD” to load Blu-ray Disc for Blu-ray to iPhone 6S conversion. Note that you need a BD drive to read Blu-ray Disc instead of DVD-ROM.Step 2. Set iPhone 6S playable format for exporting. 
Step 2. Choose the right output for Android.
As we mentioned above, we would like to introduce you to select the “HD Video”>>”H.264 HD Video(*.mp4)” as your best choice. Surely you can choose other suitable ones as you like. 
Step 3: Customize output settings
Click “Settings” button, the profile window will pop up. Beneath it, you are able to adjust audio/video parameters. Actually, the default setting profile offered for MKV/AVI conversion has the best quality. However, if you like, you can easily reset the file size, codec, frame rate, resolution, etc. for your references.
Step 4: Convert MKV and AVI for Moto X Pure Edition
After the above settings, please click “Convert” button to start MKv and AVI to Moto X Pure Edition conversion. Once the converting task is done, just transfer the generated H.264 MP4 video on Moto X Pure Edition for playing. Hopefully you can enjoy it!
Read More:
Sep
Apple finally unveiled its new Apple TV this past week, debuting the new device alongside refreshed iPhones and a brand new iPad Pro. And key new features including a built-in App Store. “It’s the golden age of television,” said CEO Tim Cook. “Our vision for TV is simple and perhaps a little provocative. We believe the future of television is apps.” Is there a way of playing .avi files on New Apple TV? Actually, there are more ways than you imagined of playing AVI or other videos on Apple TV 1/2/3/4. 
After you got this powerful ATV 4, you may want to play some AVI videos on your HDTV through Apple TV 4, you’ll find it’s difficult to do that since iTunes doesn’t allow those AVI files to be added. That’s because Apple TV supported video formats are quite limited and AVI videos are generally unaccepted.
In order to watch AVI movies on Apple TV 4, you need to convert AVI to Apple TV formats (MP4, MOV or M4V). Now, we provide you with the best Mac MKV to Apple TV 4 conversion software – Pavtube iMedia Converter for Mac, a great Mac AVI Converter for Apple TV 4 on El Capitan, you can easily achieve your goal smoothly. In addition to converting AVI to the new Apple TV, it also can MP4, H.265, Tivo, AVCHD, VOB, MPEG-2, MXF, WMV, AVI, DivX, Xvid, Flash format, WebM, and etc to Apple TV 4 video format on El Capitan.
Overall, this all-in-one Video Converting tool can help you to rip Blu-ray, DVD and various video files to your Apple TV 4 on El Capitan for watching. Furthermore, it is also equipped with advanced editing function like add subtitles, effect, text or picture watermark to AVI files, crop AVI black bars, trim or merge AVI files, compress output file size and etc. (Learn more functions in this review). 

Other Download:
– Pavtube old official address: http://www.pavtube.cn/imedia-converter-mac/
– Cnet Download: http://download.cnet.com/Pavtube-iMedia-Converter/3000-2194_4-76177788.html
The following guide shares with you how to encode 1080p/720p AVI to Apple TV 4 for playback on Mac step-by-step.
Step 1. Install and launch the AVI Converter for Apple TV 4, and click “Add file” or “Add from folder” button to load your AVI files. The software supports batch conversion so that you can add several AVI files to convert at one time. You can also load Internet torrents movies to Apple TV 4. 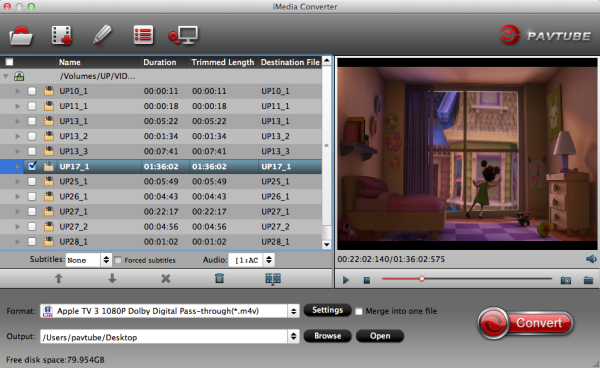
Step 2. Click on “Format” boarder to set output format.
Click on the dropdown menu of “Format” and then move your pointer to “Apple TV 3 1080P Dolby Digital Pass-through(*.m4v)” from “Apple TV” which is the compatible format for Apple TV 4. Then you can set the output folder by clicking “Browse” icon as you need. 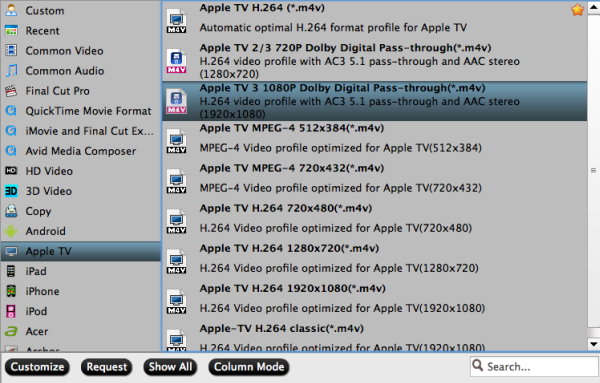
Step 3: Adjust audio and video parameters.
Click the “Settings” icon and you will go into a new interface named “Profile Settings”. You can adjust codec, aspect ratio, bit rate, frame rate, sample rate and audio channel in the interface according to your needs and optimize the output file quality. To get AC3 5.1 auido files, you can set audio codec to AC3 and change audio channels to 5.1 Channels. Learn>> how to set up Apple TV 4. 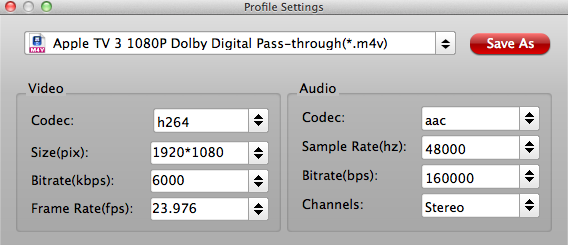
Step 3. Finally click on “Convert” button to start converting AVI to 1080p HD M4V for Apple TV 4 on Mac.
After conversion, get converted video files for transferring to ATV 4 from Mac. In this way, you can get AVI files playable on Apple TV 4 with Mac OS X without problems. We hope this short article will bring some new multimedia life to your Apple TV 4.
See Also:
