Play 4K on Kodi – Install 4K Media Add-On for Kodi

Play 4K on Kodi – Install 4K Media Add-On for Kodi

Camille Wesley No Comments

Here is a guide for installing the 4K Media add-on for Kodi. As the name suggests the add-on is focused on 4K content, but 3D & HD content is also available through the add-on.

The content is dual audio. There is a link at the top of each section saying click to change audio. If that doesn’t work then you can change the audio stream when the content is streaming via the context menu.

To Install:

● Download the Pipcan Repo and save to a location you can easily access from your Kodi device
● Open Kodi
● Select SYSTEM


● Select Add-Ons


● Select Install from zip file


● Navigate to where you downloaded the zip in the first step and select repository.pipcan-1.0.1.zip


● Wait for Add-on enabled notification


● Select Get Add-Ons or Install from repository on Isengard


● Select My Kodi Repo


● Select Video Add-Ons


● Select 4K Media


● Select Install


● Wait for Add-on enabled notification


The 4K Media add-on is now installed and ready to use. As usual the add-on now can be accessed via VIDEOS > Add-Ons > 4K Media from your home screen.

Src: https://seo-michael.co.uk/tutorial-how-to-install-4k-media-add-on-for-kodi/

Best 4K to Kodi Converter to Compress 4K to 1080P for Kodi

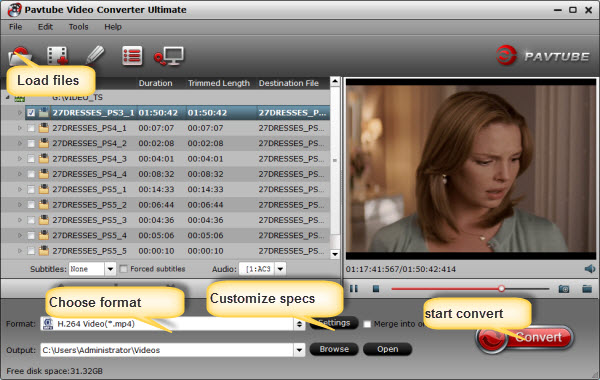
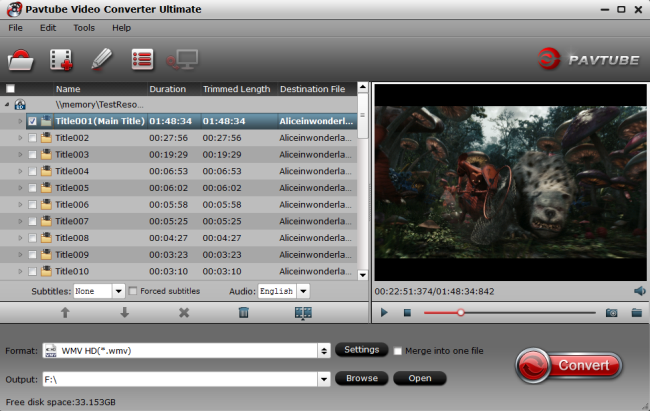
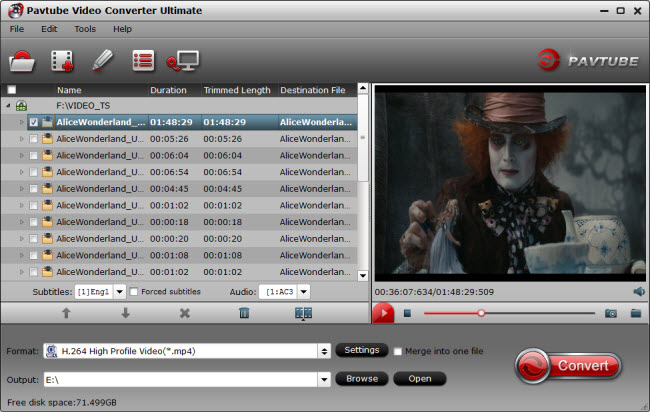
If you don’t insist on 4K resolution on Kodi but just want to play your 4K source on Kodi, there is a another way to help you – compress 4K to 1080P for Kodi with Pavtube Video Converter Ultimate:

Features

  • Compress 4K to 1080P, 720P video for Kodi
  • Batch convert 4K MP4/MKV/AVI, etc to Kodi supported MP4, MKV, AVI format in 1080p
  • Add SRT/ASS/SSA subtitle to video while transcoding 4K to Kodi
  • Cut out unwanted segment in 4K video
  • Enables users to get rid of the black edges and unwanted area of the 4K file
  • You can add images or videos as watermark onto selected 4K video file. The location can also be set by dragging on the preview screen.
  • Compatible with Windows 2003/XP/Vista/Windows 7/Windows 8/Windows 8.1/Windows 10
  • Has the equivalent Mac version which can make you compress 4K to Kodi supported 1080p on Mac OS X El Capitan, Yosemite, etc.


>> Read in-depth tutorial 

Screenshot


Download links:

– Pavtube new official address: http://www.multipelife.com/download/video-converter-ultimate/video_converter_ultimate_setup.exe
– Pavtube old official address: http://www.pavtube.cn/blu-ray-video-converter-ultimate/
– Cnet Download: http://download.cnet.com/Pavtube-Video-Converter-Ultimate/3000-2194_4-75938564.html

Check out other Kodi posts; you’ll find plenty to improve your Kodi experience

2016 Top 5 Alternatives to MakeMKV

Camille Wesley No Comments


MakeMKV is a video converting tool that can convert videos into a format that are playable on any digital media device. It usually convert the format of video to MKV files that are usually played on almost every media forums. The other features of MakeMKV are: it read out the DVD and Blu-ray discs, preserves all audio and video tracks including HD audio, preserves chapters information, fast conversion, multi-platform and many more. Following are the top six bet alternatives of MakeMKV.

ByteCopy

ByteCopy is a professional Blu-ray DVD converter that convert movies to MKV, MP4, MOV with various subtitles and audio tracks. After using ByteCopy, you can enjoy 2D and 3D movie with multiple audio tracks and subtitles. It is capable in ripping BD and DVD to MP4 and MOV with multiple audio streams without quality loss. It can also convert BD and DVD from hard discs to virtually any popular video and audio format freely and easily. – Official Website

Handbrake

HandBrake is one of the best video transcoders for converting video from all format to a selection of modern and widely supported codecs. It is free and open source and available for Windows, Mac and Linux. It can process from various multimedia formats to any DVD and Blu-ray sources that don’t contain any kind of copy protection. Outputs are file containers, video encoders, audio encoders and audio pass-thru. Following are the top six best alternatives to  – Official Website

RipIt

RipIt is a DVD ripper for Mac OS X that enables the users to watch their movies anywhere. Use RipIt and transfer DVDs to Mac with ease and speed then carry these movies without the need to carry around discs. Easily transfer a DVD in one of two ways either ripping copies or compressing. Ripping is for subtitles, extras and alternatuive tracks. Compressing is for making the track capable in playing on iPhone, iPad, iPod and Apple TV. – Official Website

BDMagic

BDMagic is a top-selling Blu-ray/DVD ripper in the market. It is designed to backup any commercial Blu-ray/DVD to H.265, M3U8, MKV, MOV, MP4, etc and some optimized preset for iPhone 6S, iPad Pro, Surface Pro 4, Galaxy Note 5, etc. Especially, it can convert region-locked Blu-ray/DVD to region-free digital version for PS4 and WMP. What’s more, it enables users to adjust video/audio size, bitare, frame rate, codec etc and trim, crop video and add srt subtitle. It is a worthy alternative to MakeMKV. – Official Website

Avidemux

Avidemux is a free video editor and convertor for cutting, filtering, and encoding tasks. It supports many file types, including AVI, DVD compatible MPEG files, MP4 and ASF using a variety of codecs. It is available for Linux, BSD, Mac OS X, and Windows operating system. Binaries available here are freely redistribute for covering mounting CD/DVD and download site. It is one of the best alternatives to Handbrake. Avidemux can be also used in place of MakeMKV. –Official Website


Related Articles:

Rip Blu-ray to Western Digital Media Server for Samsung Ultra HD TV

Camille Wesley No Comments


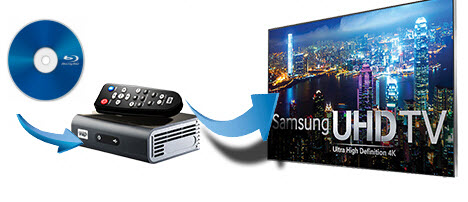
A viewer wrote in asking how he can backup his old Blu-ray collection to Western Digital Media Server for his Samsung Ultra HD TV. He wants to get rid of the trouble in taking too much time to find the disc he want from the bookshelf with a large number of discs. The viewer said he never tried to rip Blu-ray discs but recent years he often heard about Blu-ray rip. Many of his friends have chose to migrate their Blu-ray discs to media server or personal cloud storage in Home Theater and he wants to have a try now.

If the viewer knows of Blu-ray ripping, he should be aware that in the Blu-ray to WD Media Server migration, a Blu-ray Ripper is a necessary. Since he is a newbie in Blu-ray backup, here I want to use the most simple steps to help copy Blu-ray to WD Media Server with Samsung Ultra HD TV supported format.

Follow the steps one by one to rip Blu-ray to WD Media Server for Samsung UHD TV

Step 1: Download and install Blu-ray to WD Media Server/Samsung TV converter at: 

For Windows: http://www.multipelife.com/download/bytecopy/bytecopy_setup.exe
For Mac: http://www.multipelife.com/download/bytecopy-mac/bytecopy_setup.dmg

I will explain why I choose Pavtube ByteCopy at the bottom of the guide.

Step 2: Run the software on your computer. Then insert your Blu-ray to external Blu-ray drive. Click “File” > “Load from disc” on the interface to load Blu-ray movies to the program.

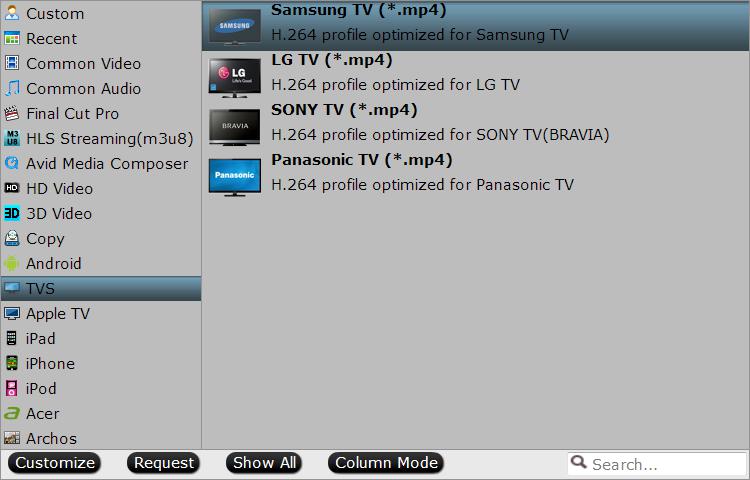
Step 3: Navigate to “Format” > “TVS” > “Samsung TV (*.mp4)”. This is one of the reasons that I choose Pavtube ByteCopy in that it has optimized preset for Samsung/LG/Sony/Panasonic TV. Sweet design.

Step 4: Press on “Browse” to set the target folder to place your generated Blu-ray rips.

Step 5: Hit “Convert” at the bottom right corner to start to backup Blu-ray to WD Media Server with Samsung UHD TV most compatible format. When the process ends, just locate the Blu-ray rips in this folder.

Step 6: Upload the Blu-ray rips to WD Media Server for Samsung UHD TV:

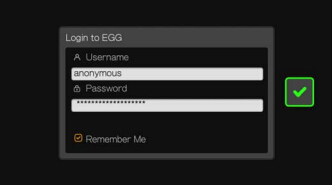
1. When accessing a network resource, you need to enter in the user name and password for the device or account using the on-screen keyboard. In some cases, a WD TV Media Player default anonymous login displays if no password is set for the device. When this happens, accept the default login, select the green tick , then press OK.

2. Select Remember Me and press OK to have the media player remember the user name and password for the resource.

3. If the media player has an active network connection, any USB drive connected to it can serve as a network drive. This allows you to transfer files between your media player and your computer. This feature is applicable to a PC running the Windows® XP, Windows Vista®, Windows 7, or Windows 8 operating systems, as well to a Macintosh® computer running Mac® OS X® Leopard® or Snow Leopard®.

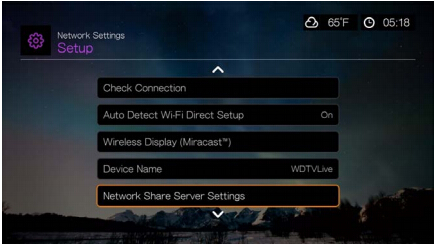
4. Navigate to the Home | Setup menu bar.

5. Press / to select Network Settings, then press OK.

6. Press / to select Network Share Server Settings and make sure the option is set to On for the Windows Share Server or Mac Share Server as appropriate.

7. Note the name indicated in the Device name field. This will help you identify your
media player on the network.

Connect a WD TV to your network using the ethernet port on the back, and then plug a HDMI cable in from your Samsung Ultra HD TV and power it on and it will instantly find Western Digital Media Server on the network, making your media collection instantly available. Now, you can enjoy Blu-ray movies on Samsung UHD TV via WD Media Server.

Reasons for I choose Pavube ByteCopy to rip Blu-ray to WD Media Server for Samsung TV

Reason 1: If your only demand for the Blu-ray Ripper is to backup Blu-ray to WD Media Server for Samsung UHD TV, the below are the two points I love:

*Pavtube ByteCopy can rip any commercial Blu-ray discs with various encryption, like AACS, BD+, Region Codes, etc.
*It has most compatible preset for Samsung TV as I mentioned above.

Reason 2: Pavtube ByteCopy is not a open-source. If I pay for a Blu-ray Ripper, I hope that the software can be powerful enough to meet all my needs about Blu-ray/DVD ripping. The discussion is that Pavtube ByteCopy deserves the money.

> The Blu-ray Ripping tool can rip Blu-ray/DVD to H.265, M3U8, MP4, MKV, AVI, MOV, M4V, etc.
> Has optimized preset for mainstreaming multimedia players and video editing tools, like iPhone, Androidtablet/phone, Microsoft Surface, PSP, PS3, FCP, iMovie, TV, etc.
> Extract FLAC , MP3, WMA, etc audio from Blu-ray/DVD audio and Blu-ray/DVD movie background music.
Extract srt subtitle from Bl-ray/DVD movies.
> Keep DTS 7.1/5.1 audio while ripping Blu-ray.
> Output lossless MKV with multiple subtitle/audio track and all chapter markers.
Full disc copy Blu-ray/DVD movies and copy the main title of Blu-ray/DVD movies.

Sadly, Pavtube ByteCopy only provides trial version for free. And the output video in trial version will have watermark in the middle. But I think it is enough for a green hand to use the free meta version to practice the Blu-ray ripping skills. If you want the perfect paid version, click the links below:
For Windows: http://www.multipelife.com/bytecopy/purchase
For Mac: http://www.multipelife.com/bytecopy-mac/purchase

Related Articles:

Rip Blu-ray/DVD for MX Player on Android Phone/Tablet

Camille Wesley No Comments

Among lots of media players, MX Video Player must take a position. It is a free video player for Android Phone/Tablet that comes with support for almost every video file format known to date along with multiple subtitle files such as mkv subtitle track, .srt, .sub, .ass, .mpl, .psb etc. Many people installed the MX media player on their Android phones/tabletss for their video playback needs.


Although there are quite a few video players available for Android users, MX Video Player simply has the edge when it comes to finding a player that combines optimum quality video playback options with a host of video formats. MX Video player supports all the popular video file formats including:

  • avi
  • mpeg
  • mp4
  • wmv
  • divx
  • xvid
  • mov
  • flv
  • vob
  • 3gp
  • and more…


But here, what we want to talk about MX Player is whether we can play Blu-ray/DVD movies with MX Player on Android phone/tablet since the media player is so powerful. If you know about Blu-ray/DVD ripping, this can be realized by ripping Blu-ray/DVD to MX Player supported format with a Blu-ray/DVD Ripper

Pavtube ByteCopy ranks top in the Blu-ray ripping softwares. It can easily help you rip and backup Blu -ray/DVD to MX Player accepted format by the following features:

>Break down the encryption in BD&DVD discs, including AACS, BD+, Disney encryption,  region codes, Sony encryption, etc.
>Convert Blu-ray/DVD to MP4, MKV, AVI, XviD, FLV, VOB, 3GP, etc for viewing on MX Player.
>Allows users to adjust video/audio size, codec, bitrate, frame rate, sample rate, channel to get more compatible video for MX Player.
>Also can rip Blu-ray/DVD to Windows Media PlayerQuickTimeVLC and other popular media players, like Asus O! Play Mini V2MP018 Full HD Media Player.
>Compatible with Windows 10/8.1/8/7/XP, etc
>Has the equivalent Mac version which supports OS X El Capitan, Yosemite, Mavericks, etc

Free download and install:
          

Other Download:
– Pavtube old official address: http://www.pavtube.cn/bytecopy/
– Cnet Download: http://download.cnet.com/Pavtube-ByteCopy/3000-7970_4-76158512.html

How to rip Blu-ray/DVD to MX Player on Android Phone/Tablet?

Step 1: Load Blu-ray/DVD movie on PC

Click “File” > “Load from disc” to load Blu-ray/DVD movie to the app. You can choose your desired subtitle and audio below the chapter list. And this app supports batch conversion so that you can add more than one Blu-ray/DVD movies at a time. 


Step 2: Choose suitable format

Since MX Player supports many video formats, you can choose MP4, MKV, AVI, etc in “Common Video” and “HD Video”.

Note: The key feature of Pavtube ByteCopy is that it can output lossless MKV with multi-track audio/subtitle and all chapter markers. So you can choose the format in “Multi-track Video” profile.


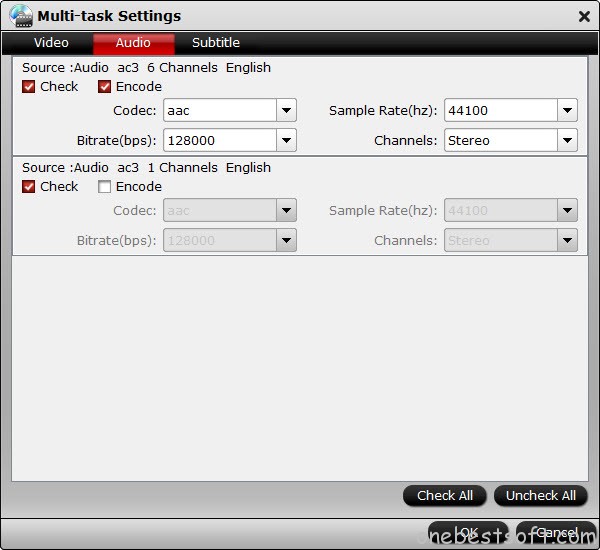
Tip: If you want to customize your own video you can click“Settings” option, which allows you to make adjustments on your audio, video, subtitles. It’s worth mentioning that, by default, all audio & subtitles tracks in a source file are checked to be saved in the MKV container, if there are some tracks you don’t like, you can go to Multi-task Settings window to uncheck and remove them under Audio tab and Subtitle tab. 


Step 3. Start ripping Blu-ray/DVD to MX Player

Hit the big Convert button, it will start converting Blu-ray/DVD movies to  MX Player in suitable video format.

Transfer the ripped Blu-ray/DVD movies to Android devices. Then you can enjoy favorite Blu-ray/DVD movies with MX Player on Android phone/tablets.

If you have many iTunes purchased movies and want to remove the DRM to transfer the iTunes movies to Android devices, you can use Pavtube ChewTune

Money saving tip – Software Bundles:

Pavtube ByteCopy($42) + Pavtube ChewTune ($29) = $54.9, Saving $16.1
That means, you can get a top-ranked DRM removal program only if you paid more $12.9.

Related Articles:

How to Stream DVD from computer to HD TV Using chromecast?

Camille Wesley No Comments

Outputting your computer to your HDTV via HDMI works well. Unfortunately, your computer’s placement depends upon the length of the cable. With Google Chromecast, however, you can literally mirror any browser tab or even your desktop, from anywhere, in just a few clicks. Based on the benefits, many people just wonder that if they can stream their DVD movies from computer to HD TV via Chromecast.


If Chromecast can cast your other movies from computer to HD TV, why not try to cast DVD? The reasons you are suspicious of the feasibility probably are the DVD copy protection and the incompatibility with Chromecast. What if we change DVD “disc format” to a Chromecast supported video? What is the difference between the normal MP4 video and MP4 video extracted from DVD? I don’t think they are different. 

What’s more, this kind of DVD Ripping is not a tough job with the help of Pavtube BDMagic. It is a integrated DVD Ripper that can remove any encryption in DVD discs and convert it to Chromecast supported MP4, AVI, MKV, FLV, MOV, VOB, 3G2, etc. It also allows you to choose audio and video codec in DVD ripping process in that Chromecast only is compatible H.264 video and AAC, MP3 audio. You can learn its other function in its review

Free download and install: 
          

Other Download:
– Pavtube old official address: http://www.pavtube.cn/blu-ray-ripper/
– Cnet Download: http://download.cnet.com/Pavtube-BDMagic/3000-7970_4-75922877.html

How to convert DVD to Chromecast accepted format?

Step 1: Import DVD to software

Click “File” to load the DVD movies to the app. It can automatically detect the main title to convert so you don’t need to check the chapter by yourself. You can choose your desired subtitle and audio track under the chapter list. 


Step 2: Choose output format

Here, you not only need to consider the supported format of Chromecast but you also should take the TV accepted format into consideration. Pavtube has optimized preset for Sony/LG/Panasonic/Samsung TV, they normal are MP4 format with the most compatible video/audio spec with the TV. If your TV is one of the brands, you can select it as the target format. 

On the other hand, if yours are other HD TV, you can simply choose MP4, HD MP4 in “Common Video” and “HD Video”.


Tip: If you chose MP4 instead of the optimized preset, you can adjust video/audio parameter on your own in “Settings”. 

Step 3: Start to convert DVD

Back to the UI, hit “Convert” to begin DVD ripping process. You can locate the generated video in output folder.

Mirror the movies from Computer to TV Using Google Chromecast

The setup of desktop screen sharing is very simple and straightforward.  You do not need any additional software or hardware.

1.In Chrome browser, click the Google Cast button, you will see the available Chormecasr devices in your network as shown below.


2.You can click the arrow icon in the right. The  options will be shown as:

  • Cast current tab. This is the default. The Chromecast tab will be cast to Chromecast.
  • Cast entire screen (experimental). This will share the desktop screen, not just a Chromecast tab, to Chromecast.
  • Audio mode. This will only send audio output to Chromecast. The screen or Chrome tab will not be shared.


3. You can click “Cast entire screen (experimental)” to start the desktop screen sharing.

Note: before sharing the desktop screen with the Chromecast device, there is a warning message letting you know that Google cast wants to share the screen and audio output (with Chromecast). You must click “Yes” to approve the screen sharing.

4.Once the desktop screen is shared to Chromecast, Google cast will indicate the screen is being captured and played on the Chromecast device.


Once the desktop screen is shared to Chromecast, Google cast will indicate the screen is being captured and played on the Chromecast device.

Now, the the desktop screen and audio is shared to Chromecast. You should be able to enjoy the ripped DVD movies on your TV.

Related Articles:

How to Play TiVo Recordings on Android Tablet/iPad while traveling?

Camille Wesley No Comments

Movie enjoyment shouldn’t be limited at cinema and home. There are many occasions where you can watch a film or TV Show which you always have no time to enjoy before. For example, you can enjoy a episode of the Vampire Diaries with your iPad in the metro or make your children watch Home Alone with their Android tablet in the RV when you are tripping so that they won’t disturb you when you are driving. Moreover, you may record your loved TV Shows with TiVo, so you can watch the TiVo recordings on your iPad/Android tablet in the family trip on Sundays to get relaxed. 


However, although TiVo released its offical Android app to allow TiVo customers to use Android device to access TiVo shows via Wi-Fi, but that is restricted to enjoying TV recordings at home. So if you’re frequent traveler, a question may come up like this – How can you get TiVo recordings played on Android tablet on the go? On the other hand, if you are an iPad user, you still convert TiVo recordings to iPad acceptable format. So it seems that a TiVo recordings converter is the key in the TiVo recordings playback on iPad.Android tablet.

Here, I recommend you Pavtube Video Converter Ultimate. It is a dynamic video convert tool that can help users convert TiVo recordings to iPad/Android tablet supported video format with high output video quality and fast encoding speed. It has optimized preset for iPad and Android tablet while you still can choose MP4, or HD MP4 for both iPad and Android Tablet. Besides, you are allowed to edit the videos by trimming, cropping, adjusting video effects, etc. to get the wanted part and effects as you like.(review) now, download the TiVo converter and follow the steps to convert TiVo recordings to iPad/Android tablet.

Free download and install
          

Other Download:
– Pavtube old official address: http://www.pavtube.cn/blu-ray-video-converter-ultimate/
– Cnet Download: http://download.cnet.com/Pavtube-Video-Converter-Ultimate/3000-2194_4-75938564.html

Part 1: Transfer TV recordings from TiVo to PC

First, you need to transfer the TiVo recordings to PC. Make sure your TiVo and computer are in the same home network, and follow this guide to proceed TiVo file transfer:

1.On your PC, launch TiVo Desktop for PC (click to download), the freeware that transfers shows from your networked TiVo box to your computer.

2.Click “Pick Recordings to Transfer.” A window showing your TiVo box’s “Now Playing” or “My Shows” list appears.


3.Highlight any title in the list to see more information about the show. Check the box next to the title of the show (or shows) you want to transfer.

4.Click “Start Transfer.” Transfer times vary, but may take as long as the show’s duration to complete the transfer.


Part 2: Convert TiVo recordings to iPad/Android Tablet

Step 1: Download and install TiVo converter (Mac version).

Step 2: Launch TiVo Converter, press “Option”icon first and enter TiVo Media Access Key to “Tivo” tab. Then hit the “Load file(s)”icon to import TiVo recorded videos to this TiVo converter. Since the app supports batch conversion so you can import more than one TiVo recordings at a time. 


Tip 1: How to find your Media Access Key on TiVo: Go to “TiVo Central” menu >> “Messages and Set Up” >> “Account and System Information”, and you will see your Media Access Key there.

Step 3: Click “Format” and select an output profile for your Android tablet/iPad. There are optimized presets for iPad,  Samsung, Kindle Fire HD, Google Nexus, Asus Transformer, Acer, Archos and more. Basically the “Common Video >> H.264 Video (*.mp4)” is an universal format for Android tablets and iPad.


Tip 2: To adjust video and audio parameters like codec, aspect ratio, bit rate, frame rate, sample rate, you could click on “Settings” button. Keep in mind that the file size and conversion quality is based more on bitrate than resolution (bitrate higher results in big file size, and lower visible quality loss, and vice versa). According to my experience, for watching videos on an Android phone or tablet, 720p with 1500~3000kbps (depends on what device you use) is just all right.

Step 4: Click Convert button to start TiVo recordings to iPad/Android tablet. The conversion process will take a while, and you’ll see an encoding progress bar. Once the process ends, you can locate the converted TiVo recordings in the output folder.

Finally, transfer the converted TiVo recordings to iPad/Android tablet. You can play the TiVo recordings on your tablet on the go or at home as you like now.

Related Articles:

How to Rip 4K Blu-ray to Sony FMPX10 4K Ultra HD Media Player?

Camille Wesley No Comments

4K is the trend in the future, no matter on media player or the development of Blu-ray. Sony has released its 4K media player – Sony FMPX10 4K Ultra HD Media Player to meet the demand. And later, it will release its own 4K Blu-ray. But the interesting thing is its 4K media player can’t play its 4K Blu-ray. Of course, the normal 4K media players won’t play the disc directly. So is there a way to play 4K Blu-ray on Sony 4K Media Player?


Sony FMPX10 4K Ultra HD Media Player has a built-in, 1TB hard drive storage of personal 4K videos. So you can rip your 4K Blu-ray to the media player. But keep in mind, only Blu -ray ripping for personal usage is legal. 

Now, get Pavtube BDMagic or the equivalent Mac version to start to rip 4K Blu-ray to 4K MP4 for Sony 4K Media Player. 

Free download and install Windows Blu-ray Ripper: 
          

Free download and install Mac Blu-ray Ripper:
          

The tutorial below is suitable for both Window and Mac product while the snapshot is Windows version.

How to Rip 4K Blu-ray to Sony 4K Media Player?

Step 1: Add 4K video to app

Run the right Blu-ray Ripper version on your computer. Click “File” to load the Blu-ray movies to the program. You can choose desired subtitle in “Subtitle” below the chapter list.


Step 2: Select suitable format

Here, you are suggested to choose “H.264 HD MP4” for the Sony FMPX10 4K Ultra HD Media Player. 


Tip: You can see the parameters and the size of your video in “Settings”. What’s more, you can adjust them if needed.

Step 3: Start to rip 4K Blu-ray

After all the settings is completed, hit right-bottom “Convert” button to start to rip 4K Blu-ray to MP4. You can locate the generated video in the output folder.

Key Features of Pavtube Blu-ray Ripper:

  • Rip and backup any commercial 4K Blu-ray to 4K/1080P/720P/540P MP4/MKV/AVI/MOV, etc video with original video quality
  • Convert 2D/3D Blu-ray to 3D MP4/MKV/AVI/MOV for VR Theater Application
  • Make entire copy of Blu-ray and directly copy the main title of Blu-ray movies.
  • Allows uses to decide the video quality and video size by making them adjust video bitrate, resolution, frame rate and codec on their own.
  • Built-in video editing tool enables you to trim and crop video. Even add subtitle and replace audio in the Blu-ray ripping process


Related Articles:

Top 5 Free Media Players 2016– Free Download Media Player Software Now

Camille Wesley No Comments

Movies rich our life. Maybe that’s the reason why so many movies are released in every year. You probably have many movies and TV shows in your hand now. Playing them on your computer is easy, but if you do a lot of downloading or ripping, you need a video player that’s lightweight, can handle virtually anything you throw at it, whether it has subtitles, was encoded a long time ago with some obscure codec, or came in a strange file format. This time we’re looking at 2016 top 5 free media players, based on your nominations.


I have to remind you that no matter you are a Windows user or a Mac user, there is a default media player on your computer. Windows users can rely on Windows Media Player, while Mac owners have QuickTime Player.  Nevertheless, for limited supported video format/codec or the interface, whatever, many people still want to look for third-party best media players. Here, let’s list the top 5 free media players 2016 on Win/Mac.

Top 1: Kodi/XBMC (Windows/OS X/Linux)


Kodi/XBMC is more than just a media center application – it’s also a highly configurable player that you can use on a desktop or laptop to get a real media center experience on screens large and small. While it’s obviously great on a big screen connected to an HTPC, it works just as well on your desktop connected to a large external display, or on your laptop’s 15″ display while you’re on a train or plane. XBMC is open source, available for Windows, OSX, Linux, and a number of other platforms. XBMC can seriously play just about anything under the sun without worrying about file format, encoding, codecs, or even subtitles—if they’re in the same place as your video, XBMC can handle it for you. XBMC can also retrieve useful information from the web for you, like movie and TV show information, ratings, episode order, and more, and it’ll show all of it to you as you browse and select what you want to watch. It also handles music and streaming video beautifully, and is ridiculously customizable thanks to its wide variety of third-party plugins.

Related: Play Blu-ray on Kodi/XBMC | Watch DVD on Kodi/XBMC | Transfer iTunes to Kodi/XBMC 

Top 2: VLC Media Player (Windows, Mac OS X, Linux)


VLC has held the media player crown for years, even before graduating from its beta phase in 2009. The free, open-source software is capable of playing just about any media format you can imagine, including Internet radio and other various streaming protocols. Although the default interface is plain and sleek, stuffed with various playback icons wrapped in a gun-gray design, the software also features an assortment of customization options for quickly swapping viewing modes and tweaking the toolbar with additional controls.

The playback quality is top-notch regardless of viewing mode — as are the intuitive video effects for interactive zooming, video capturing, blurring, and mirroring images, among others – but you’ll have to look elsewhere if you’re looking to play HD Blu-ray discs since the program is currently incompatible with them (except for a complicated workaround).

Related: Play H.265 on VLC | Watch 4K in VLC | Play Blu-ray on VLC 

Top 3: Plex (Windows, Mac OS X, Android, iOS)
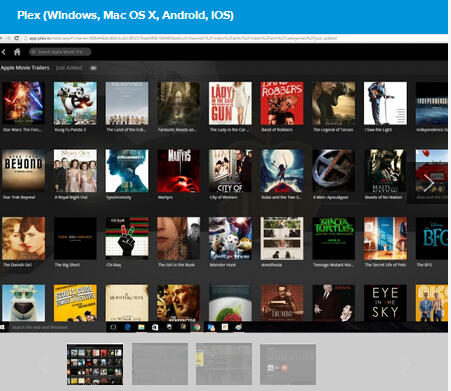


Media consumption in the year 2015 can be a very involved process. Not only are there dozens of services to juggle — i.e. Netflix, iTunes, Hulu Plus — but many consumers have more than one device within their arsenal. Jumping back and forth between tablets, TVs, laptops, and every other piece of hardware can be a pain.

Plex aims to streamline consumption, bringing together all of your services and devices under a single, unified platform. Users can add folders and files they want to their Plex library, after which they can stream them to any device capable of running Plex. For example, a movie saved on a hard drive can be watched through Plex’s browser app, or streamed to the Plex app on a tablet.

Related: MKV to Plex | DVD to Plex | Blu-ray to Plex 

Top 4: 5KPlayer (Windows & Mac)

5KPlayer is a new fast-emerging media player. New comer as it is, it can stand up to the competition of best media player due to many reasons. It is lightweight and clean. After launching this player, the first thing to catch your sight is the straightforward, modern and self-explaining interface and layout. You know what media files it can play right away while looking at the main window. It can play video media files in MKV, MP4, AVI, FLV, HEVC, AVCHD, M2TS, MOD and all video formats with 8K/5K/4K UHD/1080P HD/SD quality, audio music media files in MP3, AAC, M4A, APE, FLAC and other audio formats, as well as regular and copy-protected DVD discs, ISO files and DVD folders. It comes with all useful setting options you may need, like rotate, video tuner, deinterlace, equalizer style, create playlist, select audio/subtitle track, and so on. Moreover, it keeps updating to meet users’ new needs, for example, play video media files on new Windows 10.

Top 5: The KMPlayer(Windows only)

When everything comes down to using a media player that is feature rich and easy to use, KMPlayer definitely stands out. Also known as K-Multimedia player or KMP, it offers many advanced features, supports a wide range of codecs and formats, is extremely customizable and is available in multiple languages.

A minimalistic, user friendly and functional interface, all the options are available to you on right click in the main window which gives access to the players extensive features. The player offers quick playback and a fully skinable interface that change upon every new playing track..Its simple enough to use for an average person but don’t be deceived by its simplicity, its offers a powerhouse of configuration options and its strong user base and its active official forum helps you out whenever you run into a problem with the player.

For media playback, it includes almost all the essential decoders required built in. Additionally KMP also supports 3rd party codecs and also doesn’t install the codecs on the computer like other codecs do. Most public codec packs+players forces codecs to register on your computer, while KMP does not. This means that installing KMP will not affect your computer at all.KMPlayer used to be my top pick until recently i found PotPlayer, but nothing stops me from using this advanced media player. KMPlayer gets special mention though, feature wise outwitting every other media player in its category. 

The Bottom Line

Finding an all-in-one media player is impossible because each media player will have its own lack of certain video codec/formats. After we used several separate programs to play MP3 files, streaming media from Real, Mpeg files, Quicktime movies, CDs and DVD discs, we selected these 5 media players as the top 5 media players 2016 in light of the popularity, codec/format incompatibility and computer operating system compatibility. 

Get All-in-One Blu-ray/DVD/Video Converter for any media player

Since no media players can play any 4K/SD/HD video as well as unencrypted/encrypted Blu-ray/DVD, an all-in-one media solution is Pavtube Video Converter Ultimate with the ability of ripping any Blu-ray/DVD disc and convert any video.

Functions of Pavtube Video Converter Ultimate:

  • Remove any complex encryption in Blu-ray/DVD
  • Convert Blu-ray/DVD/4K/SD/HD to MP4, MOV, MKV, WMV, M4V, M3U8, etc for all media players
  • Equip with H.265,H.264, DivX, XviD, MPEG codec
  • Allows users to adjust video/audio bitrate, frame rate, channel, size, sample rate to get better media experience.
  • Extract audio from Blu-ray/DVD/Video and then convert to popular audio format; remove audio from movie files


Free download and install
          

Other Download:
– Pavtube old official address: http://www.pavtube.cn/blu-ray-video-converter-ultimate/
– Cnet Download: http://download.cnet.com/Pavtube-Video-Converter-Ultimate/3000-2194_4-75938564.html

If your default media player can’t satisfy you, find the best alternative in the top 5 media players 2016 or just choose to convert the unsupported format to supported format with video converter. 

Related Articles:

Rip and Backup Family DVD to NAS for Viewing via Kodi on Samsung TV 55 inches

Camille Wesley No Comments

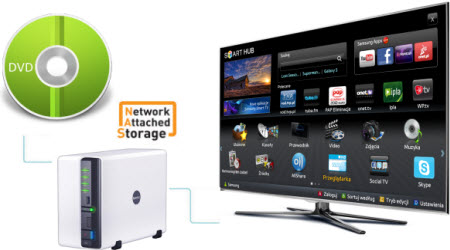
People have higher and higher demand on DVD playback. At the beginning, people play DVD with heavy DVD drive and player. Later, people want to put DVD to NAS so that they can play it at anywhere with multiple devices:

“I want to convert family DVD to MP4 video film to be put on a NAS for Media playback into the entertainment room, on the TV, at my house (personal use). Also, some commercial DVD that we bought and want to make them available also on my NAS so that I can play them with Kodi Media Player on the Samsung TV 55 inches connected directly to the NAS thru HDMI..”


If your DVD have no copy protection, Handbrake would be a nice choice for its free. But for commercial DVDs, you have to search for a powerful enough DVD Ripper that can succeed in breaking down the DVD encryption. Pavtube BDMagic should be your first consideration. It can convert any commercial and region-locked DVD to NAS with both Kodi and Samsung TV supported format. What’s more, it has optimized preset for Samsung TV so that you needn’t adjust video/audio size, bitrate, frame rate, channel on your own in “Settings”. 

Hot Search: Sony 4K XAVCS on Samsung TV | Blu-ray on Samsung 4K TV | MKV to Samsung TV 

Free download and install: 
          

Other Download:
– Pavtube old official address: http://www.pavtube.cn/blu-ray-ripper/
– Cnet Download: http://download.cnet.com/Pavtube-BDMagic/3000-7970_4-75922877.html

How to Convert Family DVD to NAS for Viewing via Kodi on Samsung TV 55 inches?

Step 1. Add DVD disc movies.

Insert yourDVD disc into an DVD drive, run the program on your computer, on the main interface click “File” > “Load from disc” to import the DVD disc to the program.


Step 2: Specify output file format.

Click “Format” drop-down bar, scroll down to select “TVS” > “Samsung TV (*.MP4)” as the output file format for directly playing on Samsung TV.


Step 3: Start DVD to Samsung TV format conversion process.

One click the big button “Convert” on bottom-right corner to start conversion.

After the conversion, click Open button to find the output files. Make sure the wireless network connection is accessible among the NAS and Samsung TV. Then just enjoy the high quality DVD movies with Kodi player on Samsung TV. 

Get Christmas Pavtube BDMAgic Coupon on Pavtube Official Site and Pavtube Facebook

Related Articles:

Convert MKV to WMV for Windows Media Player

Camille Wesley No Comments

MKV video is well-know and wildly accepted by its open source and unlimited video/audio streams holding ability. MKV also quite popular on the internet for sharing HD video content, like cartoon and anime. Normally the Windows Media Player latest version on Windows 10 supports MKV file support. But there are still many people that can’t play MKV in Windows Media Player. Moreover, still many people didn’t update to Windows 10. 


Windows Media Player is the default media player on Windows. So if you just want to play MKV on Windows, you can try another media player supporting MKV file, like VLC. Or, you can choose to install codec pack in Windows Media Player to add support for MKV. However, many people don’t like to install any extraneous codec packs. In this case, you also can achieve MKV playback in Windows Media Player by converting MKV to WMV, the best video format for Windows Media Player.

If you choose the third way to get the MKV streaming on Windows via Windows Media Player, you need a MKV to WMV converter. Pavtube Video Converter Ultimate is a top-selling MKV converter in the filed. This MKV to WMV converter tool allows the user to encode video files from MKV format to WMV extension. It can also convert various other file formats, like AVI, Blu-ray into WMV file extension for Windows Media Player. This free software program supports batch processing and drag and drop method. The users can easily initiate the conversion process by selecting the name, file extension and the output destination. The program also allows the users to alter the video and audio encoding bit rate. 

Free download and install
          

Other Download:
– Pavtube old official address: http://www.pavtube.cn/blu-ray-video-converter-ultimate/
– Cnet Download: http://download.cnet.com/Pavtube-Video-Converter-Ultimate/3000-2194_4-75938564.html

How to Convert MKV to WMV for Windows Media Player?

Step 1. Load MKV video files.

After free Downloading and install this MKV to WMP Converter software (Mac Version), open it and select the MKV files by pressing “Add Video” button. You can also add your recorded video on some important day. 


Step 2. Select output format for Windows Media Player.

Click “Format” menu you will find various video formats listed by different devices. Just choose a compatible video format for Windows Media Player. You can choose “Common Video” > “WMV 2 (WMV8)(*.wmv)” as the output format, or select “HD Video” and choose “WMV HD(*.wmv)” as the output format.


Tips: Click “Settings” on the interface and you can adjust the parameters including size, bitrate, frame rate, etc. to get a high quality of output files. And keep the settings the same as original video will provide you the least loss of video quality.

Step 4. Start conversion.

Click the “Convert” button to start MKV to WMV conversion. When it completed, click the “Open” button to get the generated videos for Windows Media Player.

Add the media to Windows Media Player library to test. It should be able to play the converted MKV video in Windows Media Player. If it still doesn’t work, connect Pavtube Support team at Windows Email: dvdwinsupport@pavtube.com. Mac Email: dvdmacsupport@pavtube.com.

Related Articles:

Top 15 Addons for kodi 2016

Camille Wesley No Comments

My best live tv and best music add-on pages proved to be very popular and for some unknown reason I have not, until now, done a list of the best movie add-ons for Kodi.


As with the other ‘best of’ pages this will be a constantly updated page where I will add any new add-ons that come along and remove any old ones that go down.

Genesis – An add-on that everybody knows. This is without a doubt the most popular add-on for Kodi. Great features include: integrates well with Trakt and IMDB; Kodi Library integration; add accounts from Real Debrid, Ororo TV and many more; allows downloads

SALTS – Another of the more popular movie add-ons for Kodi. Features include: Trakt integration; Kodi Library integration; allows downloads; enable/disable scrapers

123Movies – A nice one click and watch movie add-on from the Mucky Duck repo

1Channel – One of the oldest movie add-ons but still going strong and very popular. Features include: Kodi Library integration

Movie Night – A decent source for one click movies. Available through the Metal Kettle repo

HuluBox – For fans of the one click and watch type add-ons this is a good choice. Categorised in genres and recently added.

IceFilms – Everybody nows IceFilms, nothing really needs to be said about this except for you will find everything you want. Features include: Add Real Debrid account; Downloads; Create watch queue; Resume support

Latest Dude – A relatively new add-on but a nice option for 1080 and 720 movies

Movie4k.to – Nice movie add-on that gets content from the Movie4k.to website. (Updated Dec 4th)

Movie Hut – Another relatively new movie add-on. Nothing great but something you can fall back on for reliability.

Navi-X – You can search for any movie on here and find lots of different versions including 3D, 4K, 1080

Phoenix – One of the most famous Kodi add-ons. This has various sections ran by different members of the Kodi community. The Rockcrusher section is constantly updated with high quality movies. The Her Place section offers a more female-friendly choice of movies (I know you ladies like the same as us but there are some which you definitely prefer more), there is also a kids section in Her Place too. The One242415 section offers a nice set of collections for those who like to browse by genre. The Staael section offers HD movies from 2013, 2014 & 2015 (Updated Dec 4th)

UK Turks – There are 2 sections in here dedicated to movies: Classic Movies and Turkish movies. The classic movies section offers classic movies from various genres and decades and the Turkish section offers Turkish movies

Yify Movies HD – The name of the add-on is slightly misleading as it’s not HD quality, it’s good and movies load quickly and it is a one click and watch rather than click and pick a source. A decent add-on to have.

XMovies8 – A nice one click movie add-on from Metal Kettle. Gets content from the xmovies.co website (Updated Dec 4th)


Source: https://seo-michael.co.uk/the-best-movie-add-ons-for-kodi/

Check out other Kodi Articles:

The Best Way to Play MKV on Roku 4 with Subtitle

Camille Wesley No Comments

Officially, the Roku 4 supports H.264 MKV. But when someone is playing the rips of Blu-ray/DVD movie collection (MKVs with no transcoding of the audio, video, etc), some noticed that many of the MKVs were not playing (“corrupt”). Why? After a bit of investigating I narrowed this down to subtitles. When we ripped our movies, many people tended to rip all of the subtitle tracks even though they would be pretty unlikely to use most of them. The Roku Media player (at least via DLNA) is unable to handle a MKV with multiple subtitle tracks.


Roku 4 does not support DVD (VOB) and blu-ray (PGS) subtitle formats. The only subtitle format supported by Roku is the SRT subtitle format with UTF-8 character encoding. When you rip Blu-ray/DVD to MKV with multiple subtitle/audio, the subtitle format kept often is PGS that can’t be displayed on Roku 4. 

So if you want to play your MKV file on Roku 4, you have two choices: 1.  Remove extra subtitle track by using MKV editing tools. 2. Add external SRT subtitle to MKV video. I saw the method 1 in Roku forum while it didn’t provide an effective MKV editing tool to remove certain subtitle track indeed. But I know how to add external subtitle to MKV file. 

How to Add external subtitle to MKV for playing on Roku 4 with subtitle?

Part 1: Find the associated subtitle

1. You can go and find the proper subtitles in some subtitle sites. Here are several famous and reliable subtitle websites for you to get the subtitles you want for your MKV videos.

http://www.moviesubtitles.org/
http://subscene.com/ 
http://www.subtitles.hr/

2. Perhaps, you also can extract the suitable srt subtitle from your source Blu-ray/DVD movies. You can refer to the guide: How to Extract SRT Subtitle from Blu-ray/DVD, BDMV, ISO?

Part 2: Add external SRT subtitle to MKV file

Step 1: Download Pavtube Video  Converter Ultimate on your Windows or iMedia Converter for Mac on Mac. They can help you add SRT/ASS/SSA subtitles to your MKV/AVI/MP4, etc videos.

Free download and install
          

Other Download:
– Pavtube old official address: http://www.pavtube.cn/blu-ray-video-converter-ultimate/
– Cnet Download: http://download.cnet.com/Pavtube-Video-Converter-Ultimate/3000-2194_4-75938564.html

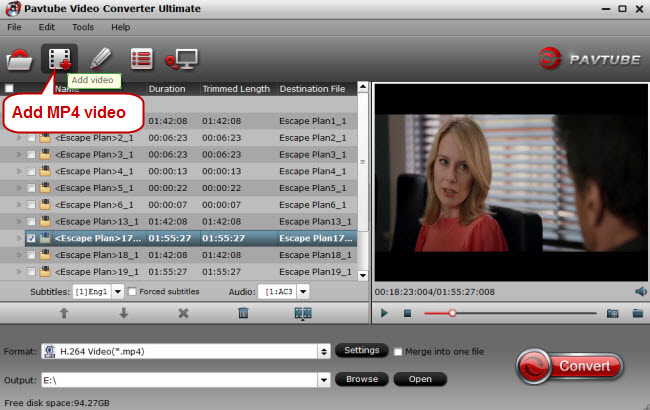
Step 2: Run the right version app on your computer and import your MKV videos to it by clicking the “Add video” icon to import MKV video. (Snapshots are based on Windows version)


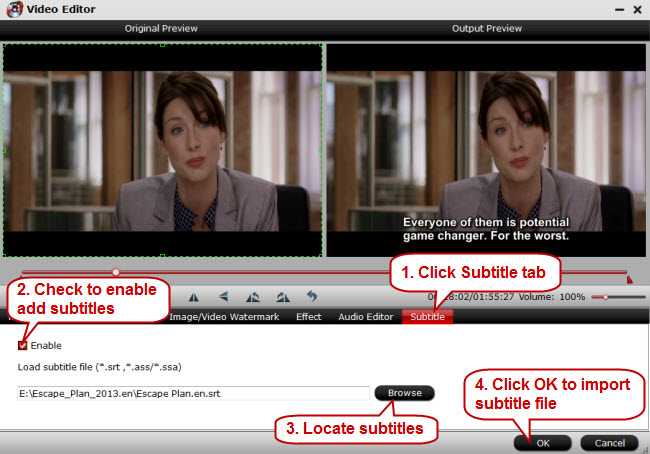
Step 3: Click “Edit” or the pencil icon  to switch to the editing interface, where you can find multiple editing functions and “Subtitle” is just one of them. Click the “Subtitle” tab and check the “Enable” box to allow you to add SRT/ASS/SSA subtitles to MKV videos. Then Click “Browse” to find and import the downloaded SRT/ASS/SSA subtitles.


Note:  Pavtube Video Converter Ultimate only supports SRT/ASS/SSA subtitles, and make sure that the subtitle file and your MKV video files are kept in the same folder sharing the same name.

Step 3: Go back to the main UI and click “Convert” to start inserting SRT subtitles to your MKV videos. If you don’t want to keep the original MKV format, just click the format bar to choose the output video format you want before conversion.

Now, test the MKV video on Roku 4. It should has subtitle displayed on the screen. 

Roku Subtitle tips

The SRT file must be external when used with MP4 and can be either external or internal when used with MKV. When using SRT subtitles, make sure your movie and the SRT file have the same name, otherwise the Roku will not know which movie it is associated with. Plex Media Server should scan your video file and automatically download the SRT subs for you. If not, you will need to download your own SRT subtitles if needed.

If you don’t want to mess with SRT subtitles, you can also embed the original subtitles from your DVD or blu-ray movies. For DVD, you can use either the MP4 or the MKV container. For blu-ray, you have to use the MKV container as PGS subtitles are not supported with MP4. Roku may never support embedded VOB and PGS subtitles, but Plex can help you by means of transcoding.

Related Articles:
Pavtube 50% OFF Multi-track Blu-ray/DVD Ripper/Copier on 16th Dec 2015

Camille Wesley No Comments

Pavtube today announces an official start of ByteCopy for Windows/Mac in the  Round 1 phase of its Christmas promotion for All Facebook Fans50% Discount Coupon! Only 3 Day! Time-Limited! Rush to Buy! Reportedly 5 to 6 times faster as well as multi-track MKV/MP4/MOV output than a boatload of its competitors, this Windows-based program is eating up a bigger market share.


“According to our statistics, 40% more users have installed Pavtube ByteCopy in 2015 than in 2014.” “This is radically because we have made a greater dent in speed boosting and performance improving.” From most users’ feedback, for an hour and half movie, it takes roughly 5-10 minutes to make the 2D/3D Blu-ray/DVD 1:1 backup. On the flip side, ByteCopy was updated with the supports for new movies and output profiles including popular portable Apple, Android, Microsoft, Google and Sony devices, smart TVs, VR Headsets, Game Consoles, Media Player & Box Streamer, Storage & Server, Non-linear editing system and more.

      (Only $21)

      (Only $21)

What can Pavtube ByteCopy give you?

Top 5 reasons to pick Pavtube ByteCopy on PC/Mac

1. Rip and copy any commercial and region-locked Blu-ray/DVD to nearly all popular video/audio format, like M3U8, H.265, MP4, MKV, AVI, Apple ProRes, DivX, etc.

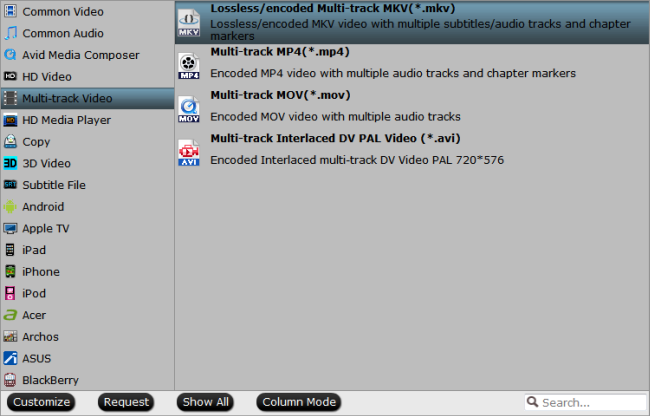
2. Lossless Blu-ray/DVD to MKV backup with multiple audio/subtitle tracks and all chapter markers and convert Blu-ray/DVD to Multi-track MP4, MOV, AVI. 

3. 1:1 backup original Blu-ray and DVD to computer hard drive with all languages, subtitle tracks and chapter info.

4. Unique feature to perfectly extract a single .srt subtitle file with chosen subtitle track from original movie.

5. Optimized preset for mainstream multimedia players: portable Apple, Android, Microsoft, Google and Sony devices, smart TVs, VR Headsets, Game Consoles, Media Player & Box Streamer, Storage & Server and more.

6. Specially designed formats included to be compatible with Mac video editing software: Apple ProRes, AIC, Avid DNxHD, MPEG-2, MOV, AVI, etc. for FCP X, iMovie, Avid Media Composer, Adobe Premiere Pro CC and more Non-linear editing system.

7. Full Compatible with Windows 10Windows 8.1, Windows 8, Windows 7, Windows 2003/XP/Vista

8. Full Compatible with Mac OS X 10.11 El Capitan, Mac OS X 10.10 Yosemite, 10.9 Mavericks, 10.8 Mountain Lion, 10.7 Lion, 10.6 Snow Leopard, 10.5 Leopard 

Expire on Dec 19, 2015

Tip 1. To reach out to Pavtube’s more Christmas Coupons, please go to http://www.multipelife.com/pavtube-2015-christmas-great-promotions

Tip 2. There are four main Pavtube products: BDMagicByteCopyDVDAidVideo Converter Ultimate. As their names suggest, they are designed for different purposes. Here is a brief form for you to make the right purchasing choice:Pavtube Softwares Comparison

Tip 3. To go deeper in user experience, Pavtube Facebook will offer more coupons with different softwares in future. The list are as follows:

Pavtube Facebook Round 2: 60% OFF DVD Ripper & Copier on Dec 21, 2015, Only 2 Day

Pavtube Facebook Round 3: 50% OFF 50% OFF Video Converter Ultimate/iMedia Converter for Mac on Dec 23, 2015, Only 4 Day

Pavtube Facebook Round 4: Only $9.9 Video Converter, HD Video Converter, MTS/M2TS Converter, MXF Converter, ChewTune, MKV Converter, FLV/F4V Converter, DVD Creator or MXF MultiMixer for Mac/Windows, on Dec 28, 2015, Only 3 Day

Pavtube Facebook Round 5: 60% OFF BDMagic for Windows, 55% OFF BDMagic for Mac on Dec 31, 2015, Only 1 Day

Constantly surprises, quickly order your favorite software to backup, edit and share your favorite Christmas movies, music, and videos. Time-Limited! Action!

If you have any problem to buy or use Pavtube, pls feel free to contact dvdwinsupport@pavtube.com (for Windows BD/DVD rippers user), videowinsupport@pavtube.com (for Windows video converters user),dvdmacsupport@pavtube.com (for Mac BD/DVD ripper user), or videomacsupport@pavtube.com (for Mac video converter user).

Learn more at https://www.facebook.com/pavtubefans/app/201742856511228/


Source site: http://i-loveshare.com/pavtube-bytecopy-christmas-promotion/

Top 3 Free MKV Players to Play HD MKV Movies on Windows (10) and Mac (10.11)

Camille Wesley No Comments

MKV is an open standard free container format that can hold an unlimited number of video, audio, picture or subtitle tracks inside a single file. Many of the videos you downloaded from torrent sites or your old personal movie collections are MKV format. Since MKV supports multiple video/audio codecs, so the MKV video you have maybe contain different codecs, which therefore leads you to download a professional MKV player to play your MKV movies. Here just shows you the top 3 free MKV players to play your HD MKV movies on Windows (10) and Mac (10.11). 


Top 1: DIVX 10 – High-Quality MKV Player

Available in 11 languages for Windows and Mac, free DivX 10 video software includes DivX Player, DivX Web Player, and DivX Converterverything you need to play, convert and stream MKV, MP4, MOV, DivX and AVI video. DivX 10 is the first free software featuring a video player and video converter with support for high-quality DivX HEVC video. DivX offers freedom like no other video format, so you can watch your movies on your computer and 1 billion DivX devices, including the PlayStation 3, Samsung Galaxy tablets and mobile phones, Blu-ray players, digital TVs and more.

Top 2: VLC Media Player

VLC (initially VideoLAN Client) is a highly portable multimedia player for various audio and video formats, including MKV, MPEG-1, MPEG-2, MPEG-4, DivX, MP3, and OGG, as well as for DVDs, VCDs, and various streaming protocols. It also can be used as a server for unicast or multicast streams in IPv4 or IPv6 on a high-bandwidth network.

Top 3: 5KPlayer – All-in-one Free MKV Player

5KPlayer is a free MKV media player. This MKV file player is made for bringing you an user-friendly and customer-oriented Matroska video playback solution. With easy to use interface, you can easily play MKV movie videos no matter you are an experienced software master or not. Tremendous video playback capacity allows you not only play MKV files, but also other videos with large-scale formats, such as M2TS, AVCHD, MOD, H.264, MPEG-4, AVI, MOV, WMV, FLV, etc. This free MKV video player can make more effective use of your computer resource.

Actually, you can also play MKV file on Mac(10.11)/Win(10) by converting MKV to MP4/MOV with MKV Converter. The biggest benefit of this way is that you don’t need to add any extra media players on your Mac/Win. And by converting MKV to MP4/MOV, you can play these MKV file on your Android phones and iPhone/iPad without hassle. 

Best MKV Converter for Windows 10/ Mac 10.11

Pavtube Video Converter Ultimate and the equivalent Pavtube iMedia Converter for Mac are top-ranked MKV converter to help you convert your HD MKV file to MP4, MOV, M4V, MPEG, AVI, H.265, M3U8, etc so that you can play MKV file on your current media players and portable devices. It can accept any code MKV and output XviD, H.264, H.265 and MPEG codec video. You can learn the full function of this MKV Converter review

Free download and install Pavtube Video Converter Ultimate
          

Free download and install iMedia Converter for Mac
          

Read: How to Use Pavtube MKV Converter?

Click here to get Christmas discount for MKV Converter. 

MKV Related Articles:
Rip DVD/Blu-ray for Playing on Samsung TV with a built-in Media Player

Camille Wesley No Comments

Samsung TV is one of the TVS which have a decent built in media player on the market. That means you can play your local movies with USB media player. For those who have large DVD/Blu-ray disc, if you rip and backup Blu-ray/DVD to USB Hard Drive for watching on Samsung TV, you can prevent your Blu-ray/DVD from damage caused by over insert-eject. 


The new Samsung TV’s built in media player would support WMV, MP4 and MPEG-2. So you can backup your Blu-ray/DVD to those format for your Samsung TV with professional Blu-ray/DVD Ripper

Pavtube BDMagic is such a tool equipped with the function of ripping any commercial and region-locked Blu-ray/DVD to MP4/WMV/MPEG for Samsung TV built-in media player. It allows you to adjust video and audio bitrate, resolution to decide the output video quality and size. Besides normal 3D movie streaming on Samsung TV, it also can rip 3D Blu-ray to 3D MP4 for your various brands of 3D TV.

Free download and install: 
          

Other Download:
– Pavtube old official address: http://www.pavtube.cn/blu-ray-ripper/
– Cnet Download: http://download.cnet.com/Pavtube-BDMagic/3000-7970_4-75922877.html

How to rip Blu-ray/DVD to Samsung TV built-in media player?

Step 1. Import Blu-ray/DVD

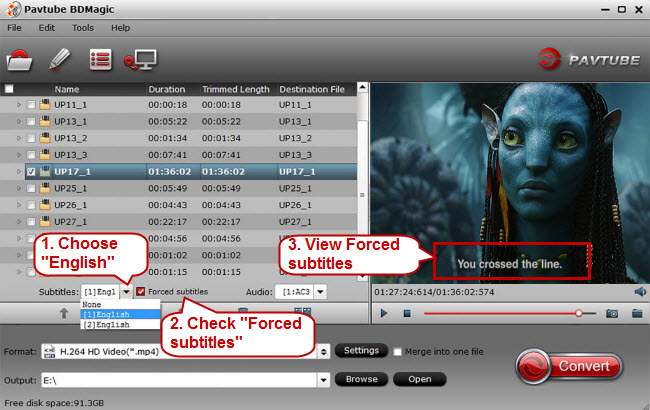
Download Blu-ray/DVD Ripper on Windows and click “File” icon to load Blu-ray/DVD movie to this program. At the chapter list below, you can choose desired subtitle or you can tick forced subtitle to show on your output movies.


Step 2: Choose Samsung TV supported format

Click “Format” and navigate to “TVS” profile. Here lists the main four TV brands. Just choose Samsung TV. Or you can also select common H.264 MP4 format in “Common Video” or HD MP4 from “HD Video” so that you can use the video in other media players, like Kodi.


Step 3: Start Blu-ray/DVD to Samsung TV supported format conversion

hit the big red “Convert” button in bottom right corner to start Blu-ray/DVD to MP4 for Samsung TV built-in media player conversion. When the process is completed, open output folder and find the ripped Blu-ray/DVD file.

Finally, you can transfer the movies to USB external hard drive and plug it into USB port on Samsung TV to stream the medias. If you are Mac users, you should download the Mac Blu-ray/DVD Ripper then follow the steps to achieve the Blu-ray/DVD ripping. And as a Christmas gift, you can click here to get the program at a lower price, saving $14.7.

Related Articles:
How to Play H.265/HEVC Video on QuickTime on Mac El Capitan/macOS Sierra?

Camille Wesley No Comments

Heard about H.265 video and got interested in its smaller size in the same video quality as H.264 video? Downloaded or purchased many H.265 movies excitedly and wanted to play them via Quicktime on Mac? If so, you must get disappointed now because Quicktime can’t support H.265 codec video at all. So how about your H.265 movies, lying them idle? No. There is always some way helping you solve your problem, like transcoding H.265 to H.264 for your Quicktime on Mac. 


If you are not a computerman and are not interested in video conversion in your dailylife, you may don’t know there is a program called H.265 Converter which can trancode H.265 video to the popular H.264 for your Quicktime and other media players. 

Here, we want to recommend the best HEVC H.265 video converter for you, the software is called Pavtube iMedia Converter for Mac, which has full support for HEVC H.265 files and other HD videos on Mac El Capitan and macOS Sierra. You can import HEVC H.265 files and convert to QuickTime supported format like MP4, MOV or M4V on Mac El Capitan, Yosemite, etc.  What’s more, you even can transcode any Blu-ray/DVD/4K/SD/HD, like MKV , AVI videos to Quicktime on Mac with excellent video quality. 

Read >> Top 3 Video Converter for macOS Sierra

Free download and install
          

Other Download:
– Pavtube old official address: http://www.pavtube.cn/imedia-converter-mac/
– Cnet Download: http://download.cnet.com/Pavtube-iMedia-Converter/3000-2194_4-76177788.html

How to transcode H.265 to Quicktime supported format on Mac?

Step 1: Add H.265 video to the app

Run the H.265 converter on Mac (Windows version), and simply drag and drop the H.265 to the app. Or you can click “File” to choose “Add video/audio” to import the source video. It supports batch conversion which allows you to add more than one video at a time. 


Step 2: Choose output format

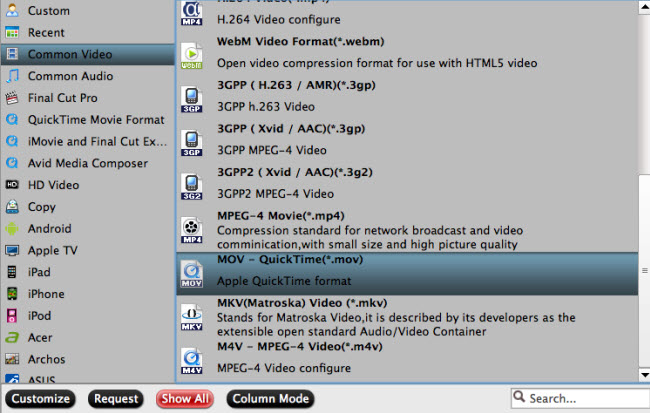
Select and custom output format. Click “Common Video” > “MOV – QuickTime (*.MOV)” to get the optimized output file for MKV to QuickTime conversion on Mac El Capitan and macOS Sierra.


Tip: You can also check the “Settings” box, and set video codec, video size, Bitrate, frame rate to get a decent video you want on your QuickTime player.


Step 3: Start H.265 video to QuickTime ripping on Mac

Click the Convert button under the preview window, and the H.265 converter will start the conversion from H.265 movies to MP4/MOV for QuickTime Player on Mac. 

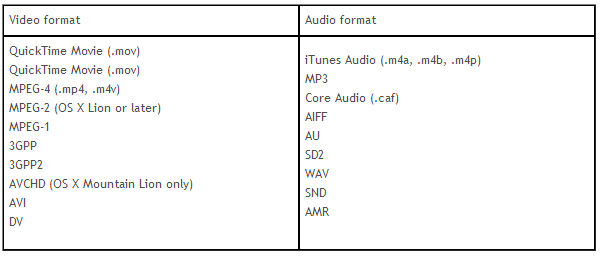
Now, you can watch your H.265 video on Quicktime on Mac. If you plan to buy the program now, you can get it at $52, saving $13, for Pavtube Chritmas Coupon. And the following chart is the supported format of Quicktime. Read it and learn which video you can play on Quicktime.


Related Articles:
How to Play H.265 encoded videos on VLC Player?

Camille Wesley No Comments

VLC Media Player is the most powerful and popular media players on PC and Mac. It can update in time every time to support 4K video and the new video codec, like H.265 video. However, according to the feedback of VLC users, when they play H.265 video on VLC, they sometimes get this information:


That’s because although VLC has claimed that it could support H.265, the ability is not stable. So if you want a more smooth playback on H.265 encoded video in VLC, you’d better transcode H.265 to H.264 video with a H.265 converter


Pavtube iMedia Converter for Mac is a professional Mac H.265 converter. It can transcode H.265/HEVC to the more compatible but less-compressed H.264 video so that you can play your source H.265 video on VLC without hassle. Besides, if your H.265 video is 4K resolution and your VLC is not the newest version to play 4K, you can use this program to compress 4K to 1080p for VLC media player. This app has updated to support Mac OS X El Capitan so you needn’t worry that this H.265 to VLC converter will break down on the newest Mac operating system. 

Free download and install
          

Other Download:
– Pavtube old official address: http://www.pavtube.cn/imedia-converter-mac/
– Cnet Download: http://download.cnet.com/Pavtube-iMedia-Converter/3000-2194_4-76177788.html

How to convert H.265 to H.264 for VLC?

Step 1: Load H.265 HEVC files

Launch the software on your Mac computer, click the “Load files” button or “Add video” button to add source H.265/HEVC files.


Step 2: Choose VLC playable output format.

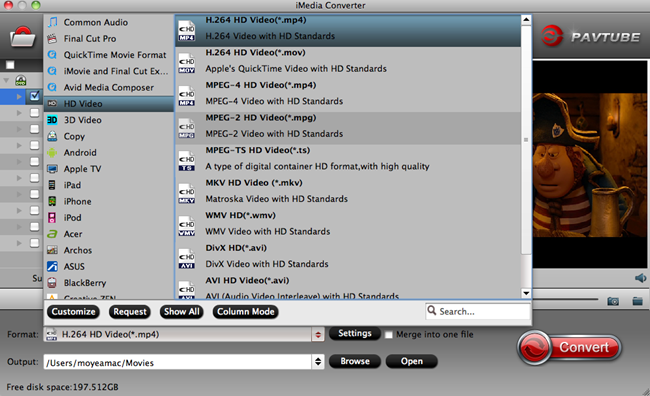
For great video quality and smoothly playback considerations, you can select the H.264 as output format from “Format > HD Video > H.264 HD Video (*.mp4)”.


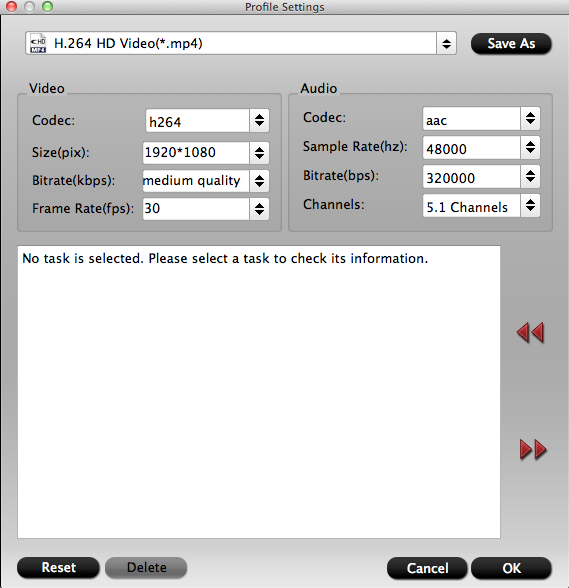
Tip: Open “Profile Settings” window, you can adjust video and audio parameters. For example, if you need to compress 4K to 1080p, you can select “1920×1080” as the resolution for output file from Size(pix) drop-down list.


Step 4: Start to convert H.265 to VLC 

Start H.265/HEVC to VLC Mac conversion by clicking the right-bottom convert button. Once the process ends, you can open the output folder to locate the generated video.

Now, you can play your H.265 video on VLC with H.264 codec. For Windows users, please use the H.265 Converter for Windows. With the approaching of Christmas, Pavtube offers up to 40% discount for its top-selling Blu-ray/DVD/Video tools. You can click here to get the H.265 Converter, saving $13. 

Related Articles:

How to Play MKV File on QuickTime on Mac El Capitan/macOS Sierra?

Camille Wesley No Comments

QuickTime, the default media player on Mac, is an extensible multimedia framework developed by Apple Inc. It’s powerful media technology that works on Mac with just about many popular video or audio format you come across. However, QuickTimes will meet its Waterloo in MKV container, which is famous for its ability of keeping multi-track subtitle and audio. For the supported format of QuickTimne does not includes MKV format. So if you want to play MKV on QuickTimes on Mac including Mac OS X El Capitan and macOS Sierra, you have to convert MKV to QuickTimes compatible format.


When you are looking for a easy-to-use MKV Converter, you can consider Pavtube iMedia Converter for Mac. This program not only serves as the best yet free MKV to MOV converter for Mac but also makes perfect synchronization with Mac El Capitan and macOS Sierra, letting you easily and freely transfer video from MKV to MOV on your Mac 10.11 El Capitan while holding the same video as original. In addition, converting MKV to MP4 on Mac El Capitan and macOS Sierra is also like a hot knife through butter with this free Mac MKV to MOV converter, thereupon, you can either import your video to QuickTime or put it to your iPhone, iPad, etc for watching on the move.

Free download and install
          

Other Download:
– Pavtube old official address: http://www.pavtube.cn/imedia-converter-mac/
– Cnet Download: http://download.cnet.com/Pavtube-iMedia-Converter/3000-2194_4-76177788.html

How to Convert MKV File to MOV for playing on QuickTime on Mac El Capitan/macOS Sierra?

Step 1: Load MKV File 

Free download this Mac free MKV to MOV video converter , fire it up and load the MKV files by hitting “Add Video/Audio” button. You also can add AVI to convert to QuickTime. 


Step 2: Choose output format

Select and custom output format. Click “Common Video” > “MOV – QuickTime (*.MOV)” to get the optimized output file for MKV to QuickTime conversion on Mac El Capitan.


Tip: If you like, you can click “Settings” to change the video encoder, resolution, frame rate, etc. Remember bitrate higher results in big file size, and lower visible quality loss. If you want to keep 1080p Full HD resolution, set the video size as 1080*1920.

Step 3: Start MKV to QuickTime conversion on Mac 

Carry out the video conversion process by hitting the right-bottom “Convert” button. When the conversion is done, hit “Open” button on the main interface to find and locate the converted MKV files to add to QuickTime on Mac OS X 10.11.

Now, the converted MKV video can be played back by QuickTime without any hassle.You can also edit them in iMovie, Final Cut Pro, and stream it to Apple TV or transfer them to your iPod and take them with you wherever you go.

Hot News!! You can get the app now in Pavtube Christmas Coupon, saving $13. 

Related Articles:

Backup Blu-ray/DVD to USB Drive for Raspberry Pi 2 Based Media Center

Camille Wesley No Comments

Raspberry Pi based Extreme XBMC Media Center allows you to manage your media library and play any of your unencrypted digital movies by attaching a USB drive. This unit itself is small enough to sit hidden out of the way and runs silently. You wouldn’t even know it was there. It would be a great idea to backup your amount of Blu-ray/DVD disc movies to USB drive and then watch them via Raspberry Pi 2 Based Media Center. When you do this, you don’t need to insert or eject your physical discs again and you can lay your heavy Blu-ray/DVD drive aside.


Raspberry Pi based Extreme XBMC Media Center is full compatible with iOS and Android. So when you are backing up Blu-ray/DVD collection to Raspberry Pi based Media Center, you can consider MP4 format which can be supported by nearly all iOS and Android deices. Here, I suggest Pavtube BDMagic to help you achieve this goal. 

This software can deal with any DVD/Blu-ray disc, no matter encrypted by AACS, BD+ or Disney, region codes, etc and output perfectly MP4 video with original video quality. For attaching more Blu-ray/DVD to USB drive for Raspberry Pi 2 Based Media Center, this app enables you to compress the video size by adjusting video size and bitrate. (review)

For Mac users, please turn to Mac version which can make you rip Blu-ray/DVD to USB drive on Mac OS X El Capitan

Free download and install: 
          

Other Download:
– Pavtube old official address: http://www.pavtube.cn/blu-ray-ripper/
– Cnet Download: http://download.cnet.com/Pavtube-BDMagic/3000-7970_4-75922877.html

How to Backup Blu-ray/DVD to USB Drive for Raspberry Pi 2 Based Media Center?

Step 1. Load Blu-ray/DVD movie

Click “File” to follow “Load from disc” to load your Blu-ray/DVD to the app. This program will automatically choose the main title to convert and it supports batch conversion so that you can load more than one movies at a time. 


Step 2: Set output format

Clicking the Format bar, choose normal iOS and Android devices playable format “H.264 HD Video(*.mp4)” under “HD Video” main category.


Tip: If you need to compress video size, you can click “Settings” to reduce the bitrate and size to get smaller size. You can preview the output video size at the below chart.

Step 3: Start Blu-ray/DVD to MP4 conversion.

Hit the big “Convert”button in right-bottom to convert Blu-ray/DVD to USB drive. 

Transfer the ripped Blu-ray/DVD to USB drive and plug this thumb drive to the USB port on Raspberry Pi 2 Based Media Center. Now, it can view your Blu-ray/DVD movies on Raspberry Pi 2 Based Media Center.

Note: This Blu-ray/DVD Ripper is also able to output other popular video format like H.265, M3U8, MOV, MKV, AVI, FLV, etc for your other media players and devices. 

Related Articles:

Backup Blu-ray/DVD to Windows Home Server for Viewing via iPad

Camille Wesley No Comments

Video conversion makes our media life more wonderful, including Blu-ray ripping, DVD backup, etc. Of course, I mean, legal Blu-ray/DVD ripping with Blu-ray/DVD Ripper

“I’ve been looking for a software that could rip my Bluray movies to mp4 with swedish subtitles. I want to place all my media on my Windows Home Server and watch them through Plex. Watch them and have them with me when I am on the road. My children watch lots of movies in the car on iPads.”


Backing up Blu-ray/DVD movies to Windows Home Server, like NASSeagate Wireless PlusWD MyCloud, etc can make you take your movie library with you and play them on your portable devices no matter on long car trip or at a coffee shop. 

A professional and powerful Blu-ray/DVD Ripper is the key point in the job. And if you choose Pavtube Video Converter Ultimate, it will not let you down. It can rip any commercial and region-locked Blu-ray/DVD to your any HD media players with H.265, MP4, MOV, M4V, MKV, AVI, etc. It even can output the new M3U8 format, which can let you watch movies on iPad more smooth than any other video format. Considering the space limit on your Windows Home Server, you can reduce the output video size by adjusting video bitrate and resolution in “Settings”. 

Free download and install
          

Other Download:
– Pavtube old official address: http://www.pavtube.cn/blu-ray-video-converter-ultimate/
– Cnet Download: http://download.cnet.com/Pavtube-Video-Converter-Ultimate/3000-2194_4-75938564.html

How to rip Blu-ray/DVD to Windows Home Server with suitable format?

Step 1: Load files to the program

Start the program on your computer and click”Load disc” from”File”drop-down list to add the Blu-ray/DVD you desire to convert to the application.


Step 2: Choose output file format.

Considering the portable devices you will use will not be limited, so I suggest you here to select a format that’s widely support by many portable devices such as ”H.264 Video(*MP4)” format as the output profile from the”Format” drop-down option.


Tip: For smaller size and better playback your Blu-ray/DVD movies via Windows Home Server on various multimedia players, you can adjust the output video parameters. Remember, lower bitrate leads to lower video size.


Step 3: Start to rip Blu-ray/DVD to Home Server

Hit the right-bottom”Convert”button to start transcode Blu-ray/DVD to MP4 for placing to Windows Home Server. Once the process ends, open the output folder to find the ripped Blu-ray/DVD movies. 

Now, place the media to your Windows Home Server so that you or your kids and watch them on iPad on the car.

For Mac users, the equivalent Mac version is iMedia Converter for Mac, which can make you rip Blu-ray/DVD on Mac OS X El Capitan. Moreover, you can get Thanksgiving Coupon here or like Pavtube Facebook to get a special offer now.  

Related Articles:

Convert MKV to Plex Media Server with Suitable format

Camille Wesley No Comments

Although MKV offers a richer media experience than any other current format With the features such as alternate audio tracks, multilingual subtitles and chapter points. However, it is not welcomed by Plex Media Sever. In Plex official site, it said that Plex for PlayStation app does not currently support Direct Playing of MKV container videos. That’s why so many people have MKV on Plex playback issue on Reddit.  


According to Plex media server supported format, if you want to play your local MKV file on Plex, you’d better convert MVK to MP4. And for Direct Streaming, you also need to keep this MP4 video with AAC audio and 20Mbps or lower bitrate. This need your MKV Converter has the ability of allowing consumers to adjust the video parameters. 

Considering the features of easy-to-use and economy, I recommend Pavtube Video Converter Ultimate. It is powerful enough to convert any MKV file to Plex supported MP4, AVI, MOV, etc and enables you to change video size, bitrate, codec, frame rate and audio sample rate, channel, etc. Its intuitive interface can make you know the next step clearly. The most important is that it now is only for $45.5 – the cheapest price for a Video Converter Ultimate product since Pavtube is offering Cyber Monday Coupon.

Its Mac verison Pavtube iMedia Converter Ultimate is much cheaper in Pavtube Thanksgiving & Black Friday & Cyber Monday Coupon. It supports El Capitan system so you can convert MKV to Plex Media server on mac OS X El Capitan without any issue. 

Free download and install
          

Other Download:
– Pavtube old official address: http://www.pavtube.cn/blu-ray-video-converter-ultimate/
– Cnet Download: http://download.cnet.com/Pavtube-Video-Converter-Ultimate/3000-2194_4-75938564.html

How to convert MKV to Plex Media Server with just 3 clicks?

Step 1: Add MKV file

Click “File” to load your MKV file to this app. It supports batch conversion so you can add more one file at a time. And you can choose your wanted subtitle and audio in the chapter list.


Step 2: Choose target format

Press “Format” icon. In the drop-down list, you can see many profiles. Find your target format in “HD Video” or “Common Video”. I suggest MP4 format so you can choose HD MP4 or “H.264 High profile MP4”.


Tip: If you are not sure the output video parameters, you can click “Settings”. Reset the audio codec to AAC and video bitrate to 20Mbps or lower. You can preview the video size and parameters at the below chart.

Step 3: Start to convert MKV to Plex

Simply hit “Convert” at the bottom right corner to start to convert MKV to MP4 for Plex. Once the conversion ends, open the output folder to locate the video.

Plex enables you to share movies on TV, PS3, Xbox One, Android, iOS, and other DLNA-certified devices locally via home network connection, or remotely, as long as you have a Internet connection. So now, you can play this MKV file via Plex on your various multimedia players. 

Related Articles:

Rip Blu-ray to Xtreamer SideWinder 2 with DTS 7.1 Audio

Camille Wesley No Comments

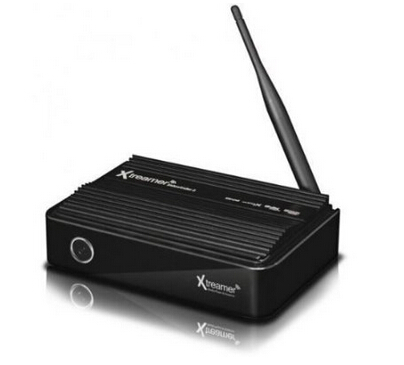
The Xtreamer SideWinder 2 is a Full HD Media Player based on the powerful next generation Realtek (RTD 1185 chipset). It can play nearly any 1080P video file, play DTS HD and Dolby TrueHD with 7.1 bit streaming (HD Audio). For those who want to rip Blu-ray to a more compatible format but keeping 7.1 surround sound, Xtreamer SideWinder 2 is a ideal media player to stream the ripped Blu-ray movies since not all media players can support DTS 7.1 sound.


Actually, not only the media player supporting 7.1 sound is hard to find, but a Blu-ray Ripper with the capability of preserving 7.1 sound while ripping Blu-ray is tough to get. As far as I know, Pavtube ByteCopy can achieve the job. This software can convert Blu-ray to lossless MKV format preserving multi-track subtitle/audio and all chapter markers. Besides lossless MKV, you also can get multi-track MKV/MOV with 7.1 audio for Xtreamer SideWinder 2 and you can choose your wanted subtitle/audio track from settings.(reasons to choose ByteCopy)

Free download and install:
          

Other Download:
– Pavtube old official address: http://www.pavtube.cn/bytecopy/
– Cnet Download: http://download.cnet.com/Pavtube-ByteCopy/3000-7970_4-76158512.html

How to rip Blu-ray to  Xtreamer SideWinder 2 with DTS 7.1 Audio?

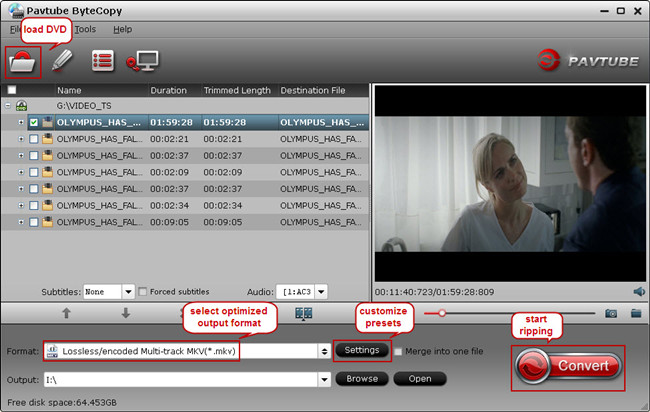
Step 1: Add Blu-ray to the app

Download this Blu-ray to Xtreamer SideWinder 2 program(Mac version) and click the “Load disc” icon to import movie files from Blu-ray Disc.


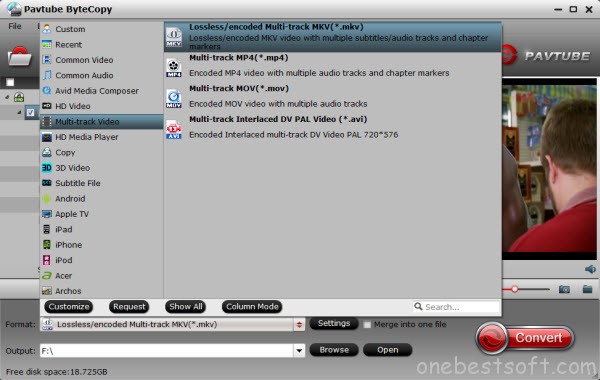
Step 2. Choose MKV format keeping 7.1 audio

Click “Format” bar to choose the output format. To preserve riginal Dolby TrueHD 7.1 audio for Blu-ray movie ripping, just select “Lossless/encoded multi-track MKV (* mkv)” from “Multi-track Video” quality in “Format” box. Make sure the original BD disc does contain Dolby TrueHD audio, otherwise you still can’t get Dolby TrueHD 7.1 audio saved. (Learn Dolby TrueHD and DTS-HD Master Audio)


Tip: In “Settings” option, you can make adjustments on your audio, video, subtitles. It’s worth mentioning that, by default, all audio & subtitles tracks in a source file are checked to be saved in the MKV container, if there are some tracks you don’t like, you can go to Multi-task Settings window to uncheck and remove them under Audio tab and Subtitle tab. Just keep your desired Dolby TrueHD 7.1 audio channel.


Step 3. Start ripping Blu-ray with 7.1 audio

Hit the big “Convert” button, it will start converting Blu-ray movies to Xtreamer SideWinder 2 in lossless mkv videos with the original Dolby TrueHD 7.1 audio saved. 

This Blu-ray ripping will cost some time depending on the original Blu-ray size, you computer configuration, network speed. 

Additional Tips: 
Pavtube ByteCopy legally bypass the copyright protection of DRM and it also supports to export .srt subtitles and add *.srt, *.ssa, *.ass subtitles to BD/DVD movies. You can get it at 20% discount at Pavtube Thanksgiving Coupon and special offer after liked Pavtube Facebook.

Related Articles:
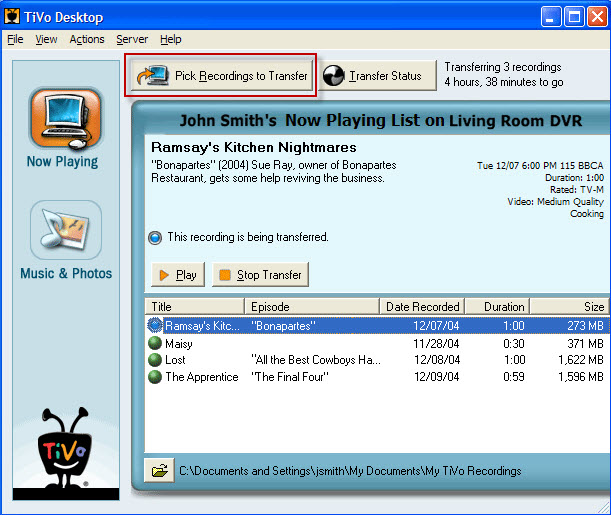
Black Friday Crazy Offer: Only $21 Get Blu-ray/DVD Ripper & Backup Mac Software

Camille Wesley No Comments

To reward the old and new customers who are are a always supporting Pavtube products, Pavtube Studio brings forward its super Black Friday offer – Mac Blu-ray/DVD Ripper & Copier for only $21. This deal will save customers an incredible $21 off the original price. 


Pavtube Studio is dedicated to multimedia software developing for Mac. Its resounding Mac Blu-ray/DVD ripper can be updated to support each Mac OS X upgrade, like El Capitan, Yosemite. With Pavtube Mac BD/DVD Ripper – Pavtube ByteCopy for Mac, you can convert and commercial and region-locked Blu-ray/DVD to H.265, M3U8, MP4, MOV, AVI, etc with original video quality. Moreover, it can output lossless MKV with multi-track subtitle/audio and all chapter markers and multi-track MP4/MOV with 5.1/7.1 sound. More details about Pavtube Mac Blu-ray/DVD Ripper are in reasons to choose Pavtube ByteCopy for Mac

Such good Mac Blu-ray/DVD ripper can’t be get at $21 in normal days. And this Black Friday Coupon from Pavtube is only from Nov 26 to Nov 28.2015. Catch the rare opportunity to make your digital life more wonderful and convenient at below:


Pavtube also picks out its another three knock-out products and offers an incredible discount at Black Friday. You can see the comparison between them in the chart. And please know more about Pavtube Black Friday & Cyber Monday & Thanksgiving Coupon in Facebook.


Software Compare iMedia Converter for Mac  Pavtube BDMagic (Win/Mac)  Pavtube MXF MultiMixer (Win/Mac) 
Purchase Benefits lifetime free upgrade; 30-day money back. Original Price: $65Now: $32.5

Buy Now

Original Price: $49Now: $34.3

Buy Now

Original Price: $45Now: $31.5

Buy Now

Supported Source 
Blu-ray,  DVD, DVD IFO, etc
Video/Audio files:
H.265, MP4, AVI,  MP3,AU, FLAC, DTS, etc.
MXF Files (*.MXF, *.mxf footage shot by Panasonic P2 camcorders, etc.)
Output Formats 
Apple/Android/Windows devices:Apple TV 4,
Samsung Galaxy S6, Microsoft Surface 3/4, PS4, BlackBerry, VTech InnoTab tablets, etc.
Video Editing/Burning Tool and More:FCP X, FCP 6/7, iDVD, Roxio Toast, YouTube, NAS, Networked Devices, Facebook, etc.
Other Functions 
Edit parameters, merge, crop, trim and add SRT subtitle.


More Guides:

Rip 3D Blu-ray to USB 3.0 for KDLinks HD720 Media player

Camille Wesley No Comments

KDLinks HD720 Media player can play all 2D/3D media files with USB 3.0 High Speed External Hard Drive. Plus it also supports Blu-Ray Navigation Menu but BD-1.0 and 2D movies only. For 3D Blu-ray owners, they can consider ripping 3D Blu-ray to 3D MP4 to achieve 3D Blu-ray playback on KDLinks HD720 Media player via USB 3.0 then to enjoy high resolution and high transmission speed. 

To convert 3D Blu-ray to 3D MP4, you can use Pavtube BDMagic for Mac. It can convert 2D/3D Blu-ray to KDLinks HD720 Media player with 3D MP4 format or normal 2D MP4, MOV, H.265, M3U8, M4V, etc. It can preserve the original video quality while ripping Blu-ray on Mac (El Captian included) and on the other hand, it allows you to adjust video/audio parameters and 3D depth to customize your own 3D movies. 

For Windows users, please turn to Pavtube BDMagic which makes you convert 3D Blu-ray to USB 3.0 for KDLinks HD720 Media player on Windows. 

Free download and install:
          

Other Download:
– Pavtube old official address: http://www.pavtube.cn/blu-ray-ripper-mac/
– Cnet Download: http://download.cnet.com/Pavtube-BDMagic/3000-7970_4-76177782.html

How to Convert 3D Blu-ray to 3D MP4 for KDLinks HD720 Media player?

Step 1: Load 3D Blu-ray Disc.

click “Load file” button to load 3D Blu-ray files directly to this 3D Blu-ray to 3D MP4 application.


Step 2. Choose 3D MP4 format

From the “Format” drop-down list, you are suggested to follow the path “3D Video > MP4 Side-by-Side 3D Video (*.mp4)” for ripping Blu-ray to side-by-side 3D MP4 video. This video also can be used in LG 3D TV or other 3D TV via Kodi.


Tip: If you like, you can click “Settings” which is next to “Format”, free change your target video size, bitrate, frame rate and 3D depth. If you want to get best video quality, pls switch them to “original”.


Step 3. Start conversion.

Click “Convert” button to start 3D Blu-ray to 3D MP4 conversion in side-by-side mode. Once the conversion finished, you are able to get the generated 3D MP4 files via clicking “Open” button with ease.

Transfer the ripped 3D Blu-ray to USB 3.0 External Drive. Then you can play HD 3D movies on KDLinks HD720 Media player via USB. (Learn: Difference between U Disc and USB Flash Drive)

Related Articles:
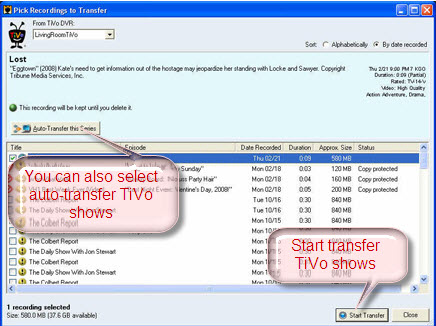
Rip Blu-ray to MKV with 7.1 Sound for Asus O! Play Mini V2

Camille Wesley No Comments

The reason why Blu-ray gets so popular in the market is it comes with lossless audio quality with mainly three lossless audio codecs: PCM, Dolby TrueHD and DTS-HD MA. And the Dolby TrueHD and DTS-HD Master Audio can deliver unprecedented home theater experience with 7.1 channels, so there may be no one willing to loose the wonderful audio while backup a Blu-ray movie. So the media players which can support 7.1 Channel will get big market, like Asus O! Play Mini V2 which supports impressive 7.1-channel surround sound. So how can you rip Blu-ray to  Asus O! Play Mini V2 with 7.1 Sound?


There are many Blu-ray rippers on the market but not all of them can keep 7.1 channel while ripping Blu-ray. Generally, if you want to preserve 5.1 or 7.1 surround sound, you have to output lossless MKV format, not SD MKV, or HD MKV. Fortunately, after I tested several free and paid Blu-ray rippers and discovered Pavtube ByteCopy.
This program can keep Dolby True HD 7.1 audio when ripping Blu-ray movie to Asus O! Play Mini V2. It can convert Blu-ray to MKV with lossless video output and multiple audio & subtitle & chapter markers preservation. 

It has the professional Mac version which can make you rip Blu-ray to MKV with 7.1 Sound for Asus O! Play Mini V2 on Mac OS X El Capitan

Free download and install:
          

Other Download:
– Pavtube old official address: http://www.pavtube.cn/bytecopy/
– Cnet Download: http://download.cnet.com/Pavtube-ByteCopy/3000-7970_4-76158512.html

How to Convert Blu-ray to MKV with 7.1 Sound for Asus O! Play Mini V2?

Step 1: Add Blu-ray to the app

Run Pavtube ByteCopy (reasons to choose it) and click the “Load disc” icon to import movie files from Blu-ray Disc.


Step 2. Choose MKV format keeping 7.1 audio

Click “Format” bar to choose the output format. To preserve riginal Dolby TrueHD 7.1 audio for Blu-ray movie ripping, just select “Lossless/encoded multi-track MKV (* mkv)” from “Multi-track Video” quality in “Format” box. Make sure the original BD disc does contain Dolby TrueHD audio, otherwise you still can’t get Dolby TrueHD 7.1 audio saved.


Tip: If you want to customize your own video you can click“Settings” option, which allows you to make adjustments on your audio, video, subtitles. It’s worth mentioning that, by default, all audio & subtitles tracks in a source file are checked to be saved in the MKV container, if there are some tracks you don’t like, you can go to Multi-task Settings window to uncheck and remove them under Audio tab and Subtitle tab. Just keep your desired Dolby TrueHD 7.1 audio channel.


Step 3. Start ripping Blu-ray with 7.1 audio

Hit the big Convert button, it will start converting Blu-ray movies to  Asus O! Play Mini V2 in lossless mkv videos with the original Dolby TrueHD 7.1 audio saved. 

This Blu-ray ripping will cost some time depending on the original Blu-ray size, you computer configuration, network speed. 

Additional Tips: 
Pavtube ByteCopy legally bypass the copyright protection of DRM and it also supports to export .srt subtitles and add *.srt, *.ssa, *.ass subtitles to BD/DVD movies. You can get it at 20% discount at Pavtube Thanksgiving Coupon and special offer after liked Pavtube Facebook.

Related Software:
BDMagic for Windwos/Mac – The best Blu-ray solution to rip and backup any commercial and region-locked Blu-ray to H.265, M3U8, MP4, MKV, AVI, FLV, etc.  
DVDAid for Windows/Mac – Capacity of ripping copy-protected and homemade DVD to iPhone 6S, iPad, Surface Pro, Synology NAS, Seagate Wireless Plus,http://www.ecardmax.com/hoteditor/styles/office2007/switch_richtext_off.gif etc with suitable format.
Pavtube Video Converter  for Windows/Mac – Function of converting Blu-ray/DVD, 4K/SD/HD video in any format to nearly all popular video format you have ever seen.

Related Articles:
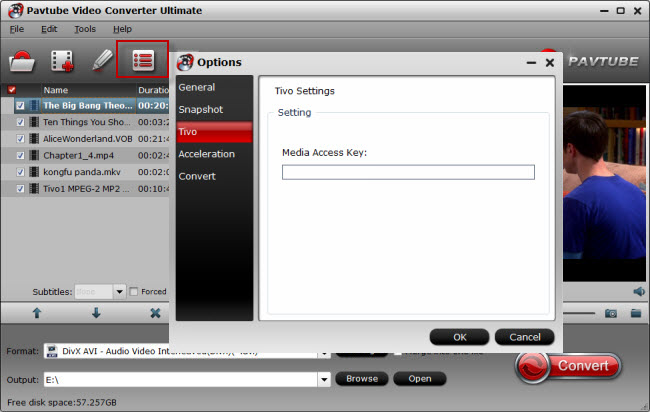
How to Fix ‘Mac(Book Pro) Won’t Play DVD’ Problem

Camille Wesley No Comments

In Apple communities and forums, we always see this knid of question: “ I put DVD in my Mac and the DVD player pops up. But when I press Play, it says “Supported Disc Not Available”. Why my Mac won’t play DVD? ”  This “Mac won’t play DVD” issue gradually becomes the common issue for Mac users. What’s the reason and how to solve it? In this article, you will find the answer.


Why DVD won’t play on Mac (Book Pro)

1. Mac (Book Pro) won’t recognize DVD for optical drive refuses DVD disc or there is no DVD icon and no recognition even though the disc is well put into the drive.
2. DVD Player on Mac can’t read DVD for commercial region codes, DVD disc scratch/broken and other incompatibility problems.

Learn More: How To Play Region Code 1 And 2 DVD Without Changing DVD Region Codes?

How to Fix ‘Mac(Book Pro) Won’t Play DVD’ Problem?

If Mac can’t read your DVD for optical drive, you need to repair or buy a new one to make DVD playback run well on your Mac.

For DVD icon lost PROBLEM, you can try to reset NVRAM (or PRAM). Shut down your computer and turn on later. When you hear the startup sound, press and hold the Command-Option-P-R keys immediately until the computer restarts and you hear the startup sound again.

You DVD get scratched/broken or has a region codes different with your DVD Drive, the only solution to solve “Mac Can’t Play DVD” is to rip DVD to MP4, MOV or other popular format with DVD Ripper. 

You can try Pavtube BDMagic for Mac. This software can rip and backup the latest DVD movies to MP4, MOV etc, on Mac with removal of copy protections, covering CSS,region code, UOP, Sony ArccOS, Disney X-project DRM. It is compatible with the newest Mac 10.11 El Capitan system so that you needn’t worry DVD Ripper breakdown issue on Mac El Capitan.

You can get it now at 30% off discount in Pavtube Thanksgiving Coupon and Pavtube Facebook

Free download and install:
          

Other Download:
– Pavtube old official address: http://www.pavtube.cn/blu-ray-ripper-mac/
– Cnet Download: http://download.cnet.com/Pavtube-BDMagic/3000-7970_4-76177782.html

Step 1: Run the DVD to Mac (Book Pro) program and click “File” > “Load from disc” to import DVD movie. (This app also work in Blu-ray so that you can convert Blu-ray to Mac with it. )


Step 2: Mac can playback MP4 format well, so just head to the output format list to follow “HD Video” > “H.264 HD Video (*.mp4).”


Tip: Click the “Settings” button to adjust video/audio parameters to get more compatible video for Mac (Book Pro). 

Step 3: Click on the “Convert” in bottom right corner to start to rip DVD to MP4 for Mac (Book Pro).

Now, try to play DVD on Mac (Book Pro) again. 

Related Articles:
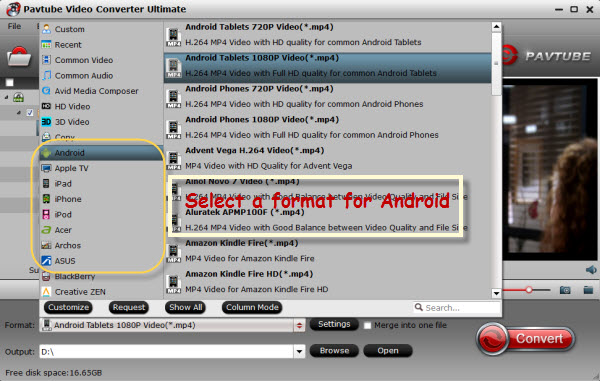
How to Play a WMV File on a Standard DVD Player?

Camille Wesley No Comments

Many people have lots of WMV files that want to play on a standard DVD player like the below questioner:
“I have a .wmv movie I would like to burn to a DVD to play on a standard DVD player connected to my TV (not just on my computer). I have several pieces of software that can convert the .wmv file to another format, but don’t know which format I should convert it to. Any suggestions?”


In fact, there are two ways to play WMV on a DVD Player: method 1: burn WMV to a DVD; method 2: convert WMV to DVD player supported format. Here, the article will introduce you the two ways in detail.

Method 1: Burn WMV to DVD for Playing on DVD Player

Pavtube DVD Creator is an easy-to-use DVD-burning software. It can burn  AVI, WMV, MP4, MOV, MTS, Tivo, etc to DVD video. The beneficial DVD menu customizing features allow you to change the DVD menu template/style, menu text, display aspect ratio and background, you can also set chapter maker and playback mode.

Step 1: Run the DVD Creator software, import WMV file into it for burning DVD disc project.


Step 2: Switch to the menu pane, double click a DVD menu beneath the Menu Template to apply it to your DVD. You can customize the background video/image, background music, text, title thumbnail and more for your DVD menu. You can also choose the DVD quality at the bottom of the software, higher quality requires bigger DVD disc volume.


Step 3:  Click the “Burn” button to start burning WMV to DVD. Once the process ends, you can play your DVD burned from WMV on DVD player. 


Method 2: Convert WMV files to DVD Player supported format

To convert WMV files to DVD player supported format,  you need a WMV to DVD player converter. Here, I recommend Pavtube Video Converter Ultimate for you. It is a comprehensive and professional video software. It can works on WMV, VOB, H.265, AVI, MOV, M4V, etc and change them to DVD Player supported format. During the process, it allows you to reset video codec, size, framerate and audio channel, codec, sample rate to get the most suitable video for your DVD player or other multimedia players. (Read review)

If you are a Mac user, the equivalence product is iMedia Converter for Mac, which can change WMV to DVD player suitable format on Mac OS X 10.11 El Capitan. Now, you can get it at 20% off discount

Free download and install
          

Other Download:
– Pavtube old official address: http://www.pavtube.cn/blu-ray-video-converter-ultimate/
– Cnet Download: http://download.cnet.com/Pavtube-Video-Converter-Ultimate/3000-2194_4-75938564.html

Step 1: Import WMV to the app

Start the program on your computer, click “File” > “Add Video/Audio” or “Add from folder” to input your source WMV files to the application.


Step 2: Choose VOB format

From “Format” bar drop-down option, choose “VOB Format” > “DVD-Video Format – NTSC(*.vob)” or “DVD-Video Format – PAL(*.vob)” as output format. 

Learn also: Play TV Program on Old DVD Player

Note: PAL and NTSC are analog television systems. PAL format is common for Europe and Asia. PAL is used in almost all Western European countries, Australia and in some countries of Africa, South America and Asia. NTSC is a Color TV standard for the United States, Canada, Japan and other countries of North and South America and Asia.


Tip: DVD player only accepts VOB format encoded with MPEG-2, so you can open profile settings to make sure or change the codec is MPEG-2.


Step 3: Convert WMV to DVD Player

Hit right-bottom convert button to carry out the conversion process from WMV to DVD Player supported VOB. When the process finishes, open output folder to locate the generated VOB file for DVD player. 

Both the ways are easy to operate. You can choose any one of them to help you play WMV file on DVD Player.

Related Software:
BDMagic for Windwos/Mac – The best Blu-ray solution to rip and backup any commercial and region-locked Blu-ray to H.265, M3U8, MP4, MKV, AVI, FLV, etc.  
DVDAid for Windows/Mac – Capacity of ripping copy-protected and homemade DVD to iPhone 6S, iPad, Surface Pro, Synology NAS, Seagate Wireless Plus, etc with suitable format.
ByteCopy for Windows/Mac – It can rip Blu-ray/DVD to lossless MKV keeping multi-track subtile/audio and all chapter markers.

Related Articles:
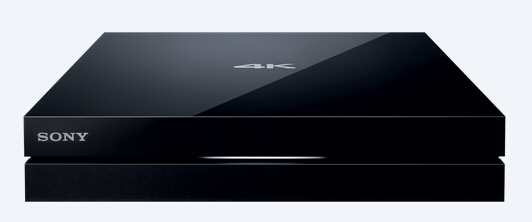
Backup Blu-ray to U Disc for MP018 Full HD Media Player

Camille Wesley No Comments

MP018 Full HD Media Player is with full 1080p player, which will give your extraordinary video experience. Moreover, it supports Ypbpr output, external HDD or U disk, SD card and HDMI and various audio and picture format, all these functions will help you to enjoy your HD movie at home. If you have plenty of Blu-ray disc collection, ripping these Blu-ray to U disc for MP018 Full HD Media Player is a nice idea. 


Hot search: Blu-ray to Seagate Wireless Plus | Blu-ray to WD MyCloud  |  300 DVD to External Drive | Blu-ray to Synology DS416 

Backing up Blu-ray to U disc not only can make you play Blu-ray movies on MP018 Full HD Media Player freely, but gives you the carriage convenience so that you can take your favorite Blu-ray movies with you. Then you can watch them in hotel with HD TV or in the caravan when you are going on a trip. To achieve the goal, you need a Blu-ray ripper

Here, I want to recommend Pavtube BDMagic to you. This top-ranked Blu-ray ripper can rip and convert any commercial and region-locked Blu-ray to U Disc for MP018 Full HD Media Player in MP4, AVI, MOV, MKV, WMV, FLV, etc. It offers you H.264, DivX codec for video and DTS, MP3, ACC codec for audio. Besides this, it also allows you to add srt/ass/ssa subtitle to your Blu-ray video.

Its equivalent Mac version is Pavtube BDMagic for Mac which has updated to support Mac OS X 10.11 El Capitan

Free download and install: 
          

Other Download:
– Pavtube old official address: http://www.pavtube.cn/blu-ray-ripper/
– Cnet Download: http://download.cnet.com/Pavtube-BDMagic/3000-7970_4-75922877.html

How to Rip Blu-ray to U Disc for MP018 Full HD Media Player?

Step 1: Load Blu-ray movie on PC

Run Blu-ray to MP018 Full HD Media Player converter on your PC, and click “File” > “Load from disc” to load Blu-ray movie to the app. You can choose your desired subtitle and audio below the chapter list. And this app supports batch conversion so that you can add more than one Blu-ray movies at a time. 


Step 2: Choose format for MP018 Full HD Media Player  

Since MP018 Full HD Media Player support H.264 and DivX video codec, so you can choose AVI or “H.264 HD Video (*.mp4)” from “HD Video” as the target output format.


Tip: If you want to add subtitle in your foreign Blu-ray for watching on MP018 Full HD Media Player via U Disc, you can go to the video editing interface by clicking“Edit”.  Then hit on “Subtitle” to add your external SRT/ASS/SSA subtitle. 

Note: The subtitle must be named as the movie title. 


Step 4: Start to rip Blu-ray to U Disc

After everything is set down for video conversion, choose your video output destination folder and click the big red button “Convert” to convert your Blu-ray to H.264 MP4 for MP018 Full HD Media Player . If you’re tired of waiting the whole converting process, tick off “shutdown computer after conversion” and take care of other business or entertainment.

That’s all for the Blu-ray ripping. See, this app is so easy to use. What’s more, you can get a up to 40% discount during Pavtube Thanksgiving Coupon activity or like Pavtube Facebook to get a FB special offer. 

Related Software:
DVDAid for Windows/Mac – Capacity of ripping copy-protected and homemade DVD to iPhone 6S, iPad, Surface Pro, Synology NAS, Seagate Wireless Plus, etc with suitable format.
ByteCopy for Windows/Mac – It can rip Blu-ray/DVD to lossless MKV keeping multi-track subtile/audio and all chapter markers.
Pavtube Video COnverter  for Windows/Mac – Function of converting Blu-ray/DVD, 4K/SD/HD video in any format to nearly all popular video format you have ever seen.

Related Articles:

Rip DVD for Popcorn Hour A-500 Pro on Mac OS X El Capitan

Camille Wesley No Comments

Cloud Media have made available a new addition to their range of media players with the launch of the Popcorn Hour A-500 Pro. Its processor is combined with Mali-400 MP4 graphics and supports HEVC decode. Other features include SD slot and HDMI port (with audio) at up to 3840 x 2160 @ 30Hz with cable to name a few. With this super high resolution, you can watch HD even 4K movies on it. You even can play DVD movies on this Popcorn Hour A-500 Pro. But before this, you should rip DVD to Popcorn Hour A-500 Pro supported format on Mac OS X El Capitan.


Popcorn Hour A-500 Pro Supported Media File Formats:

  • Audio: AAC, FLAC, OGG, Dolby Digital, Dolby Digital Plus, DTS, WMA, WMA Pro, MPEG-1 Layer 1, 2, 3, MPEG-4 AAC-LC, MPEG-4 HE-AAC, MPEG-4 BSAC ,LPCM, FLAC, Vorbis, TrueAudio, APE Audio


  • Video: MPEG1/2/4 Elementary (M1V, M2V, M4V), MPEG1/2 PS (M2P, MPG, DAT, VOB), MPEG2 Transport Stream (TS, TP, TRP, M2T, M2TS, MTS), AVI, ASF, WMV, Matroska (MKV), MOV (H.264), MP4, RMP4, 3D BD ISO


From the above chart, we figure out that although Popcorn Hour A-500 Pro support support various video format, it can;t play DVD directly. If you want to play DVD on Popcorn Hour A-500 Pro, you should copy DVD to VOB, MKV, MP4, WMV on Mac OS X El Capitan. This need you to ask help for a DVD Ripper.  Handbrake can do this unless your DVD is copy-protected. Otherwise, you should turn to a Mac Handbrake alternative. 

Pavtube BDMagic for Mac is a good choice. It can rip commercial and homemade DVD, DVD Folder, DVD IFO/ISO, even Blu-ray to MP4, MOV, MKV, AVI, WMV for Popcorn Hour A-500 Pro on Mac OS X El Capitan. It offers two ways to copy DVD, full disc copy and directly copy DVD main title. What’s more, it allows you to adjust video and audio bitrate, size to get better or smaller size video so that you can store more DVD movies on your SD card, HDD or other storage device. 

Its Windows version is called Pavtube BDMgic, both of which are in the Pavtube Thanksgiving Coupon activity, where you can get Pavtube product at up to 40% off discount. 

Free download and install:
          

Other Download:
– Pavtube old official address: http://www.pavtube.cn/blu-ray-ripper-mac/
– Cnet Download: http://download.cnet.com/Pavtube-BDMagic/3000-7970_4-76177782.html

How to Copy DVD for Popcorn Hour A-500 Pro on Mac OS X ElCapitan?

Step 1 : Input DVD source video

Instert DVD disc to DVD Drive and run DVD to Popcorn Hour A-500 Pro converter. Click “Add Disc” button on this program to import DVD into this app.


Step 2: Choose output format

Here, you have many choices, you can choose MP4, MKV, MOV, WMV in “Common Video” or “HD Video”. Moreover, you can select to directly copy DVD to VOB file for Popcorn Hour A-500 Pro.


Tip: When you choose to copy DVD to MP4, MOV, etc video, you can adjust video/audio parameters in “Settings”. If you plan to directly copy DVD to Popcorn Hour A-500 Pro, you won’t be able to reset the video spec.

Step 3: Copy DVD to Popcorn Hour A-500 Pro

Hit on the “Convert” button on software main interface and DVD to VOB/MP4/MOV/MKV conversion begins. After it is done, find the ripped DVD movie in output folder.

For other Popcorn Hour product, like Popcorn Hour A-400, the app is also a good partner to watch DVD, even Blu-ray.

Related Software:
ByteCopy for Windows/Mac – It can rip Blu-ray/DVD to lossless MKV keeping multi-track subtile/audio and all chapter markers.
Pavtube Video COnverter  for Windows/Mac – Function of converting Blu-ray/DVD, 4K/SD/HD video in any format to nearly all popular video format you have ever seen.

Related Articles:

Backup DVD Collection to HDD for Sumvision Micro 4 Media Player

Camille Wesley No Comments

Sumvision Cyclone Micro 4 is one of the smallest and smartest media streamers on the market. It enables you to stream movies or music from your PC, laptop or any Android device using WiFi to any TV. So if you have large DVD collection, backing them up to HDD then play on Sumvision Micro 4 media player will be a nice idea. Before you backing up DVD collection to HDD for Sumvision Micro 4 media player, you should know the format that  Sumvision Micro 4 media player can support:


Sumvision Micro 4 media player supported format:

Video codecs supported: RM/RMVB, H.264, VC1, WMV, MPEG 1/2/4, Xvid, BD-ISO, MKV, MOV, WMV,  TS, M2TS, MTS, FLV, AVI, DVD-ISO, VOB, M2P, MP4, MPG, SWF 
Video output support: PAL, NTSC, 480p, 576p, 720p, 1080i, 1080p/50Hz, 1080p/60Hz 

Since Sumvision Micro 4 media player supports many video format, so you can use Handbrake to rip DVD to MP4 for it if your DVD has no copy protection. Otherwise, I suggest you to use Pavtube DVDAid. It can rip any copy-protected and region-locked DVD to HDD in H.264, WMV, MPEG 1/2/4, Xvid, MKV, MOV, WMV, TS, M2TS, MTS, FLV, AVI, VOB, MP4, etc for Sumvision Micro 4. It also allows you to adjust video bitrate, fame rate, size, codec to determine output video size for Sumvision Micro 4 player. What’s mote, it can support batch conversion so you can backup more than one DVD movies at a time and tick “Shut down computer after conversion” when you don’t have enough time to wait for the process ending. (Read review)

If you are a Mac user, please turn to the equivalent Mac version which has updated to support Mac OS X 10.11 El Capitan so you can backup DVD collection to HDD for  Sumvision Micro 4 on Mac El Capitan. And both the versions are in the Pavtube Thanksgiving promotion list where you can get up to 40% discount. 

Free download and install:
          

Other Download:
– Pavtube old official address: http://www.pavtube.cn/dvd_ripper/
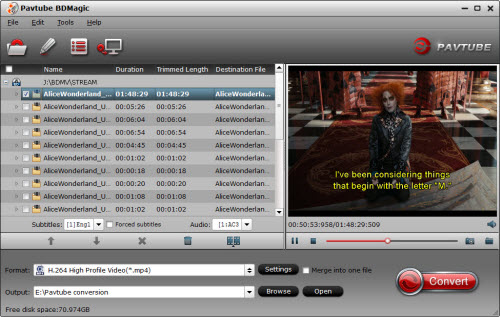
– Cnet Download: http://download.cnet.com/Pavtube-DVDAid/3000-7970_4-76158510.html
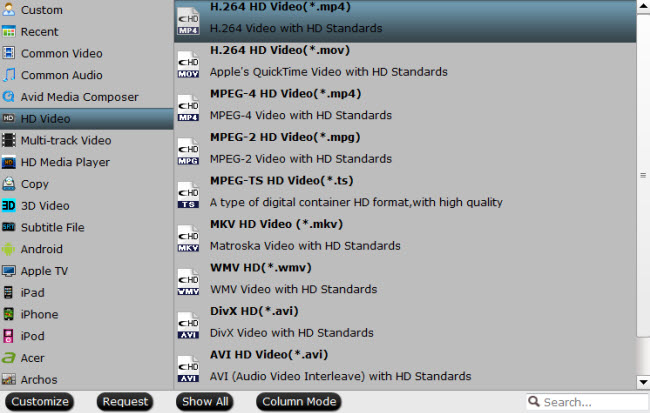
How to Backup DVD Collection to HDD for Sumvision Micro 4 player?

Step 1: Load DVD files with optical DVD drive.
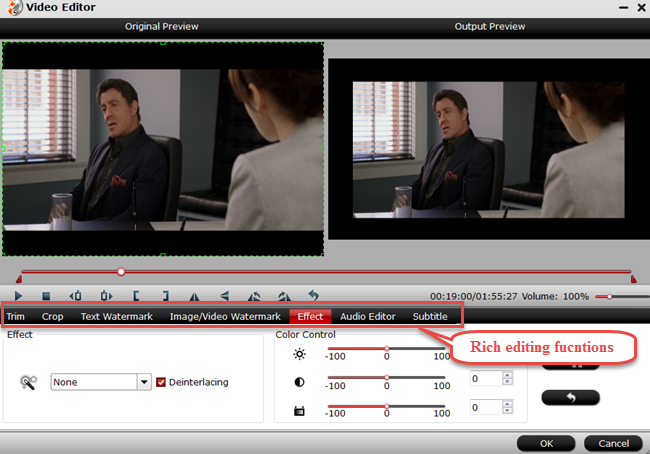
Run the program, insert DVD into your computer’s DVD optical drive, and from the “File” drop-down menu, select “Load from disc” to add DVD disc to the program.


Step 2: Select output file format.

You can directly choose to output Sumvision Micro 4 media player playable file format by following the path “HD Video” > “H.264 HD Video (*.mp4). MP4 is the best choice for nearly all multimedia players can read it.


Tip:Click “Settings” to pop out “Profile Settings” window, set output video codec, size, bitrate, frame rate and audio codec, sample rate, bitrate and channels according to your own needs.


Step 3: Start DVD to HDD conversion process.

Start to rip DVD to HDD for Sumvision Micro 4 media player by hitting right-bottom “Convert” button. Once the process ends, just open the output folder to locate the generated video.

Put your ripped DVD movies to HDD then you should be able to watch them on Sumvision Micro 4 media player. 

Related Software:
BDMagic for Windwos/Mac – The best Blu-ray solution to rip and backup any commercial and region-locked Blu-ray to H.265, M3U8, MP4, MKV, AVI, FLV, etc.  
ByteCopy for Windows/Mac – It can rip Blu-ray/DVD to lossless MKV keeping multi-track subtile/audio and all chapter markers.
Pavtube Video COnverter  for Windows/Mac – Function of converting Blu-ray/DVD, 4K/SD/HD video in any format to nearly all popular video format you have ever seen.

Related Articles: